In this article, we will look at connection diagrams for heating radiators and you will understand which scheme to choose for you. Today the question is about choosing two schemes and two systems for the operation of radiator heating systems. The first is a gravity system that operates without forced circulation using a circulation pump. And the second system is precisely the system that operates forcibly using a circulation pump. But these systems can also cooperate with each other.
That is, we have a gravitational radiator heating circuit that works on its own, precisely according to the physical laws of heat and cold, but there is a forced system.
Operating principle of radiator heating systems
What could be simpler than heating radiator connection diagrams? There is a boiler: solid fuel, diesel, gas, etc. The coolant is heated in the boiler, which gets there under the action of a pump. The heated coolant goes into the radiator heating system; in the radiators, heat is transferred to the surrounding air. The coolant cools down and, already cooled, returns to the boiler, where it heats up again and so the circle is closed. Everything is very, very simple, but, nevertheless, in reality, schemes can be much more complex. Let's see what these schemes are and how they differ from each other, let's look at their advantages and disadvantages.
How to choose and connect a heating radiator. Material, number of sections, installation diagrams
You are renovating an apartment or house. The question arose of what to replace the old cast iron radiators with. I would like to choose something more stylish. Some neighbors praise aluminum, others - steel, and still others - bimetallic radiators. Let's figure out how they differ from each other.
Radiator material
Leroy Merlin offers three types of batteries: aluminum, steel and bimetallic. We look at the advantages and disadvantages of each type.
Aluminum
- one of the most common materials for radiators. It is distinguished by its ease and speed of heating. Service life - 15-20 years.
Advantages of aluminum radiators:
- fairly simple installation and maintenance;
- stylish design;
- high heat transfer: instant response to the temperature of the medium, rapid heating and cooling, which means saving energy;
- high working pressure, 16 atmospheres;
- variety of forms;
- low section weight;
- optimal price.
Disadvantages of aluminum radiators:
- demanding on the quality of the coolant: a high alkali content can lead to rust and the formation of gases, joints between sections can begin to leak;
- it is necessary to periodically remove air from the upper manifold using an air vent valve;
- the most vulnerable parts of aluminum radiators are the threaded connections of the sections (if we compare them with steel ones).
Steel
. Batteries made from this material are best used in private homes: steel radiators require stable coolant pressure. They last for 15-25 years (using purified water and pressure control).
Advantages of steel radiators:
- fast heating and cooling (this characteristic is only slightly inferior to aluminum radiators);
- high heat transfer;
- stylish design;
- optimal ratio of cost and power;
- low operating pressure from 8.7 atmospheres.
Disadvantages of steel radiators:
- may not withstand pressure due to hydraulic shocks;
- react poorly to oxygen that may enter through the pipe system. Steel radiators come in panel and tubular types.
Tubular ones are simpler than panel ones, which means they are more reliable. They do not have intersection joints, so the risk of leaks is lower. Tubular batteries are more resistant to water hammer. The design of such radiators resembles a ladder of vertical tubes. Colored batteries look the most advantageous; they can decorate a modern designer interior.
Panel radiators have a more complex internal structure: steel zigzag plates are hidden under the body, which are connected by spot welding. The resulting cavities serve as channels through which hot water circulates. One of the advantages of panel radiators is their smooth surfaces, which make it easier to remove dust.
Bimetal
. Inside these radiators there are steel pipes, the outer casing is coated with aluminum. They combine the advantages of steel and aluminum radiators.
Bimetallic radiators take excellent thermal conductivity and the ability to withstand high pressure from aluminum radiators, and strength and resistance to corrosion from steel ones. They have a high service life - 20-30 years.
Advantages of bimetallic radiators:
- high heat transfer;
- resistance to low quality coolant;
- high operating pressure (from 20 atmospheres), withstand hydraulic shocks;
- small volume of coolant in the section;
- corrosion resistance;
- quick response to thermostat commands;
- modern design;
- light weight;
- relative ease of installation;
- minimal number of sharp corners - important if you have small children.
Disadvantages of bimetallic radiators:
- the design is quite complex, because of this the price is higher than that of batteries made of aluminum and steel;
- budget models may not be well protected from corrosion;
- If installed incorrectly, overheating may occur in areas of poor contact.
Bimetallic radiators are needed where additional reliability is required, for example, in high-rise residential buildings and office buildings.
Let's summarize:
- if you have an apartment in a multi-storey building with central heating, choose aluminum or bimetallic radiators;
- If you live in a private house with your own heating system, aluminum or steel batteries are suitable.
Selection of thermal power
We have decided on the type of material, now let’s figure out how to calculate the power.
The amount of power consumed depends on four factors:
- room size;
- number of external walls and windows;
- type of house (brick, panel);
- type of windows (wooden, plastic).
The easiest way to choose a heating radiator is based on thermal power:
This calculation of heat transfer is relevant for a room with ceilings no higher than 3 meters and with windows up to 1.5 × 1.8 m in size.
The power of the radiator is indicated in the technical specifications; you will find them on the battery packaging. Please note that the set power value is relevant at a coolant temperature of about 70°C; it is considered optimal.
When calculating the number of sections, it is worth taking into account heat loss, focusing on the following diagram:
Two useful tips to help calculate the power and number of radiator sections:
- If plastic energy-saving double-glazed windows are installed in the room, you can reduce the power of the radiators by 10-20%, since the windows reduce heat loss;
- If you have a side one-sided supply, then there is no point in installing radiators longer than 10 sections; the last segments will remain practically cold.
Example: You have decided that you will take bimetallic batteries from our own brand, Equation. The size of the room is 18 sq.m., it is corner, two windows, two walls facing outside. There will be two batteries, both of which will be installed in niches. We calculate: for 1 sq.m of area you will need 130 W + 15% = 143 W. We have 18 sq.m., which means the total power of the two batteries will be 2574 W. We look at the Leroy Merlin catalogue. You can buy two identical radiators: seven sections plus seven sections, or eight sections plus eight sections. You can take one large and one small, say, for 12 and four or five sections.
Helpful advice: if you glue a reflective screen to the wall behind the radiator, the heat transfer from the battery will increase by 10-15%.
In Russian houses and apartments, batteries are usually installed under the windows. The wall temperature is lower than the radiator temperature. The surface immediately behind the radiator heats up to 35-40 °C, and then this heat goes to the outer part of the wall. The task is to return him to the room. The reflective screen is responsible for this.
The easiest way to make a screen is from foamed polyethylene; on one side it is covered with foil, and on the other with an adhesive composition. Cut a piece of the desired size, tear off the protective film and glue the sheet to the wall behind the battery.
Basic rules for installing a heat-reflecting layer:
- The distance between the screen and the battery must be at least three cm;
- The reflective layer should be larger than the battery; it’s good if it protrudes five to six cm on each side;
- the reflective side of the material should be directed towards the battery.
Remember, to avoid mistakes, it is better to entrust the design and installation of a heating system to professionals.
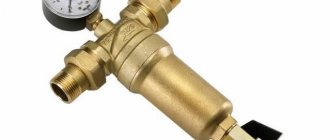
Complex purchase
To avoid having to go to the store twice, we recommend purchasing accessories, consumables and tools along with heating radiators.
You will need:
- ball valves, tees, jumpers (bypass), extension pipes, plugs, fittings;
- sealants: silicone, linen/thread;
- sets of brackets for radiators.
Heating system diagrams
Before we talk about installation, we will consider two main heating schemes: one-pipe and two-pipe.
A few terms to make things clearer:
- “supply” - a pipe that supplies heat;
- “return” - a pipe that returns the coolant;
- “riser” - any vertical pipe, supply or return.
Single pipe system
it is designed in such a way that the same pipe is responsible for the supply and return. Batteries are built in series into this pipe. The coolant bypasses the radiators in the order in which they are connected.
Two-pipe principle
it works as follows: one pipe is supply, the second is return. The batteries are connected simultaneously to both pipes, parallel to each other. Hot water circulates through all radiators simultaneously.
There are three main ways to connect heating radiators. The coolant circulates in them differently.
Scheme. How heated water circulates in the batteries:
Features of different types of radiator connections
Diagonally
— the coolant enters the battery from above on one side and leaves from below on the other. This is the most effective method; we especially recommend this type of connection for batteries with a length of 12 sections or more. This option works great even on unstable systems.
From the side
— all pipes are located on one side, on top is the inlet, on the bottom is the outlet. A convenient option, since the connection length is the shortest. The method is only suitable for well-functioning heating systems.
Bottom on both sides
. This method has the lowest efficiency, but this connection looks neater than others. Heating system wiring is installed in the floor, the pipes are practically invisible. This option also requires fine tuning of the heating system.
Principles for choosing an installation scheme
In high-rise buildings, both single-pipe and two-pipe heating systems can be installed. In two-pipe systems, a diagonal connection diagram works best. Please note: if in a new building the pipes are hidden in the floor, the lower connection diagram is suitable.
If you are planning a heating system in a small private house, a two-pipe distribution with a bottom connection would be ideal. In a large cottage, it is also worth installing a two-pipe system, but here you can already choose which scheme to use. If the heating pipes run from top to bottom and you need to connect only one radiator in the room, you can make a side system; in other cases, a diagonal system will do.
Radiator installation
Radiators should be mounted on prepared walls, surfaces should be plastered and painted. Before performing work, carefully study the passport that is attached to the radiator; the preferred installation diagrams are drawn on it.
Heating battery installation diagram
- We mark the points where the brackets will be installed. We take into account the mounting brackets, which are located on the back side of the radiator.
- We secure the brackets using hardware.
- We hang the radiator.
- We connect the battery with the pipes of the heating system.
- We install a Mayevsky valve in the upper fitting of the radiator, it is needed to bleed air, and a plug in the unused fitting.
- We fill the system with water. We bleed the air by unscrewing the screw in the center of the Mayevsky valve. This should be done when the device is filled. We perform repeated bleeding at a pressure of 5 bar.
We figured out how to choose a radiator. We looked at the basic materials, learned how to calculate power, and talked about installation diagrams.
Come to the Leroy Merlin Water Supply department for materials and tools and select products on the website.
May your homes always be warm and cozy!
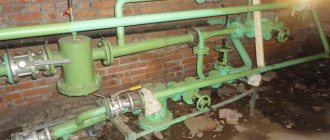
Spider radiator connection diagram
Let’s figuratively imagine a boiler from which we take a pipeline and bring it somewhere to the center of the house. Usually such a system is called a spider. We lower the risers and collect them, sending it all to the return line. We connect radiators to the pipes. The coolant rises up according to its natural physical laws. That is, the hot coolant goes up, and on the second pipe in the middle it leaves and falls down. It passes through the radiator, cools and enters the return line.
Please note that the lower pipes are sloped. This is the only problem, that you need to do slopes. But it is precisely in today’s time that many are again switching to these old systems, as problems with energy resources begin. For example, the electricity is often turned off, and the pump will not work. The system will just stop. But such a system works for you all the time. The boiler can be any: gas, coal, diesel and even electric. This whole system will work.
This system is very cumbersome. It must be practically brought out onto the roof and into the attic. Therefore, not everyone can master it.
Model one
In a single-pipe heating system, the coolant heated in the boiler rises upward and, displacing a column of cold water, flows one by one to all heating devices. And then lowers, entering the boiler for subsequent heating. The method is economical and is often used for heating multi-storey buildings.
Advantages and disadvantages
The advantages of this scheme are ease of installation and low pipe consumption. However, there are significant disadvantages:
- when several radiators are connected in series, the difference in temperature between the first and last will be significant;
- The heat supply is not regulated. The heat transfer of a single-pipe system is determined by the design norm laid down in the project;
- Only bottom connection of batteries is possible.
Methods for overcoming shortcomings
There are a number of techniques to compensate for the disadvantages of a single-pipe system:
- each subsequent unit must consist of a greater number of sections than the previous one;
- you can increase the number of batteries in the room;
- be the first to connect the rooms with the greatest heat losses;
- install valves when connecting radiators diagonally;
- equip the system with a circulation pump.
Connection diagram "Leningradka"
Let's consider the second system. When we take the feed from the boiler and then lower it down. We carry it out at the level of the radiators and then return it back to the boiler. Here, too, it is necessary to observe the slope. Figuratively, this is called a radiator heating system, since 2-3 radiators are mounted along the length. That is, the first one enters the hot coolant, some part goes down the return line cooled, and the hot part goes to the next radiator. This connection diagram for heating radiators is also called “classic Leningrad”. The only thing is to raise the pipes a little upward to create acceleration. Then the water will go down the slope, here they are also very important. This is not always convenient to do, because the doors will get in the way. Also, the fewer taps, the better this system works. If you do not follow this rule, you can plant the entire system.
Leningradka can work with a pump. He crashes into the return line. Due to it, the speed increases and the system works more efficiently. The only drawback of this system is the large diameter of the pipes. If in a forced connection scheme for heating radiators we take pipes with a diameter of 32, we will install a pump and it will push everything everywhere. Here, for the system to work, the pipes must be large. Therefore, these are very good systems now. In new buildings, we always recommend making just such a diagram for connecting heating radiators if there are problems with the electricity supply. And here you can heat the stove or even gas boilers. Now there are non-volatile systems with temperature control.
Single-pipe forced circuit
The simplest heating radiator connection scheme that is used in practice is a single-pipe system. The good thing about it is that it is simple and requires fewer pipes on the routes. It is because of this that it was often used back in Soviet times, precisely to save material.
However, this advantage of the “single-tube” looks dubious against the background of its disadvantages. The main one is parallel threads. The coolant enters the radiator, gives off heat to the surrounding air, and then returns to its own flow. But, since the coolant in the radiator has cooled a little, the flow temperature decreases slightly. That is, the coolant enters the second radiator cooler than the one that entered the first. The second radiator gives off heat again, the coolant has cooled again and is again mixed with the coolant that comes from the boiler and from the first radiator. It comes to the third radiator even colder than to the second. If the system is long enough, then temperature changes on the last radiator will be quite noticeable.
How can you correct the situation when different radiators heat differently? The only solution is to increase the size of the latest radiators. And the easiest way is not to use a single-pipe scheme, but to choose some other one. Which one? We will look at this further.
Options for coolant circulation in the heating system
In order to decide how to properly connect the heating battery, do not forget that the coolant, which is water, can circulate both autonomously, that is, naturally, and forcibly. In the first case, a special circulation pump is used, the main function of which is to move the coolant through the pipes. The installation of this pump is usually carried out in the area of the heating boiler, but sometimes it can already form the basis of its design.
Connecting batteries to a heating system with natural circulation of water will be especially suitable for those regions where there are periodic interruptions in the supply of electrical energy.
This is due to the fact that the heating boiler operates exclusively on electricity, due to which the cooled coolant is forced out of the system.
Two-pipe radiator connection diagram
It is very simple: all devices in this heating radiator connection diagram are connected in parallel to each other. Like everything that moves, liquid, of course, chooses the path that is easiest for it. With a two-pipe design, it is easier for the coolant to flow through the first radiator. Further on, on the second radiator, the pressure will be weaker, so there will be less flow through it. On the third radiator there will be even less pressure, and so on throughout the network. If there are a lot of radiators, then there is a high probability that with such a scheme nothing will flow through the last radiator at all.
It turns out that the first radiator heats the best, the second heats worse, the third even worse, the fourth heats very poorly, and the last does not heat at all. The problem is similar to what we observed in the single-pipe circuit; it can be partially solved by increasing the area of the last radiator.
Both systems are bad because they are very poorly balanced. We can struggle for a long time with the fact that one radiator heats us, but the other does not. If we close one, the first one starts to heat up. We close the first one, the second one starts heating, but the first one stops heating. This kind of nonsense happens in two-pipe connection diagrams for heating radiators. It happens that there are two radiators next to each other, there is a flow through one, but there is no flow through the other. That's all. No matter how you fight, no matter how you adjust, either one or the other warms, but never together. Therefore, if you use such a system, then use it in very small spaces.
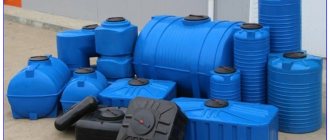
Types of radiators for piping
Before you start creating a heating system and before connecting the radiators, you need to determine what types of radiators you want to use. Today there are a huge number of types of batteries. They may differ in:
- material;
- the principle of how to connect a heating battery;
- wall mounting method.
Today the most common types of radiators are:
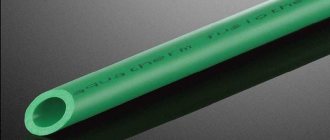
- steel panel batteries - are a relatively thin panel of flat steel plates. How to properly connect a heating radiator of this type? Radiators of this type are connected from the side or bottom.
Steel panel batteries
- sectional radiators. Lightweight sectional model made of aluminum (there are also bimetallic radiators of this type). How to properly connect the heating batteries in this case? Such batteries can be connected in several sections or one at a time. For such radiators, it is best to use polypropylene pipes, the connection type is lateral.
Sectional aluminum radiators
About connecting bimetal in the article: Connecting bimetallic heating radiators.
It is noteworthy that recently, in apartments with central heating, bimetallic batteries are increasingly being installed, abandoning cast iron ones. The reason for this change is due to a number of reasons. First of all, cast iron radiators are heavier and bulkier. In addition, due to poor-quality water used as a coolant in the heating system, sediment, sand and rust appear in such radiators quite quickly - and these factors significantly contribute to a decrease in the heat transfer of radiators. Such problems do not arise with bimetallic radiators.
For a private home, you can choose panel radiators. They can be either aluminum or steel - it all depends on the customer’s wishes.
The main thing is to comply with all rules during installation. It is important to remember that if you have a copper pipeline, then you can connect both steel and aluminum radiators to it. And if the pipeline is made of ordinary pipes, only aluminum batteries are allowed to be installed.
Tichelman scheme: all radiators in the same conditions
As the name implies, this heating radiator connection diagram is quite simple, but at the same time tricky. The first radiator is located closest to the pump, but farthest from the return pipe, and the last is located farthest from the pump, but closest to the return pipe. It turns out that the resistance on each radiator, or the pressure on each radiator, is the same. The flow through all radiators is the same. If we take and shut off any of these radiators, the rest will work as they did, the system balances itself. It seems like there are more pipes here, but in fact, if these radiators are located in a circle around the building, then the design turns out to be much lighter, simpler, and more elegant than the previous ones. The Tichelman loop can be tied around two or even three floors. Moreover, if you close all the radiators on one floor, they will continue to heat normally on the other.
Radial diagram for connecting heating radiators
Let's consider a scheme in which a collector is used. The coolant from the boiler approaches the collector, and from the collector to each of the radiators there is its own pair of pipes: direct and return. If these pipes are hidden in the floor, for example, in the insulation of a heated floor screed, or even placed between the “subfloor” and the finished floor, then a room without pipes will look very aesthetically pleasing. Pipes to another floor can be routed along the ceiling. With this scheme, each of the radiators can also be turned off, but the others will continue to work.
Arrangement
The exact number of radiator sections is determined during thermal engineering calculations. A correctly performed calculation will make up for heat loss and increase energy efficiency. The main data for calculation is the heat loss value for each individual room and the heat transfer power of the battery section.
Let's consider the calculation of sections using the example of Condor radiators
The total heat output of the batteries must compensate for the heat loss. Also during the calculation, the required pipe cross-section for each section of the system is determined. There are standard options for placing heating devices.
Placement principles
It would be correct to place additional radiators in corner rooms and on the outermost floors: heat loss in these rooms is much higher than in the middle of the building. This is due to the presence of surfaces in contact with the external environment: cold walls of corner rooms, floors and ceilings of the outermost floors.
The traditional location of radiators is under windows, the main sources of heat loss. This allows you to create protection (screen) from cold air.
The heat lost through the light openings as a result of air exchange is immediately replenished, thereby preventing drafts and significant temperature changes.
Options
The types of heating system do not affect the location of the batteries: they are installed in accordance with building codes. The main thing is to ensure effective air circulation around the battery. This will allow more heat to be transferred from the coolant to the room.
Parameters for the location of radiators in a niche, ensuring normal air circulation:
- 10 cm from the bottom of the window sill;
- 12 cm from floor level;
- 5 cm – gap between the unit and the wall or thermal insulation layer.
What and where should I finally use it?
Let's summarize. If you live in central cities and you do not have problems with energy, gas, electricity and others, we recommend using a two-pipe system, with counter movement, circular movement and forced circulation. Because then we save on the diameter of the pipes and the volume of coolant. Accordingly, the less water is needed, the less energy is required to heat it.
If you have problems with energy resources or emergency situations often arise, then you should consider connection diagrams for gravity-type heating radiators with natural circulation. Just in case, you can also embed a pump there, only it is embedded around the pipe so that it does not interfere with the main passage. For the time when you have electricity, you will drive it with a pump, because the speed increases, the radiators are all at a uniform temperature. The efficiency of the pump increases by 30-50%. When there is no electricity, this system will continue to work for you. You already know which radiators you have chosen, their number and size. Accordingly, you can now calculate what is needed in order to connect them. Let me remind you that in the first case, large, large diameters are needed; large valves can be used. And of course, in this case it is difficult to regulate the temperature. Of course there are options, we will definitely consider them in a more detailed review.
Natural and forced coolant circulation
It is worth noting that the method of connecting pipes to radiators will also depend on how the coolant circulates inside the heating circuit. There are two types of circulation - natural and forced.
Natural circulation of liquid inside the heating circuit is achieved through the application of physical laws, and no additional equipment needs to be installed. This is only possible when using water as a coolant. If any antifreeze is used, it will not be able to circulate freely through the pipes.
Heating with natural circulation includes a boiler for heating water, an expansion tank, 2 pipelines for supply and return, as well as radiators. In this case, a working boiler gradually heats the water, which expands and moves along the riser, passing through all the radiators in the system. Then the cooled water flows by gravity back into the boiler.
To ensure free movement of water, horizontal pipes are installed with a slight slope towards the direction of movement of the coolant. A natural circulation heating system is self-regulating because the amount of water changes depending on its temperature. When water is heated, the circulation pressure increases, which ensures uniform heating of the room.
In systems with natural circulation of liquid, it is possible to install a radiator with a bottom connection, provided there is a two-pipe connection, and also use a scheme with a top connection in a one- and two-pipe circuit. As a rule, this type of circulation is carried out only in small houses.
Please note that the batteries must have air vents through which air pockets can be removed. As an option, you can equip the risers with automatic air vents. It is advisable to place the heating boiler below the level of the heated room, for example, in the basement.
If the area of the house exceeds 100 m2, then the method of circulation of the coolant must be forced. In this case, you will need to install a special circulation pump, which will ensure the movement of antifreeze or water along the circuit. The power of the pump depends on the size of the house.
The circulation pump can be mounted on both the supply and return pipes. It is very important to install automatic bleeders at the top point of the pipeline or provide Mayevsky taps on each radiator in order to remove air pockets manually.
The use of a circulation pump is justified in both one- and two-pipe systems with vertical and horizontal radiator connections.
Radiator connection methods
A classic multi-section radiator consists of several sections that transfer heat from the coolant to the surrounding air. When assembling the radiator, thanks to a threaded connection, the upper and lower manifold of each section are hermetically connected to each other, increasing the total length. A closed system is formed that uses the coolant as an energy source.
There are 3 schemes for connecting a heating battery to the system:
- Lateral.
- Bottom.
- Diagonal.
Let's look at each option in detail.
Factors affecting radiator efficiency
The main requirements for a heating system are, of course, its efficiency and economy. Therefore, its design must be approached thoughtfully so as not to miss all sorts of subtleties and features of a particular living space. If you do not have sufficient skills to create a competent project, it is better to entrust this work to specialists who have already proven themselves and have positive feedback from clients. You should not rely on the advice of friends who recommend certain methods of connecting radiators, since in each specific case the initial conditions will be different. Simply put, what suits one person may not necessarily suit another.
However, if you still want to install pipes to heating radiators yourself, pay attention to the following factors:
- the size of radiators and their thermal power;
- placement of heating appliances inside the house;
- connection diagram.
The modern consumer has a variety of heating appliance models to choose from - these include wall-mounted radiators made of various materials, and baseboard or floor convectors. The difference between them is not only in size and appearance, but also in the methods of liner, as well as the degree of heat transfer. All these factors will influence the choice of options for connecting heating radiators.
Depending on the size of the heated room, the presence or absence of an insulating layer on the external walls of the building, power, as well as the type of connection recommended by the radiator manufacturer, the number and dimensions of such devices will vary.
As a rule, radiators are placed under windows or in the walls between them if the windows are located at a great distance from each other, as well as in corners or along a blank wall of a room, in a bathroom, hallway, storage room, and often in the stairwells of apartment buildings.
To direct the thermal energy from the radiator into the room, it is advisable to attach a special reflective screen between the device and the wall. Such a screen can be made from any heat-reflecting foil material - for example, penofol, isospan or any other.
Before connecting the radiator to the heating system, pay attention to some features of its installation:
- within the same residential premises, the level of placement of all batteries must be the same;
- the fins on convectors must be directed vertically;
- the middle of the radiator must coincide with the center point of the window or can be shifted 2 cm to the right or left;
- the total length of the battery should be 75% of the width of the window opening;
- the distance from the window sill to the radiator must be at least 5 cm, and there must be at least a 6 cm gap between the device and the floor. It is best to leave 10-12 cm.
Please note that the correct choice of methods for connecting heating radiators in an apartment building will depend not only on the heat transfer of the battery, but also on the level of heat loss.
There are often cases when apartment owners assemble and connect a heating system, following the recommendations of friends. In this case, the result turns out to be much worse than expected. This means that errors were made during the installation process, the power of the devices is not enough to heat a particular room, or the scheme for connecting the heating pipes to the radiators is inappropriate for a given house.
Lateral connection of radiators
In the case of lateral connection of radiators, the inlet and outlet pipes occur on the same side. Most often, hot coolant enters through the entry point at the top of the battery, and spent coolant exits through the lower connection point. But there are exceptions when the connection is made the other way around. It is assumed that the coolant flows evenly along the entire length of the radiator, then goes down and exits. But in reality this is not the case; the coolant passes through the sections closest to the exit much faster than through those further away.
This is due to the length of the path, if for the near section it is 8-10 cm of the section width, vertical pipeline and 8-10 cm to the exit, then for the far section this path is many times longer. During the time it takes for the coolant to reach the far section and then return, two to three times more volume can pass through the near section. Because of this, the heating process of the battery occurs unevenly; the distant sections may be slightly warm, while those closest to the input and output will be hot.
There is also a diagram for the side connection of heating radiators, only from the bottom. With this scheme, the hot coolant comes from below and, in theory, rises evenly upward. But in reality we have the same thing as with the top connection: the first sections warm up perfectly. The rest are getting smaller and smaller.
Features of radiator installation
When installing heating radiators and when connecting a heating radiator, the requirements specified in SNiP must be strictly observed. In particular, this applies to maintaining the required distance between the radiator and the wall, floor and window sill:
- the distance from the top of the radiator to the window sill must be at least 10 cm. If the specified gap is lower, this may impede the movement of heat flow - thus, the room will not warm up as well;
- the distance from the bottom of the radiator to the floor should be at least 12 cm. If it is smaller, there is a risk of a significant increase in the temperature difference at different heights of the room;
- the distance from the rear wall of the radiator to the wall must be at least 2 cm. Otherwise, the heat transfer of the radiator will be impaired.
Requirements for installing a heating battery
It is also important to take into account that the installation method and how to correctly connect the heating radiators also affect the quality of heating the room. So, possible options for installing radiators:
- open under the window sill – maximum efficiency of the heating system – 96%-97%;
- in an open form in a niche – the efficiency is slightly lower – 93%;
- in a partially closed form – there is a decrease in efficiency to 88%;
- completely closed – heating efficiency is only 75%-80%.
Examples of installing a heating radiator
Piping a heating radiator and how to properly connect a radiator can be done using different types of pipes. The main thing is strict compliance with all specified requirements and rules. If the radiator connection is made without errors, the heating system will not require repairs for many years. Now we know how best to connect heating radiators - but it’s even better to ask professionals about this.
Bottom connection of radiators
Quite often there is such a scheme for connecting heating radiators, when the incoming coolant flow is connected to the lower collector, while the output flow is connected to the lower collector from the other edge of the radiator battery.
Hot water has a lower density and, due to this, must rise upward, and the already cooled coolant must sink down. Thanks to this circulation, the coolant is replaced with a hotter one. But according to manufacturers’ calculations, with this type of battery connection, 10 to 20 percent of the coolant simply flows past the vertical pipelines and does not participate in heat exchange. This is due to the fact that the narrow channel does not facilitate effective circulation and the process of displacing the cooled coolant can occur very slowly. Naturally, when salts and scale are deposited on the vertical radiator pipes, the circulation speed will deteriorate and the efficiency will drop even more.
Diagonal battery connection
The most effective scheme for connecting a heating battery to the heating network. In this case, the incoming flow is connected to the upper collector, and the output flow is connected to the lower collector on the opposite side. The coolant flow moves diagonally and all sections are involved in effective heat exchange. This ensures maximum efficiency in the use of coolant and reduces losses.
Types of heating systems
Before talking about how to properly connect heating batteries, you should consider in detail which system options are most common today. Even after studying numerous photos of these communications, one way or another, you need to understand the principle of their operation and understand the peculiarities of the functioning of each part of a particular system.