Types and materials for manufacturing
For the collection and disposal of liquid household waste, it is difficult to imagine something simpler than a drainage hole dug in the ground. This is the oldest sewer structure used by people to construct toilets. The liquid sewage that got into it was partially absorbed into the soil, and the residues not processed by bacteria accumulated. The filled pit was buried, and the toilet was moved to another place.
With modern requirements for comfort, this option has lost its relevance and is occasionally used only in summer cottages with seasonal residence. Today, the question of how to make a cesspool is being solved in accordance with the manifold increase in the volume of wastewater, which is collected year-round from several points: kitchen, toilet, bathroom, laundry, home sauna, etc.
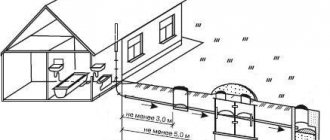
Of course, a small hole in the ground is not enough to collect them. You need a volumetric storage tank with reliable walls into which the pipe from the house is discharged.
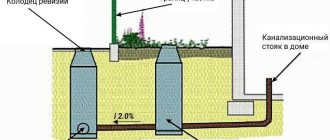
This is how a modern cesspool looks schematically Source lanshaft.com
Types of structures
Based on the method of waste disposal, these structures are divided into 2 types: sealed storage tanks and filter wells. Before you make a drain hole, you need to decide on its design:
- In sealed structures, sewage waste simply accumulates, is periodically pumped out by sewerage equipment and transported to treatment facilities or to specially designated places. Such structures can be installed in any soil and at any groundwater level. Their operation is associated with some inconveniences: you need to constantly monitor the filling level of the container and pump it out in a timely manner.
- Filter structures do not have a bottom as such, and often holes are made in the walls. Through them, part of the wastewater leaves the well, is filtered through a layer of sand and gravel backfill and seeps into the ground. With the same volume as a sealed structure, they fill more slowly, so pumping is not required as often.
Layout of a filter cesspool Source kanalizaciya1.ru
When choosing one type or another, first of all you need to find out at what distance from the surface of the earth the upper groundwater level is located on the site. If there is less than 100 cm from it to the bottom of the well, then it is impossible to install a filter structure, as this threatens to pollute the soil and groundwater. It will not “work” in clay or rocky soils that do not allow water to pass through.
It is also worth calculating the approximate volume of wastewater for a certain period of time. If it is small, preference should be given to a sealed container. Especially if the area is small and it is impossible to place a water well, fruit trees and other plantings on it at a safe distance from the cesspool.
Materials for the device
Since correctly making a drainage pit in a private house means ensuring its long service life without reducing its performance characteristics, the material for its construction must be chosen that is resistant to moisture and soil pressure. Therefore, most often it is built from red brick, concrete rings or monolithic reinforced concrete.
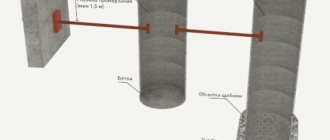
Monolithic structures are made by pouring concrete into formwork Source remontik.org
See also: Catalog of country house projects
Depending on the type of structure chosen, the walls are made solid or perforated:
- In the case of brick, masonry is carried out with holes made of half a brick;
- Holes are made in concrete rings using a puncher or special perforated products are purchased;
- To ensure filtration through monolithic concrete walls, pipe scraps are placed into the formwork during the process of pouring the solution.
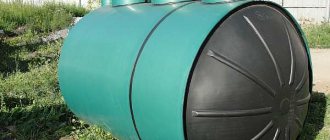
You can also purchase ready-made metal or plastic containers. They are produced specifically for this purpose and have a hatch with a lid, as well as holes for installing drain pipes. Their use greatly simplifies the task of making a sewer system in a private house with your own hands with a cesspool, since such containers, with good strength, are light in weight and do not require sealing work.
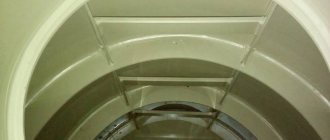
Plastic container for a cesspool with stiffening ribs Source ukrhimplast.com
A small volume of relatively clean wastewater can be discharged into a pit, the walls of which are made of car tires. This is an almost free option for its arrangement, often used in the construction of free-standing baths.
The procedure for filling the pit walls
- Marking the pit, digging a pit, leveling the walls, planning the surrounding area;
- Production of formwork. The best option is sliding formwork, 2 x 0.5 meters long. Assembled from edged boards and wooden beams. A polyethylene film is placed on the side of the formwork facing the concrete;
- Arrangement of drainage holes. Pieces of pipes for drainage holes are driven into the walls of the pit in rows (2 rows for each pour), to a depth of 50 mm. The pitch between pipes in a row is approximately 300-400 mm, the distance between rows is 350 mm. The protruding parts of the pipes simultaneously serve as a kind of separation between the wall of the pit and the formwork, determining the thickness of the concrete wall - 150 mm;
- Installation of formwork. Along the perimeter of the pit, formwork panels 2 meters long and 0.5 meters wide are installed. In this case, the shields from inside the pit are wedged together with wooden blocks. The pit is ready for filling!
- A concrete solution is prepared in the following proportions: 6 parts granotsev, 4 parts sand, 1 part Portland cement, thoroughly mixed together. Water is added (until the required consistency of “thick sour cream” is obtained) and superplasticizer (according to the instructions for its use);
- Using shovels or buckets, pour the solution into the cavity between the wall of the pit and the formwork, inserting reinforcement bars into the middle of the resulting structure in increments of 150-200 mm and compacting it by tapping on the formwork and bayoneting with a shovel or a piece of reinforcement;
- The poured structure is left for 72 hours until it sets completely, after which another “portion” of drainage pipes is filled into the pit wall, the formwork is reinstalled higher and the next pour is performed;
- Before the last pouring of the formwork, a sewer pipe should be placed in the hole, positioning it at an angle of 3-5 degrees at a depth of approximately 300 mm from the soil level;
- The last pour is also kept for 72 hours, after which the formwork is dismantled. In this case, the released panels can be used to arrange “supporting” formwork for pouring the floor slab.
Autonomous sewage system with cesspool
Even such a simple task as making a drainage hole in a private house with your own hands must be solved wisely, having drawn up a plan in advance and wisely choosing a place for it. This is very important, since mistakes made during planning can result in a non-functioning system or contamination of soil water.
Design
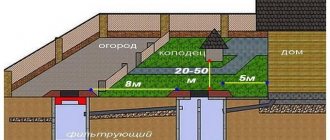
There are standards that determine the minimum distance from a cesspool to objects located on the site:
- from the house - 5 meters;
- from the border with the neighboring plot - 1 meter;
- from the road – 5 meters;
- from a drinking well - 25 meters in the case of a sealed container and 50 meters with a filter well;
- from a deep well - 25 meters;
- from a natural reservoir – 30 meters;
- from fruit trees - 3 meters.
Standards for placing a septic tank relative to other objects Source strojdvor.ru
See also: Catalog of companies that specialize in sewerage and water supply of any complexity
You should also take into account the topography of the site. When deciding how to properly make a cesspool in a private house, you cannot choose lowlands and depressions for it, since in such places the groundwater is located close to the surface. In the spring, during snow melting and floods, the container will overflow, and its contents will contaminate groundwater.
It is also necessary to consider how to clean the structure. If it will be pumped out by a sewer truck, there must be free access to it.
When calculating the required volume, various factors are taken into account:
- number of permanent residents;
- seasonality of living in the house;
- the number of water taps, water-consuming household appliances, the presence of a bathhouse, etc.
Advice! It is recommended to make the volume of the cesspool such that the sewer truck pumps it out completely, since this service is paid for each visit, and not for the volume pumped out.
Installation
Regardless of the type of structure, a foundation pit is first dug for it. It is better to do this with the help of technology, since the volume of soil will be large.
Pit made of wood
A drainage pit made of wood is constructed in the form of knocked down boards in the form of formwork.
Pros:
- Wood is significantly cheaper than concrete rings and plastic containers.
- The work does not take much time, can be completed in one day and does not require special skills.
- The soil is well protected from sewage pollution.
But do not forget that wood begins to rot over time, especially when exposed to moisture. Therefore, the treatment of boards with special protective mixtures and compositions must be mandatory (however, the service life of such a structure does not exceed ten years). And its volume is small - the height is no more than one and a half meters, the length of the side is no more than a meter. Therefore, a wooden cesspool can be used as a temporary option, for example, at a summer cottage until it is possible to build a pit from more durable metals.
The top cover of the pit should be higher than the ground level - this will reduce the risk of rainwater getting into the pit and filling it ahead of time.
Video description
This stage of installation of external sewerage is shown in more detail in the video:
- They test the pipeline by running water through it. If there is no leak, a trench is buried;
- all joints, if required by the design, are sealed;
- carry out backfilling of soil into the gap between the earthen and erected walls;
- close the container with a lid with a hatch;
- a vertical ventilation pipe with a diameter of 100 mm with a deflector on top is removed from the ceiling to remove gases and avoid the appearance of an unpleasant odor.
The instructions on how to properly make a cesspool from a finished container look much simpler. It is simply installed in a pit on a sand cushion, the drain pipe is led into the finished hole and filled up.
When burying a plastic barrel without stiffeners, it must be simultaneously filled with water in order to balance the external pressure on the walls Source strport.ru
Pouring the floor slab
- Channels are laid on concrete walls in increments of 300-350 mm;
- In the center of the structure, a hatch structure is installed directly on the channel. In general, a reliable hatch design is a square frame with dimensions of 700x700, welded from four channels No. 20-No. 25 with the shelves facing outward. Hinges and a hatch panel with a handle are welded on top of the frame. There should be a hole with a diameter of 20-25 mm in the hatch panel for air to escape. Accordingly, the channels should not overlap the “mirror” of the hatch. To do this, they are cut “to size”, and the free end of the resulting piece of channel is attached to the channel shelf of the hatch frame with wire or screws;
- From the bottom of the planned ceiling, stepping back downwards (from the upper cut of the wall) 50 mm, over the entire area of the ceiling, with the help of logs or wooden beams, panels of “supporting” formwork are placed. In this case, a hole is cut in the formwork at the location of the hatch to allow exit from the pit. The horizontality of the shields is controlled by the building level;
- For the strength of the slab, the channels are tied together with steel binding wire;
- Having retreated from the outer perimeter of the pit walls to a distance of 50-100, formwork with a height of 100 mm is installed from wooden boards along the perimeter of the pit;
- Pouring the floor slab. The result is a monolithic slab 150 mm thick, in the center of which channels No. 10 are located;
- After soaking the poured slab for 72 hours, retreating about the hatch structure by 250-300, the formwork is installed (height depending on the height of the channel of the hatch frame) and is also filled with concrete.
After the concrete has completely dried, the inner surface of the walls and ceiling are treated with waterproofing mastic. The upper part of the slab is covered with soil up to the upper edge of the hatch.
A filter made of crushed stone of different fractions is poured into the bottom of the pit. The gaps of the drainage pipes are cleared of pieces of concrete. The cesspool is ready to receive waste!
Features of operation
To use an autonomous sewer system calmly and without problems, it is not enough to know how to make a drainage hole in a private house. You need to use it correctly. Simply pumping it out as it fills is not enough, since over time the bottom and walls of the structure become silted and covered with fatty deposits. This is especially undesirable for filter-type storage tanks, since water from them stops seeping into the ground. And the likelihood of an unpleasant odor in this situation greatly increases.
This problem is solved with the help of special preparations with live bacteria that process sewage. These are powders or liquid compositions that are added to the pit according to the instructions. As a rule, they are poured through the toilet.
Note! Carefully study the instructions for compatibility of the drug with household chemicals. Some washing powders and other chemicals have a detrimental effect on bacteria.
Preparations with bacteria for cesspools and septic tanks Source i.ytimg.com
Old deposits in a pit can only be removed mechanically, scraping them from the bottom and walls or knocking them down with a powerful pressure of water.
Temporary drain hole
A temporary pit can be constructed from used car tires. The advantages of this design:
- Used tires are easy to get - at any car service center, trucking company, and even at a flea market, and for mere pennies.
- One person can build such a pit.
- No need to use additional equipment or tools.
- The material does not corrode, which is why the drainage pit lasts for more than 10 years.
But there are also significant disadvantages.
- In severe frosts, rubber drains freeze and interfere with the complete drainage of sewage.
- The tire pit is not suitable for a large family - maximum 3 people.
- It is difficult to seal the joints between tires, so over time, sewage begins to seep out.
It is advisable to install such a structure on well-drained, light soil (on heavy soil, moisture will stagnate), with a wastewater volume of no more than 1 cubic meter per day.
Concrete drainage pit
A concrete pit is the most durable of all: it can serve a person for decades. The chemical resistance of concrete allows it to withstand the processes of fermentation and decay, and its water resistance guarantees the absence of contamination of groundwater and soil. Another “plus” is that concrete can be used regardless of the groundwater level and geological features of the soil.
The disadvantages include the mandatory use of special equipment (for example, a truck crane), a large waste of energy and dirt during work.
When buying rings, choose elements with the same internal diameter. This will allow you to assemble the structure with maximum tightness. Use waterproofing materials (cement mortar, rubber gaskets) and metal brackets.
