| Rice. 1. Homemade pantograph. |
A pantograph is a tool with which you can redraw a plan or map, drawing or drawing, etc. with great accuracy and to the desired scale (Fig. 1).
Such a homemade pantograph is of interest to specialists of many professions - architects, artists, engineers, inventors, innovators.
The pantograph uses the principle of a parallelogram mechanism, which makes it possible for two points of the mechanism to perform absolutely identical movements with one rigidly fixed end. Depending on the size of the selected shoulder, the image scale can be different and change in the desired direction. The scale is fixed and is set according to marks with corresponding digital markings.
How to make a pantograph - a homemade pantograph with your own hands
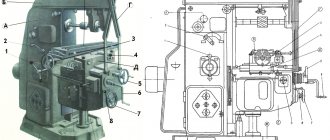
Anyone can make a pantograph of sufficiently high quality with their own hands, provided that the exact dimensions of all parts are observed (Fig. 2).
|
The design of a homemade pantograph, which we would like to bring to your attention, consists of four lever-rulers (three long and one short), in which holes are drilled in a certain order to secure the axes. Brass bushings are inserted into the holes of the rulers.
The axes of the pantograph mechanism are of different designs; the two central axes are a pin with a cap. The axes for attaching the lead (copier) and the tracking rod are made like a device for clamping the lead in the leg of the compass. It is advisable to use a plastic tip as a tracking rod. This tip does not spoil the original and provides good glide. One axis (extreme) with a heel on which the pantograph mechanism rests, and, finally, an axis that secures the entire mechanism to the base boss.
All axes have an annular groove in the upper part, which serves to secure a wire pin-clamp.
The boss is metal. Three stings (gramophone needles) are embedded into the boss from below, making it easy to fix the base on the drawing board.
Rulers are best made of plastic, for example, plexiglass (plexiglass), 5 mm thick. The most important operation is marking and drilling holes in the rulers, so it must be treated with special attention. To ensure high accuracy and alignment of the holes, it is enough to make markings on one ruler, put all the rulers in a bag and drill holes in all the rulers along the marked ruler in one step. Try to make the diameter of the holes such that the bushings fit into them tightly, with a slight interference fit.
The bushings are machined from brass according to the dimensions given in Fig. 2. Axles - steel. The length of the axles is directly dependent on the length of the bushing. Bend wire pins-clamps from steel wire with a diameter of 1.2-1.5 mm.
The base boss can be made from an aluminum block 39 mm thick. In the lower part of the boss, punch three needles into the blind holes (you can use a gramophone), so that their points protrude 2-3 mm.
What is a pantograph for a wardrobe: how to choose and install it?
The upper part of tall, massive cabinets is usually reserved for rarely used and unnecessary things. Old outfits that are inappropriate for the current season are sent there. This is because to access it you need to stand on a chair, stool or use a ladder. But there is a device that can provide free access to the top of the wardrobe and convenience when choosing clothes. Let's look at a pantograph for a closet, what it comes in, how to make and install a furniture lift with your own hands.
Specification of parts for a homemade pantograph
| Part letter designation | the name of detail | Quantity | Dimensions in mm | ||
| Length | Width | Thickness | |||
| A | Large ruler | 3 | 406 | 20 | 5 |
| B | Ruler small | 1 | 220 | 20 | 5 |
| IN | Base (boss) | 1 | 60 | 40 | 30 |
| G | Bushing | 12 | 8 | — | Ø8 |
| D | Fixing axis | 1 | — | — | — |
| E | Axle support with heel | 1 | — | — | — |
| AND | Copier axis (original) | 2 | — | — | — |
| Z | Middle axis | 2 | — | — | — |
| AND | Pin clamp | 6 | — | — | 1,2-1,5 |
When all the parts are ready, assemble the pantograph mechanism. When assembling and adjusting parts, try to ensure ease of movement of all links of the mechanism, for which their rubbing surfaces can be slightly lubricated.
The final step in making a homemade pantograph with your own hands is to mark the holes on a ruler, according to which it will be easy to select the scale of enlargement (reduction) of the copy.
Be sure to check the correspondence of the markings with the resulting dimensions experimentally.
| Recommend this page to your friends or bookmark it: |
Home Latest publications, new on the site.
Repair and construction House and apartment, design and architecture, house projects. Reviews, advice.
Garden, vegetable garden, estate Gardening and horticulture, homestead farming.
Decorative and applied arts Wood carving, burning, chasing, weaving and much more.
Ideas for a DIY master, various original and useful homemade products.
Do-it-yourself furniture Self-made furniture, drawings, diagrams.
What should be considered when designing a machine?
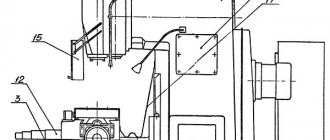
When creating a drawing of a wood copying machine and designing it, you need to do everything depending on the parts that will be made on it. So, in order to mill long workpieces or perform engraving work, a completely different method of securing the workpieces and the type of work table are required.
Also, the power of the electric motor required for high-quality work, which ensures the rotation of the cutter, depends on the parts manufactured and copied on the machine. But in most cases, a 150-220 W DC motor is sufficient for processing wood parts.
To ensure maximum accuracy of copying parts, the device holding the router and the copying probe must be secured to each other as firmly as possible. At the same time, their planes, together with the height above the working surface, must coincide completely.
The created rigid structure must be installed on the table surface in such a way that it is able to move in horizontal and vertical planes.
Thus, it is not very difficult to make a copying machine yourself for making various parts from wood, so many people can cope with such work. But you need to remember that if you make such equipment yourself, it will only be suitable for the production of products of a certain type. Otherwise, only modern universal factory-made equipment will do.
Milling and copying equipment: operating principle
The operating principle of such a device is to clearly transmit the movements of the copy head through the holder profile to the cutting tool.
It is quite difficult to purchase a copy milling machine, so craftsmen make it with their own hands from scrap materials. Everything happens by trial and error. Therefore, experts advise first assembling a duplicate carver, and only then introducing it into mass production. As a rule, this stage is preceded by more than one serious adjustment and alteration.
Factory or homemade machine?
The modern market offers the purchase of milling and copying machines of various levels of complexity and design. But it is not always possible to make such a purchase, and the cost of such woodworking equipment is quite significant. That is why craftsmen often raise the question of a homemade milling and copying machine, the production of which is less expensive than self-assembly. Now, if you have the appropriate drawings, materials and skills, you can make such equipment yourself.
It is clear that this type of homemade equipment cannot compete with factory-produced equipment in terms of its parameters and ease of use. But if performed reliably with a home-made machine, it is possible to make fairly high-quality copies of certain wooden objects.
It should be noted right away that it is almost impossible to install copying equipment at the factory, since this implies a radical re-equipment of the entire machine.
That is why you can make a copying machine for wood with your own hands only “from scratch”, using systems of rods, an electric motor and a special chuck in which the cutter that processes the workpiece will be held.
Milling and copying equipment: areas of application
Milling copying machines can process not only flat, but also three-dimensional parts. With their help, along with simple milling operations, you can perform engraving, repeat drawings, patterns and inscriptions. The design of the machine is quite simple, and any craftsman can make it.
Copy-milling machines allow you to process not only wooden parts, but also cast iron, steel and plastic workpieces, as well as products made of non-ferrous metals. This is ensured by high-quality tools made of high-speed steel and hard alloys. The copying machine allows you to mill not only straight, but also curved surfaces. In this case, the details are completely identical.
How to choose a clothes lift
To ensure that your purchase expectations are justified, follow these simple rules:
- The dimensions must match the dimensions of the cabinet. Typically, the extension range of the rod is from 450 to 1250 mm.
- The carrying capacity of the model must be selected according to the amount of clothing. The wider the section, the more hangers will fit.
- If there is high humidity, buy a plastic model; metal is susceptible to corrosion.
- Spread and opening angle. Measure the space in front of the cabinet doors, will it be possible to fit the extended pantograph, will there be anything in the way?
- Reviews of manufacturers and their reputation will help you make your choice.
- The price of a pantograph depends not only on the company, but also on the type of mechanism: spring, gas and electric.
- Don't forget about the warranty period, especially when buying expensive devices.
Below is a table of the best mechanical models, with the specified characteristics and average price in Russia.
Average price (rubles)
Manufacturing of copy milling machine: materials
To create a duplicate carver at home with your own hands, you should draw a basic sketch, which will become a guide to further actions. In addition, you need to stock up on some materials. This:
- Knee cemented polished shaft Ø 16 mm.
- Linear bearings in the amount of 2 pcs.
- Rail guides 900 mm long – 2 pcs. For ease of fastening, their length is taken as a multiple of 150.
- Split linear bearings in the amount of 4 pcs. It is advisable to use bearings with a clamping screw to adjust the tightness of the fit on the guide.
- Profile pipe 30×60 with a wall thickness of up to 3 mm.
- Metal plate 900 mm long and 100 mm wide.
- End posts in the amount of 2 pcs.
- Moving element in the form of a plate – 1 pc.
- Rocker arm for attaching the copier and router – 2 pcs. The length is chosen arbitrarily.
- Movable couplings – 2 pcs.
- Profile pipe 40×40 with a wall thickness of up to 3 mm.
- Crown clutch for turning the part and template.
Review of the Rigerd suspension system for photo and video shooting
Today I’ll talk about professional equipment for shooting with artificial light. That's who shoots in the studio, whether it's film or video. Photos with flash or constant light. The topic of today’s review is relevant for everyone, so I recommend spending a little time and getting the most complete (without false modesty) information about the situation on the market for mounting systems for photographic equipment with an advertising slant in Rigerd (which I’m actually glad about because I’m basically talking about bad things I’m not telling you, just what I tried and liked).
Making a copy-milling machine: tools
After this, you need to prepare a tool that will definitely be useful for assembling the machine structure. This:
- angle grinder;
- cutting and cleaning disc;
- welding machine;
- welding mask;
- petal disc or brush;
- self-tapping screws for fastening rail guides and moving elements;
- electric drill;
- screwdriver;
- measuring instruments: tape measure, caliper;
- center punch and scriber.
Making a copy-milling machine: step-by-step instructions
After everything is ready, the actual assembly of the copy-milling machine begins.
Step #1
It is necessary to cut two pieces 950 mm long from a 30×60 profile pipe to attach the rail guides. A margin of 50 mm is needed for installing limit switches in order to prevent linear bearings from slipping off.
Step #2
The 40×40 profile pipe needs to be cut into blanks for the base. Guided by the existing sketch, you need to cut two pieces of 1350 mm and two pieces of 900 mm.
Step #3
It is necessary to cut small racks from the same pipe. Their linear size depends on the height of the subsequently processed parts.
Step #4
Now you need to remove the rust from the pipes. To do this, you can use a flap disc or brush.
Step #5
After this, we weld all the joints and clean the seams with a 6 mm thick cleaning wheel.
Step #6
Then it is necessary to ensure parallelism of the rail guides. To do this, you need to make the connection between the rack and the base of the rail guide detachable. It is necessary to take a washer according to the internal size of the rack, weld a nut to it and screw in the bolt. At this stage, the bolt is needed in order to install the nut and washer in the cavity of the stand pipe flush and in a strictly vertical position, and when welding it, do not damage the thread. This must be done with all four racks.
Pros and cons of pantographs
Among the advantages that a pantograph in a wardrobe has are the following:
- It is convenient to get things from the upper section.
- The pantograph allows things to ventilate.
- Clothes don't wrinkle.
- Easy to use.
- Extra storage space.
With the help of a pantograph for sliding wardrobes, even a child will be able to get clothes from the upper sections. In addition, thanks to pantographs, things on hangers can be placed in two tiers: the first is on the pantograph, the second is a standard crossbar.
The disadvantages include the following:
- Short service life due to mobility of parts.
- Noisy.
Perhaps these are all the disadvantages that a pantograph in a wardrobe has. But it is worth noting that the service life depends on the manufacturer. If you buy a pantograph from a manufacturer that guarantees the quality of the product, then its service life can be long.
Pantograph for a router: principle of operation
The schematic diagram of a pantograph looks quite simple. It is a square divided in half. All joints are hinged, so all sides are movable, and the square easily turns into a rhombus when impacted. The zero point, located in one of the corners of the square, is fixed rigidly. Relatively, its design can be modified, turning into a rhombus. A cutting tool is installed in the middle of the square. A copier is fixed diagonally in the opposite corner of the square. The distance from the zero point to the cutter is a certain value A, and to the copier 2A. This gives a 2:1 scale. The linear size of the long and short sides of the pantograph should also differ from each other by 2 times.
Pantograph for a router: materials
In order to make a pantograph with your own hands, you will need the following materials:
- Square metal profile 12×12
- Bearing 180201.
- Bushings for the outer race of the bearing.
- Pins according to the internal size of the bearing and M12 thread.
- Nut M12.
- Bolts M6×45
- Nuts M6.
- Bushing for securing the copier.
- Profile pipe 40×40
- Hinge of a metal-plastic window.
- Dye.
- Masking tape.
- Metal plate.
- Screw for fixing the copier.
conclusions
Now you know everything about furniture pantographs and can choose and install this mechanism in your closet yourself. Let's summarize the article:
- pantograph simplifies access to the upper sections of the cabinet;
- There are mechanical and electrical models;
- You can install the device yourself;
- Convenience and ergonomics are compensated by the high price.
An ingenious engineering design solved the problem of operating tall wardrobes without mezzanines. It is very easy to get any item from your wardrobe if you have a pantograph. Take advantage of modern solutions.
| 750-1150 | 730 — 1190 | 15 | 14 | chrome steel, plastic | steel, plastic | grey, brown | white | white | 9100 | 6200 | 8663 |
Pantograph for a router: step-by-step instructions for making it yourself
Let's proceed to the actual production of the pantograph.
Stage No. 1. Workpiece cutting
It is necessary to mark and cut the square profile according to the calculated dimensions. For convenience, you can use masking tape and a metal plate. The tape will allow for clear markings, and the plate will help make an even and high-quality cut. The blanks for the platform for the router must be cut at a right angle, and the sections of the profile for the connecting rods must be beveled for maximum fit of the bearing sleeve.
Stage No. 2. Drilling technological holes
All workpieces must be chamfered and holes Ø 6.2 mm drilled for further connection into the structure.
Stage No. 3. Welding the platform for the router
After this, you need to weld the platform for the router.
Stage No. 4. Manufacturing of connecting rods
It is necessary to make something like a jig on the board and firmly fasten all the parts to be welded. To do this, a hole is drilled in the board, and the bearing in the bushing is clamped with a bolt, the square profiles of the connecting rods are secured with clamps. First you need to insert two washers between them and fasten them with bolts. After this, all joints of the structure are scalded and cleaned. Then you need to cut the bearing sleeve between the square profiles on each connecting rod. M6 bolts, washers and bearings must be removed. It is necessary to weld a mount for the router onto the frame, and an extension for scaling onto the short connecting rod at the point opposite the zero point. The connecting rods can be painted to give an aesthetic appearance.
CNC on muscular traction (3D Pantograph)
In the modern world, in the community of people who love to do things with their own hands and who do not shy away from technology, such a thing as a desktop CNC machine is extremely popular. Although these devices have become quite accessible, they still remain expensive. The cheapest Chinese option today will cost you 700-800 US money and it will probably not work right out of the box, but will require some effort to bring it to fruition. Making a CNC machine yourself can be cheaper, but usually requires access to a variety of woodworking and metalworking equipment and the ability to use it to produce parts with high precision.
But people are always looking for ways to achieve their goals using affordable means. In some tasks for CNC machines, namely when you need to repeat the same part many times, a pantograph, invented back in 1603 by Christoph Scheiner, can help - a device for copying maps, plans and other vector drawings.
A classic pantograph consists of two vertices, one of which has a pointer handle, which is used to trace the pattern being copied. The second contains a writing instrument, which, through a system of levers and hinges, repeats the movements of the first vertex, drawing a copy on the second sheet. Often, pantographs have the function of scaling the original image.
A simple and brilliant idea. Now, how to copy a certain volumetric object? To do this, we need to add a Z-coordinate connection to the pantograph and replace the pencil with a drill, or better yet, a high-speed spindle, and we will get a 3D pantograph.
Machines for copying wooden products on this principle are produced, for example, by the American company Gemini, but their prices are such that for this money you can buy a good CNC machine from China. Therefore, it is more interesting what the DIY community has achieved in this area.
Frank Ford makes acoustic guitars. At the same time, he has to make many identical guitar parts, such as string holders. Tired of doing it manually, but not wanting to bother with buying and setting up a CNC, he made a duplicator for himself. Because High copying accuracy was important to him; his instrument was made entirely of metal. The probe used to remove the mold and the spindle are fixed on a common frame, which moves only along the Z axis. Movement along the X and Y axes is carried out using a table on which the workpieces are fixed. Another original thing in its design is that it uses a pneumatic drive operating at 40,000 rpm as a spindle.
However, although this is a homemade, it is still an expensive version of the 3D pantograph. There are also cheaper ones.
For example, Adran, dreaming of his own CNC machine, but not having the funds for it. I built myself a duplicator from a Dremel drill, three metal guides and standard-sized wooden strips from the store. A regular screwdriver is used as a probe. Its design can be easily repeated, because he posted the drawings and all the manufacturing stages on the Instructables website.
However, a hand drill is not the most successful tool for such work; its material removal speed is rather low. Here Matthias Wandel from Canada used a manual milling cutter in his 3D pantograph. Which gave him enough power to quickly copy objects in the tree. As an example of working with such a duplicator, here is his video where he makes a copy of the shape of an old rotary telephone (English).
Its design can also be repeated, because he has posted plans and manufacturing instructions on his website, Woodgears.ca. Even if you are not fluent in English, you can easily understand the whole process from numerous photographs.
If the topic of 3D pantographs interests you, then on English-language resources examples of such devices can be found under the tags: carving duplicator, duplicarver, pantorouter.
Cutting tools for milling work: copy cutters
Copy cutters are a tool on which, in addition to the cutting part, there is a bearing. Its size is equal to the diameter of the cutting part of the cutter. The bearing can be located both in the upper and lower parts of the cutter. This is how the tool is classified. It is worth considering that the marking indicates the position of the bearing in the usual placement of the cutter - with the shank up.
They are used to perform copying work according to a template. When using a cutter with an upper bearing, the template is located on top of the part; if with a lower bearing position, then from the bottom.
Working with a hand router involves the use of any cutters. It is safe. The only thing is that when using a cutting tool with an upper bearing, you should pay attention to the overhang of the cutter so as not to damage the workbench.
Milling on a woodworking machine involves using cutters only with a lower bearing position. This is due to the fact that a cutter with an upper bearing position has an open rotating cutting part in the workpiece area. Careless movement may result in serious injury. Such cutters are used on machines only in special cases with maximum compliance with safety regulations.
Copy-milling machines are unique equipment with the help of which the most complex work is performed on the production of identical parts. But for working at home, you can make simple analogues of such equipment and devices that will help in your home or small business.
Let's look carefully around us and we will see how many identical objects there are around. They seem similar to each other, but differ in size, color...
Such similarity is called similarity, i.e. a concept that characterizes the same shape of objects, regardless of their size. There are a great many similar figures around us. Similarity surrounds us. Here are some examples from our life.
Many drawings in children's coloring books are similar to each other.
In order to draw them, you and I can use a device called a pantograph.
Today we will make a simple pantograph ourselves from cocktail tubes.
- 4 cocktail straws (without corrugation)
- 4 sewing pins
- Narrow tape
- Scissors
- 2 markers
Purpose, design, operating principle
A pantograph is a U-shaped lever telescopic mechanism that lowers the top rod with clothes to the level of the first floor of the closet.
The lifting mechanism, consisting of two parts and equipped with a casing, is attached to the walls of the cabinet. Two side levers extend upward from it, carrying a sliding rod, to which a handle is attached in mechanical models.
As a rule, the pantograph is equipped with a rod as a support, but sometimes a cable plays this role. The retractable rod, on which hangers with clothes are hung, adjusts to the width of the closet section.
The "clothes lift" can keep expensive dresses away from pets who like to explore their surroundings and away from children who might get their clothes dirty. It is also a good solution for older people and people with disabilities.
A furniture elevator has a load limit and certain operating rules. When lowered with more clothing, the bar will move faster, sag and arch. The moment of inertia will lead to a shift in the axes and positions of the mechanism, and subsequently to premature failure.
- comfort and easy access to the upper compartments;
- clothes are ventilated and the smell of dampness does not appear;
- there is no need to iron things, they are always smooth.
- noisy operating mechanism, even on new models;
- requires care and regular diagnostics;
- Over time, mechanical parts wear out;
- installation requires minimal skills in the construction industry.