In the design of a shower stall, the siphon plays a kind of intermediate role. It ensures the redirection of used water from the pan to the sewer. And its function also includes providing a hydraulic seal (better known as a water plug), which cannot always be detected due to the presence of membrane analogues that protect the apartment from the penetration of foul-smelling air from the sewer. Air from drains can be hazardous to the respiratory system and human health, as it is toxic.
The standard siphon design consists of two elements - a drain and an overflow, which is also not always present. The modern market offers consumers a wide variety and choice of a wide variety of siphons, varying in design, method of operation and size.
Classification of siphons by design
Based on their design features, there are several types of siphons:
- bottle type;
- pipe;
- corrugated;
- dry.
Separately, the presence or absence of an overflow in the design should be highlighted. All of them can be used when connecting a shower tray. When choosing a specific type, you need to take into account the presence of an overflow hole in the pan design.
If the tray for the cabin is equipped with an overflow, you definitely need an appropriate siphon, because when the tray overflows, water will simply flow through the hole onto the floor.
Such fittings can be any of the above varieties. A distinctive feature is the presence of an additional pipe connecting the siphon structure and the overflow.
The presence of such a feature as an overflow makes the use of a shower tray more practical. With sufficient depth, you can bathe a small child in it, like in a bath, or even do laundry
As a rule, the upper hole has a smaller diameter - about 4 cm. The connecting hose is made flexible - from a corrugated pipe, since the location of the overflow can vary depending on the type of shower stall, and the siphon should fit most models.
Now let's take a closer look at the main types of siphons. To understand how they work, you need to familiarize yourself with the features of each type, as well as their disadvantages and advantages.
Type #1 – bottle siphon
The first type of siphons is the bottle type. In its design it resembles a flask. A drain from a pan with a filter grid (outlet) is connected at one end, and a sewer pipe is connected at the other end.
The hydraulic seal is formed due to the fact that the outlet from the siphon is located above the edge of the inlet pipe.
There are two construction options: with a tube immersed in water, or with two communicating chambers with a partition. Both varieties are equally effective
The device is made of plastic. Sediment collects at the bottom and must be removed periodically.
To clean a bottle model, the drainage fittings must be accessible from below, and the design of standard shower trays rarely requires a comfortable height. For this reason, the classic bottle shape cannot be used for low trays.
Type #2 – pipe version with a water seal
An equally common option is a pipe siphon. It is a curved tube made of hard plastic. A bend is required.
Most often, pipe models are made in the shape of the letter “S” or the letter “U”. This configuration ensures the natural formation of a water plug in the bends.
In addition to the height of the siphon itself, it is necessary to take into account the necessary angle of deflection for normal outflow of water. The reference point is the place of insertion into the sewer pipe
Pipe siphons are compact and easily fit under the shower stall. There are modifications for pallets of any height, even the lowest ones. Thanks to the smooth inner surface of the plastic from which the device is made, contaminants do not accumulate on the walls, but are sent straight to the drain.
The main advantages of this type of drainage fittings are durability and the absence of the need for frequent cleaning.
Type #3 – corrugated siphon
The most popular siphons for low pallets are made from corrugated pipe. According to the principle of operation, they are identical to conventional pipe models, but their main feature is contained in a flexible and elastic corrugation: the siphon can be manually set to any suitable shape.
This versatility makes corrugated models suitable for all shower enclosures.
The main condition is that the bend of the siphon must be made so that the water in this place completely blocks the pipe opening. Only in this case will the hydraulic valve function correctly
The main disadvantage of this design is caused by the structure of the corrugated hose. Since its entire inner surface consists of small folds, dirt accumulates in them.
In addition, to ensure the necessary flexibility, the thickness of the hose walls is quite low, which also affects the durability of the device. The siphon quickly breaks down and requires cleaning.
Type #4 – dry siphon version
In order to ensure the minimum possible height of the siphon, manufacturers abandoned the conventional water seal in favor of a new technology for protection against sewer “odors” - a silicone membrane.
Models with such a system are called dry siphons, because water does not linger in them, but goes directly into the drain. The silicone membrane acts as a valve, allowing water to flow in the desired direction, but retaining gases from the drain.
It looks like a tightly rolled polymer tube, which straightens out and allows the flow of water to pass through, and as soon as it stops, it returns to its original position.
Another advantage of this design is that it does not freeze or dry out. Even in the presence of a heated floor - a frequent culprit of evaporation of the water seal and the appearance of unpleasant odors in the bathroom - the silicone membrane will not be damaged in any way
This feature plays an important role in rooms that are heated intermittently, for example, in a free-standing bathhouse or sauna in the country. In this situation, the presence of a siphon, which does not need to be “preserved” every time so that it does not crack due to frost due to the water remaining in it, is a significant advantage.
This type of siphon is the most expensive, but its efficiency justifies the high price. Fittings with a dry seal are installed even under the lowest shower trays, where it is impossible to install other models.
In addition to the high cost of the device itself, if the membrane becomes dirty or damaged, repairs will also be expensive.
We reviewed more detailed information on the types of shower drains in this article.
Types of structures
Types of siphons
There are several types of dry valves: membrane, pendulum, float, and with molecular memory.
The diaphragm valve operates on the nipple principle. The membranes are attached to the screw-on pipe by means of a spring. Under the pressure of water, the valve opens, letting it through. When the pressure in the system stops, the springs return the valve to its place, pressing it tightly against the tube. Thus, the smell does not spread and the liquid from the sewer does not spread.
The float valve is a combined design. When water is present in the siphon, a light, air-filled float floats, but when the water dries up, it sinks, blocking the sewer hole. This option cannot be used at low temperatures to prevent the liquid from freezing.
Pendulum shutter - operates according to the law of gravity. The pendulum is mounted in the siphon perpendicular to the opening of the sewer drain pipe. Its diameter should be equal to the diameter of the pipe, this will allow the sewer to be hermetically sealed. Under the influence of water flow, the pendulum deviates, opening the hole in the drain channel; after the liquid passes, the pendulum, under the influence of gravity, returns to its original position.
A water seal with molecular memory is a modern high-tech invention based on the ability of some elastic materials to restore a given shape after deformation stops.
It is advisable to buy a dry water seal for the shower, additionally equipped with a drain, concreted or built into the floor. It is equipped with a grille that prevents the entry of debris; it can be closed if necessary, serving as an additional barrier to the penetration of odors from the sewer. In addition, the drain provides a hermetic connection with the floor of the bathhouse or shower.
Manufacturers
The most popular and in demand metal-plastic models of shower siphons from domestic and foreign manufacturers:
- multi-position model WIRQUIN BOND JAMES in black from the French manufacturer Wirquin. It is distinguished by the presence of a self-centering gasket and a compact removable filter;
- model WIRQUIN Tourbillon gray from the French manufacturer Wirquin. Characterized by an ABS chrome grille and an easy to clean removable cup;
- domestic model UNICORN for deep trays with chrome-plated overflow, flexible outlet to the sewer system and a cup made of stainless steel;
- the Temporlekh Plus model from the German manufacturer Viega, which has a convenient horizontal outlet, a chrome plate and high throughput;
- the Raindrain model from the German manufacturer Hansgrohe, characterized by high productivity (51 l/min), for a water level of 150 mm and the presence of an external steel panel;
- German model Ideal Standard, characterized by a drain hole diameter of 9.0 cm and good throughput;
- Uniflex model from the Swiss manufacturer Geberit, which has the ability to dismantle the immersion pipe and its retainer, an installation height of 8.0 cm, and mobility of the outlet pipe within 15°.
Siphon for shower cabin IDO SHOWERAMA
Manufacturers produce shower siphons of horizontal and vertical types. The first option is used when the height of the shower tray is small or completely absent. In this case, the wastewater flow is directed to the side, which minimizes the size of the device.
Vertical or direct-flow siphons are characterized by water draining downward, thereby increasing the throughput of the system.
Dry water seals
The need for dry water seals is caused by one of the disadvantages of wet ones - they constantly contain water, and if it is not changed, it begins to smell bad, microorganisms, mold, and algae can appear in it. Therefore, the installation of dry water seals is relevant in places where water is used at long intervals - baths, saunas, shower rooms and similar rooms.
There are several types of dry water seals, differing in their operating principles, the main ones being:
Float A sewer drain with a float-type water seal is one of the most popular models. The typical design is an inverted lightweight glass, the edges of which are immersed in water located between the drain body and its central drain pipe. Water enters the interior of the body through a cover that protects the inverted float; after using the shower, it gradually dries out, the float sinks to the bottom and blocks the drain hole with its body.
In other designs, instead of a float, a light ball is used, which, after the water leaves, is lowered into the outer seat and hermetically closes the drain hole.
Rice. 9 Operating principle of the float siphon
With check valve . The operating principle of the design is based on the fact that the drain channel is closed by a valve on curtains (pendulum design) or in the form of a spring-loaded nipple. When using water, it opens the valve under pressure and pours into the pipes; as soon as the water is turned off, its pressure on the locking element drops, and it mechanically closes the drain channel.
Membrane . One of the latest developments is a dry water seal for sewage with a silicone insert. Its difference from analogues is that it is detached from drains, sanitary equipment and other elements of devices due to the possibility of use anywhere in the pipeline.
This is achieved by a design that is a short piece of pipe, inside of which a silicone membrane is placed in the form of a short sleeve. Its direction is indicated on the body of the device by an arrow; when turned on directly, water passes freely through the hose under its own pressure; in the absence of direct water flow, the walls of the hose are compressed and do not allow the liquid to flow back into the channel. Similar products are supplied to the domestic market by foreign manufacturers in standard sizes 32, 40 and 50 mm. The advantages of the devices are that they can be located vertically or horizontally in the pipeline.
There are other models of membrane valves that are mounted directly into the drain in a vertical position; they operate on the principle of a check valve, opening under water pressure and closing the channel after it leaves.
Rice. 10 Types of dry membrane hoses
Choice
Parameters and characteristics that determine the choice:
- Geometric - dimensions of the shutter, height of the space under the shower stall, diameter of the drain hole;
- Technical – performance and throughput;
- Quality of material;
- Difficulty of installation;
- Operational features.
Shower cabins are often sold together with siphons. If you are satisfied with this cabin modification, you can purchase it. But just as often you have to select the siphon yourself. Therefore, you should pay attention to the following points.
Geometric parameters
The design of the tray and methods of its installation determine the choice of the mounting height of the shutter. Modifications of devices with a height of 8 to 20 cm are made. However, for a shower cabin that requires low installation, only those whose height does not exceed 10 cm are suitable. The lower the height of the device, the easier its installation will be. The most difficult thing is to select shutters for the cabin installed directly on the floor.
The market is increasingly selling shower cabins that have drain holes in Euro sizes - 52, 62 and 90 millimeters. The structural parts of the shutter must comply with them.
Technical specifications
The depth of the shower cabin sink is usually small, the water flow is large, therefore, the water must have time to come out without delay. The throughput capacity (CA) of a water seal determines the speed at which water will flow out, as well as how quickly the seal structure will become clogged and how often it will need to be cleaned. The average PS of shower cabins is 30 liters per minute. If hydromassage and other additional functions are available, water consumption increases. An indicator characterizing the SS is the height of the water layer above the level of the top of the drain. With a height h=12 cm - diameters are 5.2/6.2 cm, with h=15 cm - a diameter of 9 cm. Therefore, for low pallets there are siphons of small diameters - 50 mm, for high ones - large ones. The instructions for the shower cabin indicate the PS, which must be taken into account when choosing a shutter device.
GOST recommends a minimum flow rate of at least 15 liters per minute for shower cabins with outlet, at least 21 for siphons with overflow and for deep sinks.
Material quality
The parts located under the shower stall are not exposed to external physical stress, so they can fail due to aging of the plastic. Low-quality plastics begin to crack already in the second year of service. High-quality ones last a long time.
The grate covering the drain requires attention. The best option is when it is made of stainless steel. This is the most durable material used for gratings. There are gratings made of alloys. In this case, you should pay attention to the decorative coating. Two layers of chrome guarantee that the coating will not peel off and the grille will last a long time. Chrome is resistant to detergents, which is an additional advantage. Plastic nickel-plated grilles quickly remain without a coating that cannot be restored on your own.
To facilitate periodic maintenance of the valve device, as well as to protect against sewer odors, the valve devices are equipped with additional parts - dry or hydraulic valves, removable settling cups. The more additional parts there are, the lower the shutter reliability. The likelihood of breakdowns increases with the number of parts.
When buying cheap water seals, they waste large sums of money, since only lifting the pan will allow them to be replaced. In some cases, you will have to dismantle the entire shower cabin, then you cannot do without breaking its parts. Whether it is worth saving on the shutter device is up to the buyer to decide.
Performance
Drain fittings, according to regulations, must be easy to disassemble and assemble manually. This is an important condition, especially when the drain is clogged, or in other emergency situations. Therefore, installation of the shutter device is carried out with a minimum set of tools.
During operation, the main difficulty is cleaning the locking device. When choosing, you should think about this issue. Some modifications are made to be self-cleaning. Some can be cleaned through the drain hole. Such modifications of the bolt product have an outlet diameter of 90 mm, which allows you to disassemble the device, remove everything you need in sequence, and then reassemble what was removed in the reverse order.
When buying a siphon, it is better to choose products with click-clacks that can be removed with a cleaning basket
Reasons for failure
The water seal of the sewerage system is a structurally simple product that does not contain complex elements, so its failure occurs quite rarely. The following situations arise most often:
- A water seal failure in a sewer occurs when the pipe in an apartment in a multi-storey building, a cottage, or in a country house along the riser above is closed or clogged. In this case, when large volumes of water are drained, the vacuum formed in the riser pipe carries water from the water seal with it, and it opens. This problem can be eliminated by cleaning the riser pipe or installing a vacuum valve at its end.
- Blockages are the most common cause of failure of water seals; dry operating devices are especially susceptible to this disease. If debris gets under the lowering float or into the closing sleeve of the membrane, they cannot close and foreign odors enter the room.
- Improper installation is another reason why water seals malfunction. Failure to observe slopes in pipes, spontaneous straightening of corrugations, and violation of the assembly sequence of complex systems leads to incorrect operation of locking devices.
- Leaks can also cause water seals to fail. A situation that often arises is that water flows out of the bottle elbow through a poorly screwed sump lid at the bottom.
Rice. 11 Types and cost of siphons for sinks and bathtubs
DIY drain installation
Installing a water drainage system into a sewer involves sequentially completing the tasks of installing pipes, a siphon and a drainage system.
Shower channel
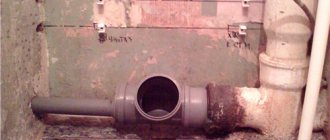
The installation of the siphon to the shower tray is carried out before the base is leveled to the floor. The upper part of the drainage fittings is attached to the inside of the pan, fixed with a bolt in the center (pre-treat with sealant).
Sequencing:
- The drain grate is covered with tape to prevent damage.
- Degrease the surface.
- The channel is attached to the floor with brackets.
- The drainage body made of metal is grounded.
- The tray is leveled.
- One edge of the hose is connected to the channel pipe.
- The second edge is attached to the sewer.
- Water leakage is checked.
- The space is filled with cement mixture and finished with tiles.
Drainage drain
Installation is carried out using a channel-type siphon. You can additionally install a drain in front of the installed shower stall to avoid leakage beyond the required limits, but such a system is rarely used.
- The location where the pipe is inserted into the water outlet pipe is determined, and a line is drawn from it to the siphon installation point.
- If the decorative elements are the same size as the ceramic elements, a flange is installed instead of 1 tile. If the ceramic squares are huge, you need to attach the ladder at the junction of the two elements.
- The drain outlet cuts into the sewer, pre-coating the joints with silicone.
If you need to install several devices (washing machine, washbasin) in one drain pipe, use models with a pass-through device and two outlets.
- The floor is laid on extruded polystyrene foam.
Siphon on the cabin tray
If there is an overflow, first install the tube in the siphon, and only then attach it to the sewer.
Assembling drainage fittings is not difficult, the main thing is to follow the instructions and carefully treat the joints of the parts with sealant. The pipe is connected on one side to the sewer outlet, and on the other side it is attached to the drain of the shower stall.
Recommendations
In order for drainage fittings to work for a long time, it is important to use high-quality sealants that are resistant to high temperatures. You should also not use inexpensive plastic siphons to provide hot water drainage; it is better to purchase stainless steel models that will last longer. Other recommendations:
- The lower level of the siphon must be higher than the level of the sewer opening.
- To clean the siphon less, you need to install a mesh on the drain.
- Before choosing drain fittings, measure the height of the tray to the floor.
Using a drain
The use of an additional drainage system is relevant if the shower stall is of a combined or open type.
Then there is a risk of water getting beyond the sides. If the cabin has a high tray, then this application is not relevant.
To save money, you can install a double siphon, which will receive water from the shower tray and drain. You need to choose stainless steel models.
How to install
Any siphon purchased in a retail chain has an instruction manual, which details the order of its assembly according to the drawn diagram, so a detailed description of the process of connecting various parts does not make sense. Installing a standard siphon (Fig. 13) in a bathtub consists of the following steps:
- On the floor, according to the instructions, connect the elements of the U-shaped sump, screw in the inspection cover and the pipe, which is attached to the bottom of the bath.
Important: The most important thing in this case, as in assembling the entire siphon, is the correct installation of the cone-shaped ring gaskets. The sharp end should fit into the joint of the parts being connected, and the wide end should be pressed with a union nut.
- Next, place a gasket in the drain hole of the bathtub, place the assembled unit underneath and screw it with a screw inserted into a metal cup with holes on the other side. However, do not apply too much force when rotating to avoid stripping the thread.
- Insert a pipe with a cup and a rubber gasket from the outside into the overflow hole at the top of the bathtub, screw it on the other side with a screw through a metal round grille.
- Next, connect the outlet pipes of the overflow bowl and the lower unit of the siphon with a double-sided corrugation; to do this, place cone-shaped rings on its ends and screw the corrugation with union nuts, pressing the wide edge of the gaskets.
- Insert a corrugation with a cone-shaped ring into the outlet hole of the siphon unit and press it with a union nut. The second end of the corrugation is inserted into the sewer pipe.
Rice.
13 Bath siphon - assembly diagram Seals in the sewer system are the main way to get rid of unpleasant odors from pipes. For their installation, various types of siphons are sold in the retail chain. Each product is intended for use in a specific type of plumbing fixture, so the consumer only has to purchase the item for its intended purpose, assemble and install it according to the attached instructions.
Using a drain
Previously mentioned was the miracle of the modern plumbing market known as the drain drain. This device is perfect for use in combination with shower trays of a wide variety of heights. It is important to understand that the drain has certain dimensions, and there must be enough space between the floor surface and the underside of the upper edge of the shower tray to install the plumbing product.
If the shower tray is installed on adjustable legs or a support frame, no problems will arise - the required height of the tray is set, the drain ladder is installed (guidelines for its assembly/disassembly and correct placement will be given below), the drain is connected to the sewer, after which the space between the floor and the pallet is covered with a decorative screen or masked in another suitable way.
Plumbing drains Shower drain Viega Advantix Corner drain Viega corner drain
It’s a different matter if the owner bought an almost completely flat pallet. In this case, you will have to resort to a trick, using one of the options discussed in the following table.
Table. Options for installing a flat tray for connecting a siphon
| Installation option | Description |
| Installation on a wooden pedestal | The bottom line is this: a pedestal is assembled from wooden boards (in fact, a durable hard box without top and bottom edges) and a shower tray is placed on it. For assembly, use boards with a length along the sides of the pallet, a height sufficient to install a ladder of the selected dimensions, and a thickness of 4 cm or more, so that the structure can easily support the weight of the pallet and the washing room visitor standing on it. The boards are fastened inside with corners and tightened with screws/screws. As a result, it becomes possible to install a drain and connect it to the sewer pipe. The method is extremely simple and inexpensive, but has a big drawback: fragility. Ultimately, the boards will still begin to rot from use in such conditions. To delay this moment, firstly, use the highest quality material, and secondly, be sure to treat it with a special antiseptic impregnation, which helps increase the moisture-repellent properties of the wood. |
| Installation above a sewer pit | A simple option that does not require much effort to implement. A small pit is built under the future installation site of the shower tray (one of the popular size variations will be presented after the table). The resulting free space will allow you to easily accommodate a drain ladder (it does not need a rigid base) and connect it through a corrugated pipe to the sewer. The hole shown can be made even with a finished floor already installed. It is enough to mark an area on the floor according to the shape and size of the shower tray (the sides, as shown in the figure, will rest on the floor) and cut the wood in accordance with the markings. |
Example of a pit Scheme for using a pit The procedure for installing a shower tray on a base made of blocks deserves special consideration (foam concrete and the like are suitable, if desired and the overall dimensions are satisfactory, it can even be a brick or cinder block). The instructions are given in the table.
Important! The same manual will show you the procedure for installation, connection and subsequent actions with the drain. Apart from arranging the supporting structure, the work steps remain identical.
Table. Installing a pallet on a block base
| Work stage | Description |
| Marking | Place the pallet on the floor at the installation site and trace the contours of the product with a pencil. |
| Installation of support blocks | Place 4 pre-cut support blocks (you can use a hand saw) onto the pieces at the required height. Make sure that the resulting free space under the pallet is sufficient to accommodate the siphon/drain structure. Do not forget to waterproof the base under the blocks with any available rolled material, securing it with mastic. |
| Control pallet laying | Place the pallet on blocks. Check whether the structure is stable, whether there are excessive distortions (pallets are often installed with a slope of 2-5 degrees in the direction of the drain to ensure efficient drainage of water) and whether there is enough space under the pallet for the siphon/drain of the selected model. If everything is fine, remove the pallet and begin fixing the blocks. |
| Fixing the supports | Apply tile adhesive to each support one at a time and secure all 4 blocks to the floor. |
| Marking the drain hole | Place the tray on stands and use a pencil to mark the location of the drain hole on the floor. Remove the tray. |
| Siphon connection | Connect the siphon to the sewer pipe. The connection locations and fasteners used are shown in the figure. If necessary, use a corrugated pipe and/or adapters, depending on the specifics of the sewer pipe entering the room and its characteristics. |
| Completing the base structure | Following the already familiar technology, install support blocks around the entire perimeter of the pallet. |
| Preparing the base for laying the pallet | Apply tile adhesive around the perimeter of the supporting structure. Spread the glue into a thin layer. |
| Pallet installation | Place the pallet on the resulting support structure. To fix the pallet, carefully tap its sides with a wooden hammer, while controlling the position of the structure with a building level. |
| Installing a siphon in a tray | Install the corresponding part of the siphon into the pan through the sealing gasket. As a rule, this part is screwed into the drain hole using a special tool included in the kit (shown in the image). |
| Sealing | Apply silicone sealant along the joints of the pallet with the walls. Finish the block support with tiles of your choice. You can also use an overhead decorative screen or other suitable options at your discretion to disguise the base. |
Video - Installing a shower tray on a block base
The above guide showed how to connect a compact siphon (drain) for a low shower tray. In general, the sequence of actions remains the same for all existing models of the mentioned plumbing products, however, in order for the installation to be quick and easy, it is necessary to have a complete understanding of the design of the drain and, most importantly, the process of its independent disassembly/assembly.
The design of the ladder is shown in the following table.
Table. Drainage design
| Design element | Image |
| Gangway assembly | |
| Disassembled gangway | |
| Overlay | Overlay |
| Siphon | |
| Flange with swivel fixing screws | |
| System for connecting to a sewer pipe. Complete with gasket. |
Video - Drain drain design
You can familiarize yourself with the procedure for disassembling the ladder yourself for its subsequent installation in the following table.
Table. The procedure for disassembling the drain ladder
| Work stage | Description |
| Removing the trim | We pry the cover with a screwdriver, as shown in the figure, and remove it from the fasteners. Next, remove the mesh, if present. |
| Taking out the “core” | To get to the mounting screws, remove the middle part of the structure (shown in the figure). To do this, carefully pry up its edges with a screwdriver, like the top cover, and remove it. |
| Unscrew the fasteners | Their number may vary depending on the specific design. In the example under consideration there are two fasteners. |
| Removing the top part of the system | After unscrewing the screws, remove the upper part of the system. This part is installed in a pallet. |
| The lower part of the system is located in the space under the pallet | There is an outlet for connecting to a sewer pipe. Assembly is carried out in reverse order. |
Video - Dismantling the drain ladder
The siphon, a plumbing element invisible at first glance, performs very important functions in the system under consideration. In order for the structure to serve as long and efficiently as possible, try to initially purchase a high-quality plumbing product, or even better, use the unit included in the shower cabin, if present.
If you buy an extremely budget siphon from a little-known manufacturer, you run the risk of encountering many problems in the future associated with the need to very often clean the system or even repair it as quickly as possible.
Purpose of a water seal for sewerage
The sewer water seal performs the following functions in the system:
- Prevents unpleasant odors from sewer pipes from entering the room.
- Reduces noise when draining waste water streams.
- Blocks the entry into the home of explosive gases (ammonia and methane), which are formed during the decay of organic waste.
- During a fire, it cuts off the siphon units of plumbing fixtures from the general sewer line.
- Performs the functions of a garbage collector, accumulating various types of waste at the bottom of siphon devices.
- Prevents bacteria, various types of microorganisms, and insects from entering the premises through sewer pipes.
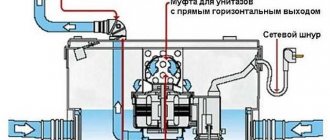
Rice. 2 The operating principle of water seals in toilets and siphons
General information
The water seal performs several functions:
- Eliminates sewer odor
- Protects drainage from water hammer
- Reduces the risk of blockages in the central system
- Reduces stress on pipes
For your information. If you do not use plumbing fixtures for a long time, the water will gradually evaporate from the “lock” and an unpleasant odor may appear. After the first flush, the amount of water will be restored and the smell will be eliminated.
If you assemble a sewer system without siphons, then the bathtub, toilet, and sink will lose their water barrier, the liquid will go directly into the sewer system, and an odor will come from the pipes.