It’s not just the muffler that burns out: what’s falling apart and how to repair it in the exhaust system
Many have probably encountered a situation when a car began to roar in Dzhigurda’s voice. At first she growled quietly, then she began to grumble louder, and then she simply screamed. Often this car's tendency to roar is explained simply - “the muffler has burned out.” But in fact, not only the muffler can burn out - the exhaust system itself is more complicated than it seems. Let's see what can grumble, growl and make other obscene sounds in it.
From “pants” to “cans”
The exhaust system is needed not only to remove exhaust gases. It has several functions, and reducing noise and exhaust emissions is not all.
Firstly, exhaust gases spin the turbine impeller (or turbines, if there are two of them) on supercharged engines. But we won’t talk about this, this is a slightly different topic. Secondly, lambda probes (oxygen sensors) installed at the exhaust are needed to prepare the fuel mixture. They transmit data on the amount of unburned oxygen, on the basis of which the ECU adjusts the composition of the mixture. Thirdly, yes: the exhaust system must reduce the toxicity of the exhaust, primarily the concentration of carbon compounds, nitrogen oxides and soot.
Despite the fact that the exhaust systems may differ slightly, the circuit diagram for any naturally aspirated engine is the same. It consists of several elements: the exhaust manifold (sometimes called the "spider" or "pants"), the clutch, the catalyst, the exhaust pipe, the resonator and the muffler (which is sometimes called the "can"). You can also add oxygen sensors and an exhaust suspension system here. The cause of extraneous sounds can be anything, except, perhaps, sensors. What are all these parts for?
The exhaust manifold is the first thing that stands in the way of exhaust gases (except for the gas distribution mechanism). Its task is to divert gases from each cylinder into one common exhaust pipe. And he needs to do this in a smart way: by ensuring high-quality purging and filling of the combustion chambers. It is known that the movement of gases occurs in waves, which often makes it difficult to release gases and fill the combustion chambers. Therefore, the design of a collector is almost always complex, and a lot of time is spent searching for the optimal shapes and cross-sections of pipes. Everyone, most likely, has heard about the desire of tuners of various types to install a 4-2-1 exhaust on their “chepyrka” - that is, a manifold in which first four pipes converge into two, and only after that – two pipes into one. Simpler manifolds have a 4-1 scheme, in which all four pipes (if we are talking about four-cylinder engines) immediately converge into one. Well, God bless him, the main thing is that there is a collector in the exhaust.
The next element is the resonator. It is also a front or pre-muffler. It does not affect the environment in any way, and its only task is to reduce noise levels. In fact, that’s why it’s called a resonator. Exhaust waves are reflected in it and standing waves are formed. That is, the sound after it should become smooth, and not rumble like a series of shots. But the noise finally disappears in the main (rear) muffler. Structurally, it is a little similar to a resonator: inside it also has perforated pipes and compartments, inside which gases walk, as if through a labyrinth, losing speed and temperature. The formulation is somewhat simplified, but clear.
Another detail is the pipes, at least the receiving and middle ones. Everything is simple here, they connect the rest of the release elements. And finally, the entire structure is not tightly screwed to the body or frame, but is secured by a suspension system with rubber shock absorbers (donuts or whatever you like). This is quite logical. Think for yourself what a shiver would go through the body if the exhaust were tightly attached to it. To reduce vibrations, suspension and corrugation are used.
We figured out the device in general terms. Now let's see what can go wrong here. Let's start from the very beginning - with the collector.
What's wrong?
The exhaust manifold operates under very harsh conditions. Most of all, of course, it suffers from temperature, which usually ranges from 700 to 1000 degrees. Sometimes it can be higher - up to 1300. Therefore, the collector itself is made of refractory materials. This is good, but it has one weak point - the gasket between it and the block. If the gasket burns out, a sound appears that is described as “the gasket is cutting.” This is often a whistling sound, the source of which is not difficult to find. The solution is obvious - replacing the gasket. In this case, you need to pay attention to the fastening of the collector itself: the gasket itself usually does not burn out. But if, for example, the pin that attracts it to the block breaks, it will burn out very quickly: it will be burned by the hot exhaust gases breaking through the leak. Therefore, if the gasket “cuts”, first of all you need to look at the manifold fasteners.
This exhaust sound is the easiest to find for at least one reason: you don’t have to crawl under the car to find it. To determine the source of another roar, you will have to either use a lift or crawl under the car (which is not always convenient, possible or safe).
Signs of a burnt gasket
The easiest way is for the owner of a car with an injection engine, the operation of which is monitored by an ECU (electronic control unit). It sends a signal about a gasket failure to the dashboard, where the Check light comes on. This means that the lambda probe, which is usually equipped with the manifold, detected a change in the volume of oxygen in the exhaust, informing the ECU. The engine begins to operate in emergency mode until the defect is eliminated.
“Symptoms” of a burnt gasket:
- the engine is unstable;
- makes an uncharacteristic sound during operation;
- The cabin smells like exhaust gases.
ATTENTION! The fact that the exhaust manifold gasket has burned out is indicated by a recognizable chirping sound created by gases that break through the seal. Motorists often say that the engine “cuts.”
Exhausts through ventilation and heating systems quickly penetrate into the cabin, which is fraught not only with a deterioration of the microclimate, but also with negative consequences for health. This is why replacing the exhaust manifold gasket becomes a forced but necessary measure.
Gasket between exhaust manifold and exhaust pipe
If the manifold seal is not replaced in a timely manner, the safety conditions for operating the vehicle are greatly reduced.
In general, a manifold is a device designed to remove exhaust gases from a car engine. The second function of the collector is to improve the filling of the working chambers and enhance the ventilation of the working space. All operation of the exhaust device is carried out at elevated temperatures and high gas pressure.
This element is attached directly to the head ( cylinder head
) and the other side is in contact with the exhaust pipe or converter. The most important task of the exhaust manifold gasket is to prevent exhaust gases from entering the valve space. These gases, in turn, can cause fire of parts or elements of the power unit.
Symptoms of a blown exhaust manifold gasket
The following can be distinguished: exhaust gases begin to flow into the car interior or their smell is felt; the car engine begins to start poorly; Strange sounds appear in the engine compartment. If these ailments are detected, you should begin to inspect the exhaust system. The collector itself is made of high-strength austenitic steel.
Causes of malfunctions
The gasket is placed between the exhaust manifold and the cylinder head. The stamped asbestos gasket is resistant to high temperatures, can be compressed (creating the necessary impermeability) and has increased strength. To enhance the latter quality, the exhaust manifold gaskets are additionally reinforced with steel.
IMPORTANT! The main task of the gasket is to prevent exhaust gases from penetrating under the hood, where they can cause ignition of parts/assemblies of the engine compartment.
The gasket is recognized as the most vulnerable point of the exhaust manifold, which operates under extreme loads in both temperature and pressure. It is not surprising that gaskets have to be changed not only on cars with significant mileage, but also on almost new cars.
Gaskets need to be rotated for several reasons:
Gasket between exhaust manifold and exhaust pipe
↳ Boxer 1, 2. Transmission
Selection, purchase, reviews
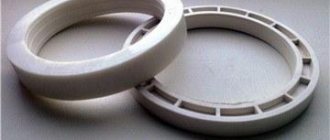
All of these symptoms indicate a damaged ring that needs to be replaced. This service takes a little time. Sequence of actions when replacing the muffler ring-gasket:
We unscrew the nuts; they usually come complete with a stud; they rarely come off, but if this happens, we are ready to replace them.
We have spare parts. On Renault Logan, we unscrew the nuts with a 10mm socket. When you remove the ring, you can see the shine at the joint and how the ring is flattened.
That is, the pipe hit the exhaust manifold and gradually flattened the ring. This type of ring can be replaced, but in order to remove it, sometimes you have to cut it.
If you do not change the muffler gasket in time, this will be followed by wiping the “Gander” part of the exhaust pipe. The gander is not sold separately, but comes complete with a muffler.
The gasket is changed approximately once at a mileage of 150 thousand km.
Diesel engine
Electrical and optics
How to get rid of the problem
The muffler gasket is usually beyond repair. If the muffler gasket (ring) is damaged, it will have to be replaced with a new one. Replacing the gasket is fairly easy.
- First of all, you need to get rid of the old gasket. You need to unscrew the two bolts that hold the flanges together. The bolts are usually rusty, making them quite difficult to remove. For this purpose, you can use a special tool (“liquid keys” or an angle grinder, if the situation is critical).
- After the bolts are removed, you will have to carefully move the resonator tube to the left side.
- The old muffler gasket is located on the resonator pipe. You will have to use a screwdriver to pry the product and remove it.
- Next, you need to use a metal brush and sandpaper to remove carbon deposits from the flanges.
- After this, the muffler gasket is replaced. The ring is installed on the resonator flange. The main muffler pipes are connected, and the flanges are screwed together using a clamp that has spring-loaded bolts that come in one set with a gasket.
It is necessary to replace it in the event of a breakdown, because otherwise the car interior will be filled with fumes. Also, if a malfunction occurs, carbon deposits will begin to form under the very bottom, which will be very difficult to eliminate.
conclusions
Replacing the exhaust manifold gasket on a VAZ-2114 engine is quite difficult and not easy, which can become a whole challenge for many novice motorists. But if you follow the instructions, everything will work out. Well, if you can’t do it, then go directly to a car service center. Particular attention should be paid to the quality of the product so that you do not have to change the part after several thousand kilometers.
sucks air into the engine cylinders, a suction sound is heard from under the hood; exhaust gases escape under the hood.
the seals of the intake pipeline (manifold) are worn out; The exhaust manifold seal is worn.
a set of wrenches, a set of sockets, a set of screwdrivers.
1. Place the car on an inspection hole or overpass.
2. Drain the engine cooling system.
3. Disconnect the exhaust manifold and the exhaust pipe.
4. Remove the air filter housing from the vehicle.
5. Disconnect the choke drive rod from the carburetor, and then disconnect the throttle drive cross rod from it.
6. Remove the battery. This operation is optional, but is recommended to improve access to other parts and fasteners.
7. Using a 13mm socket wrench, unscrew the bottom nut securing the air intake.
8. Using a 13mm socket wrench, unscrew the top nut securing the air intake, and then remove it from the vehicle.
9. Unscrew the top nut securing the starter heat shield.
10. Using a 13mm socket wrench, unscrew the eyelet mounting nut and then remove it.
11. Using a 13mm socket wrench, unscrew the nut securing the ground wire, and then remove this wire from the stud (for better clarity, the timing chain tensioner has been removed).
12. Using a 10mm wrench, unscrew the two nuts securing the coolant supply tube to the coolant pump, and then disconnect the tube. During reinstallation, replace the seal gasket for this connection with a new one.
13. Using a 13mm socket wrench and extension, remove the seven nuts securing the intake manifold to the exhaust manifold. Please note that under the joint mounting nuts of the intake and exhaust manifolds there are washers that are slightly thicker than others (the attached photo shows the mounting points for the intake manifold and exhaust manifold).
14. Disconnect the intake manifold from the engine cylinder head by removing the first from the studs on the second. After this, move the collector to the side.
15. Remove the exhaust manifold from the engine head studs.
A good driver must maintain his car efficiently and in a timely manner, but at the same time always be prepared for the unexpected. Indeed, it is very difficult to control the condition of all the components, parts and gaskets of the machine, which at any moment can fail and stop performing their functions. Thus, one of the most unpleasant “surprises” for car enthusiasts is damage to the exhaust manifold gasket.
Which gaskets are best to use?
Quite often, a muffler exhaust pipe flange gasket is used for replacement, which is responsible for sealing the connection between the exhaust pipe of a car exhaust system and the exhaust manifold. This gasket is usually used on cars that have a receiving pipe mounted at two points (Volga third series, GAZ-21).
However, you can make your own pant liner. It is recommended to use the following materials:
Also, many motorists advise using automotive sealant that can withstand high temperatures. The technology for using it is quite simple: a thin layer (about one millimeter thick) is applied to the muffler in the seat, and then left to dry for twelve hours.
Most drivers prefer to use paronite to create a gasket. The creation process is as follows:
- First, a square-shaped piece of material is cut out, the old gasket is placed on it and placed on superglue.
- Then a marker is drawn along the entire contour. It is also necessary to circle all the holes located inside the product.
- The old gasket is removed, and then all the glue is removed.
- Next, the correct hole ratio is checked. If a discrepancy occurs, the product must be refined using a file.
There is an easier way:
- The surface on which the gasket will be present is cleaned and degreased;
- The gasket material is applied.
- Next, the product is hammered around the entire perimeter with a hammer.
- The gasket will gradually become visible, and the unnecessary part of the material will fall behind.
Ultimately, the finished gasket is modified using a round file and sandpaper, and then can be used for its intended purpose.
Source
Exhaust manifold functions
It consists of several pipes that merge into one, but has different mountings and configurations for different engines. To produce VC, high-carbon cast iron, stainless steel and titanium are used, sometimes coated with ceramic/chrome.
The task of the “spider” (as the exhaust manifold is called in the Russian Federation) is to transfer combustion products collected from all cylinders to the exhaust pipe. Gases from the AC enter the catalyst or directly into the exhaust pipe and then to the muffler. The exhaust manifold is attached to the engine, or more precisely to the cylinder head (cylinder head), sealing the joint using a special element.
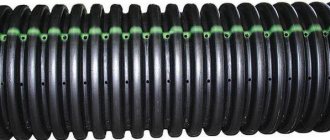
Replacing the vibration compensator (corrugation)
The exhaust pipe, like the muffler as a whole, contrary to popular belief, does not fail very often. In most cases of device malfunction, the problem lies in the vibration compensator, in the breakdown of the corrugation. The consequences can only be eliminated by installing a new corrugation.
Replacing the vibration compensator (corrugation) is required much more often than repairing the exhaust pipe
There are two types of corrugations, differing in operating principles:
The corrugation is replaced in the following sequence:
It is customary to replace the receiving pipe if the device fails; the concept of a warranty period is not applicable to it due to the unpredictability of operating conditions.