Dimensions and materials of forging tongs
This device, which can be used to hold a workpiece during blacksmith work, is quite simple to implement.
Ticks consist of two separate elements - castor beans, which are movably fastened together. A rivet or bolt with a nut is used as an axis between them. The main thing is that such a connection should not create obstacles in work.
Each castor bean consists of three parts: a sponge, a middle part with a hole for the connection and a handle of the required length. Depending on the shape and purpose of the jaws, pliers are longitudinal, transverse and special.
Pliers are, in fact, an extension of the craftsman’s hand, so they must provide reliable grip and hold of the workpiece, be a little springy, and the jaws fit tightly to the part.
Often, part of the holder is heated to ensure a secure grip. Therefore, the sponges must be made of a fairly heat-resistant material.
In general, the length of blacksmith pliers can vary from 300 to 1500 millimeters, depending on the purpose of the work.
Different types of pliers for different workpieces
Both homemade and purchased versions of the tool should have these properties and parameters.
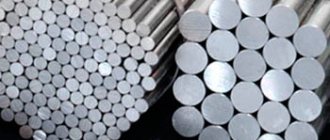
The material for the manufacture of forging tongs can be steel grades 15, 20, 25. They have the necessary qualities for the manufacture of such a tool. Also, some experts recommend using reinforcing steel grades. The material has excellent properties: resistance to deformation, ductility and good heat-resistant properties. In addition, reinforcement is a common rolled metal product and has a variety of cross-sections. This is convenient for making pliers of various sizes, from the smallest to a fairly large two-handed tool.
The main thing is that the reinforcement is not susceptible to hardening. After all, constant heating and cooling during operation will lead to the forging tongs becoming fragile and breaking very quickly.
Do-it-yourself blacksmith pliers are made as follows.
Other blacksmith tools for forging, application, photo, homemade
Pliers, sometimes called tongs, are two castor beans connected by a rivet , which acts as an axis. The castor bean has a main, working part, which is called a sponge, a middle part with a hole for the rivet axle, and the longest part - a handle.
Forging longitudinal-transverse tongs. Photo ForgingPRO
Tools based on the shape of the jaws are divided into special, longitudinal and transverse . They serve the blacksmith as an extension of his hand, and therefore they must be comfortable and light, the handles must be springy, and the jaws must tightly grip the forging.
For more reliable fixation of the forging during operation, the handles of the pliers are tightened with a ring called a spandrel. In addition, in order for the tool to hold the forging tightly, the jaws must first be heated in the forge, clamp the forging with them, and then press the jaws with a handbrake.
In addition to tongs for hot forging of metal, other tools are used to carry out certain processing operations:
- sledgehammers and hammer, anvil - for deforming hot workpieces by striking;
Forging hammer with offset center. Photo ForgingPRO
- vice – reliable fastening of workpieces for bending, cutting, etc.;
Forge vice. Photo ForgingPRO
- manual and stand forks - for bending metal;
Hand forged fork. Photo ForgingPRO
- chisel - for chopping metal;
Blacksmith chisel. Photo ForgingPRO
- nail shop - for making heads for bolts, nails, rivets and other parts of a similar type.
Manual blacksmith nailer. Photo ForgingPRO
The listed tools and devices are also quite easy to make with your own hands.
Recommendations for choosing the right tool
Forging hammers
In order for pliers or any other tool of a similar purpose to be effective in use, you should be very careful when choosing such devices. The first thing you need to decide on when choosing pliers, pliers or pliers is the technical tasks for which such tools are needed.
The main criteria when choosing a tool: length, grip size and workmanship
To ensure high strength and, accordingly, reliability and durability, high-quality clamping devices are made from tool steel. At the same time, the working jaws of such devices, which experience the greatest mechanical loads during use, are additionally subjected to hardening. To protect the metal surface of the tool from the formation and development of corrosion, a special protective composition is used.
For ease of use, the handles of high-quality models of pliers and pliers are coated with a rubber or polymer compound. This coating not only prevents the tool from slipping out of the user's hands, but also protects against electric shock.
Pliers with anti-slip handles
Adjustable dielectric pliers
Tool size is another important parameter that those who purchase pliers should pay attention to. It is necessary to take into account the characteristics of the parts and workpieces for which the tool will be used.
So, if pliers are needed for cables of small diameter, it is better to choose more compact models of such devices, and for manipulating plumbing pipes you should purchase larger clamping devices.
Pliers
How to make holes for furniture hinges
Pliers are a type of pliers that have a flat working surface. Often it is equipped with small notches. They are designed to grip and hold relatively small parts. For ease of working with parts, two such tools are sometimes used at once. They can have various shapes of working surfaces, which is why they got their name: long-nose pliers, duck-billed pliers, narrow-nose pliers. Often, pliers are equipped with cutting edges designed for cutting wire.
Combination pliers are also called pliers. Such tools include pliers equipped with a cutting edge for cutting nails and wire, and serrated grooves designed to hold tubes, nuts and other cylindrical parts.
How to make blacksmith's tongs
Pliers are an extension of the craftsman's hand; they should provide reliable grip and hold of the workpiece, be a little springy, and the jaws should adhere to the part.
Blacksmith pliers are classified as auxiliary tools. Their purpose is to manipulate heated workpieces during operation. Any master should have several types of such devices that are convenient to work with.
How to make such a tool yourself and what you need to know about blacksmith pliers is further in our article.
Manufacturing of forging holders
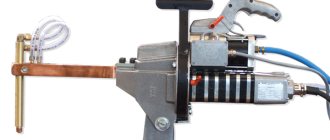
Spot welding pliers
The algorithm for producing a forging device is as follows.
- To make pliers, take a piece of 25 mm reinforcement and heat it to forging temperature.
- At a distance of approximately 350 millimeters from the edge, the circular section is pulled onto a square with sides of 20 mm.
- Having retreated part of the square by 50 mm, press it into the depth of the workpiece 8-10 millimeters.
- The next step is to cut the remaining 300 mm square into a strip, which, in turn, is formed into the handle of the future tool. Their length is about 500 mm.
- Now the finished piece for the pliers is cut off from the rest of the piece of reinforcement.
- After heating, the end of the remaining square is pressed into sponges of the desired shape.
- The second half of the forging tongs is made in the same way.
- To connect them, you need to fold them together, stitch them, or better yet, drill a hole for the fastening rivet.
Step-by-step process of making castor beans from reinforcement.
The halves are connected into a single tool. To obtain the sponges of the desired shape, they are heated and forged into a mandrel.
How to make such a blacksmith tool will become clear after watching the video presented.
For the manufacture of smaller or, conversely, larger forging tongs, they take reinforcement or a workpiece of the appropriate diameter.
Historical perspective
Initially, as a tool, pliers were intended to remove hot metal blanks and crucibles of molten metal from forges. They were also used by blacksmiths to hold various workpieces during forging.
Archaeologists prove that the prototype of pliers - tongs, which had a rod-axis - was invented back in the Neolithic era. Back then this instrument was made from burnt wood.
The first depiction of hand pliers tools dates back to the 6th-5th centuries BC. In the Bronze Age, blacksmiths used primitive pliers as clamps. They are currently found in the burials of blacksmiths as burial goods, indicating that the deceased had a special and fairly high social status.
Since ancient times, pliers have been two castor beans connected by a rivet that acts as an axis. This tool has been evidence of specialized blacksmithing skills since ancient times. Together with the anvil and hammer, pliers were an attribute of numerous ancient Greek and Roman blacksmith gods and lords of thunder (Thor, Vulcan, Hephaestus, etc.).
Much later, pliers began to be used in construction work, in plumbing activities, widely used in electrical work, etc. Depending on the specialization and principle of the device, various pliers are called side cutters, pliers, wire cutters, pliers, etc.
My DIYs #55: Blacksmith pliers from old pliers
Good health friends.
And so, taking my old pliers in my hand, I began to think. This sometimes happens to me, although it’s extremely rare, but I can think.
I thought for a long time, drank coffee and thought again.
In the end, I came up with the idea that old pliers can be reforged.
He lit the forge, threw them into the coals and began to flatten the metal, as it came out and flattened it.
I pulled out the arms and lips for the new pliers. Then he put everything together and riveted it.
Then I saw that why were they crooked, just like my teeth? He heated it up again and began to level it, it was tedious for a long time, but it seemed a little more even than steel.
Then I took the petal circle to the grinder and cleaned what, in my opinion, should have been cleaned. At the end, I hardened it in oil (working off) and started testing.
What I can say in the end is that it turned out crooked and weird, but it’s unique and it works.
What do you think? Did I break a good tool that was not used or did I give it a second life and give it the opportunity to work again?
Thank you for watching.
Possible duplicates found
Handicrafts
27.6K post 43.6K followers
Community Rules
Trading, price discussion, links to sales pages, and author’s contacts in comments are prohibited in the community. Information about materials and tools in text form is required.
1. Be polite, try to write correctly.
2. Use clear and beautiful photographs in your publications.
3. The author of a post with the tag [my] can leave a link to his profile, group or channel on other sources, provided that the links ( active and inactive
) do not lead to direct sales. No more than four links are allowed and only at the end of the post (clause 8.5 of the basic rules).
-advertising/spam links;
-links leading to stores indicating the cost of the product/service;
-links leading to calls, purchases, sales, subscriptions, reposts, voting and the like.
(violation of the basic rules of the site, clause 8.1 and clause 8.2).
Alternative Tool Options
To convert it into a blacksmith's tool, you can take nail pullers or old pliers.
In the first option, they need to be remade, since the grip of this tool is too curved for comfortable clamping of nail heads.
To do this, you need to disassemble them into two separate parts and, by heating the ends of the clamp, disperse it into a flat shape. You can also simply weld jaws made from a strip of metal to the clamp.
For normal and comfortable operation, you will need to lengthen the handles. This can be done by welding pieces of pipes or fittings onto the existing handles.
Then you need to assemble the tool.
Pliers can also be adapted for blacksmith tools. To do this, they increase the length of the handles. However, such a tool is suitable when working with small forgings, because the area of the jaws will not provide reliable grip and hold of a large part.
It is possible to replace real pliers for the first time. However, it is better to get a normal tool later. The metal of pliers and forceps is hardened and working under high temperatures will cause them to become brittle and break very quickly. In addition, without a professional device it will be very difficult to work, because such a tool is intended to perform other, and not unusual, functions. And pliers have a very small gripping area, which will make it much more difficult to hold forged parts.
Forging forge tongs steel 40x
Hello, dear friends, a year ago, quite by accident, I came into the hands of a forge like a soldier’s portable one. It was in a terrible state for about a month of work, but it was restored, started up, forged the first knife, and so it is still forging in my free time. One day, on occasion, I bought factory-made blacksmith bells and used them; there were no others. Just recently I came across a video about forging blacksmith tongs and I learned that there are many types of pliers for different jobs. In general, believing in myself, I decided to forge myself pliers with narrow curved lips. Since my pliers are mainly for holding bars of squares, well, since I mainly forge knives with my pliers, the blade flies off when held by the shank, especially when forging the tip of the tip, it flew off a couple of times near the ear, flew by. Having selected the approximate recommended shape of the pliers, I decided to forge them to my own size. After searching a little on the net, I looked for what kind of steel to forge from. Most pliers are forged from spring steel or from a spring. Automotive springs make pliers strong and shock-resistant, and springs can be found anywhere. When time appeared, I went to a friend’s house and bought two 12 mm rods, 50 cm long, steel according to documents from the 40s, a friend said that this steel is for pliers like butter for bread. Having waited for free time, I started forging pliers. Here is a photo of old ticks.
You will need a tool
- Drill
- Bulgarian
- Forge
- Hammer
- Grinder
- Anvil
Materials needed
- Two rods 50 cm
- Bolt with washer and nut
- Grinder feed
Preparation and forging
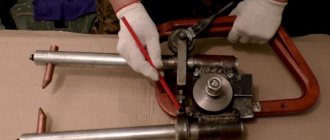
I brought the rods with the lady, lit the forge while I was warming up, and touched the elastic rods, which is what I need. The forge reached operating temperature and began forging. He heated the rods and let them cool after they had completely cooled down to begin forging. Mostly they start forging from the place where the pincers overlap, but I always do it the other way around and that’s why I started forging from the lips. I heat the tip of the rod and begin to flatten it evenly, giving it splashed edges on one side. Next, I bend it again and when the thickness reaches 3 mm, I place it on the edge of the anvil and bend it so that the length of the lip is equal on all sides, 4 cm, and the width inside the lip is 5 mm, which is what I need. Then I heat it, stepping back 3 cm from the lip, forge the rod into a square, then put it on the horn of the anvil and give the rod a slight rounding, the bending height is 1.5 cm. I heat it again, stepping back another 4 cm and placing it on the edge, I forge it by adding a hammer to make it smoother. That's all, I forged the ivy on one side, the thickness is 3 mm, well, it looks like everything is ready, the total length is 45 cm, having forged one, I started forging the second handle. The second handle is forged in exactly the same way as the first, only the place where the two handles join is dug from the opposite side on the wrong side. That's all, I basically join everything together and bend it where necessary so that the lips connect tightly. With forging done, I start grinding and hardening.
Grinding
After forging, I start sanding all the excess. I grind and cut the beginning with a grinder, and then I finish everything on the Grinder; the metal after forging is soft; the tape greedily eats. First of all, I sand the appearance of rust and scale. Then I grind the place where the handles are joined, and then I use a file to give the required gap of the jaws and the shape of the jaws; the final width of the jaws is 5 mm. That's it, I've sanded everything, now I mark where the hole should be, mark it, and drill a hole 8 mm. Next, I take a bolt with a nut and a washer, tighten it so that everything fits tightly, heat the bolt and flare it with a hammer. I lubricate it with WD40 and rub it in so that the pliers open freely with one hand. If you tighten it loosely and flare it, the pliers will rub in and become loose in places of unevenness, but if you tighten it and then flare it and rub it in, the pliers won’t hang out for a long time. That's all, everything seems to be fine and it works, just grind it in a little crooked in places, but it's not scary. Once again, before hardening, I'll heat it up and straighten it to fit where needed. Here is a photo after grinding, then I harden the pliers and polish them again to a shine; I won’t grind them because I don’t see the point, it will rust anyway, I’ll just remove the scale and everything will come off anyway, the main thing is that they are comfortable and durable.
Hardening
Hardening of the pliers is necessary so that the handles of the pliers are elastic like a spring and not very fragile, since fragile pliers will burst, and soft ones will bend during forging. I harden it in oil, heat the pliers in the forge until they stop being magnetic, hold them for another 30 seconds and dip them in heated oil up to 50°C, dip the pliers until the metal stops screaming in the oil. I harden only part of the pliers where the handles cross; the handles are already hardened, so I don’t harden them. That’s all the hardening is done, I turn off the forge and leave it to cool with the tongs since I always used a furnace for tempering, but it’s small for the tongs, but in the forge tempering also happens normally; I’ve already tempered forgings this way. After it has cooled completely, I sand everything down so that the appearance is more or less, and not black. I don’t polish it to a shine because 40x steel rusts, especially when working with pliers, I constantly cool the pliers in water, the most important thing is not to heat the metal too much, otherwise it may become soft and the handles will bend. Well, that's all with forging and grinding.
Become the author of the site, publish your own articles, descriptions of homemade products and pay for the text. Read more here.
Design features of adjustable pliers
Since adjustable pliers are the most versatile tool, it is worth getting to know their design features in more detail. Based on the type of mechanism used, adjustable pliers are divided into two categories of tools.
The adjustable mechanism can consist of an axis fixed to the movable jaw of the tool and a groove on a stationary clamping element, which is a series of aligned circles. On the axis, so that it can be moved along the groove and thereby adjust the degree of opening of the jaws, a sector is specially cut out. This adjustable mechanism works as follows: the axis for moving along the groove is rotated so that its bevel is parallel to the side of the cutout. Having positioned the axis in this way, the adjustable pliers are set to the required amount of jaw opening.
Pliers with grooves on the fixed part
More common are adjustable pliers, the jaw opening mechanism of which is made according to the so-called American system. On the fixed jaw of such pliers there is a number of circular grooves along which the “tide”, made on the movable handle of the tool, moves.
Circular groove pliers
To adjust the degree of opening of the pliers, you must perform the following steps:
- Remove the “tide” from its engagement with the side walls of the grooves.
- Place the mite lips as far apart as possible from each other.
- Place the tool handles in the required position and bring them together again.
Adjustable pliers equipped with a mechanism of the second type are considered more reliable and easier to use.
Many experts, when comparing adjustable plumbing pliers with conventional adjustable wrenches, emphasize that the former are easier to use and the required degree of opening of their working jaws is carried out more quickly. As a rule, adjustable pliers, equipped with adjustable mechanisms of both the first and second types, have about seven fixed positions of the clamping jaws.