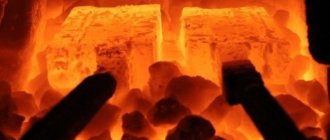
Chamber furnaces
This type of unit is used in the firing of ceramics, porcelain, in the preparation (heating) of metal blanks before forging, rolling, and various types of heat treatment. In this case, the products being processed are motionless.
They vary in design and are divided into vertical, bell-type, pit, bogie, heating well, and so on. The temperature inside the unit can be constant or gradually change, ensuring uniform heating (cooling) of the products. Gas, liquid fuel, or electricity can be used as a heat source. Electric power supply provides more even heating. The most widespread are chamber furnaces with a fixed hearth. They are installed in forge shops.
Why is hardening needed?
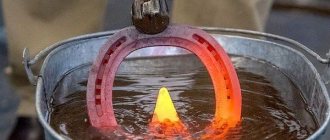
Hardening is the heating and subsequent cooling of a metal workpiece. After these processes, the crystal lattice of the material is reconstructed. Its strength and hardness indicators increase. At the same time, the ductility of the metal decreases.
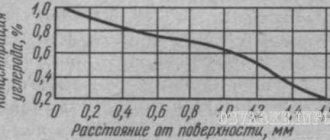
When heat treatment is completed, the finished metal product becomes hard and brittle because the surface layers of the metal are decarburized after heating in industrial ovens. The parts should not have a small allowance. Additionally, the surface of the workpiece can be protected using special gases that are introduced into the furnace chamber during heating.
Muffle furnaces
To prevent heated objects from coming into contact with fuel and combustion products, they are placed in a special compartment - a muffle. Such furnaces are called muffle furnaces. The muffle is made of fire-resistant materials; the air inside it is heated to a certain temperature, which is then maintained at a constant level.
Since their use does not require high temperatures, they usually operate from an electrical network. Such units have a wide range of uses: for firing ceramic products, in jewelry, chemical, medical production, and the food industry. They are equipped with replaceable muffle chambers for working with different materials.
Operating rules
It is important to know the scope of application and operating principle of the muffle furnace in order to avoid mistakes during operation. It is necessary to check all equipment connections. Leaks must not be allowed. Make sure that the oven body is not damaged. When working with hot metals, you need to wear protective gloves, goggles and a respirator. The workpieces are pulled out of the chamber using forging tongs.
A furnace for hardening metal is needed to give metal workpieces a high level of strength and hardness. You don't need to buy expensive equipment for this. You can make the oven yourself and without serious complications.
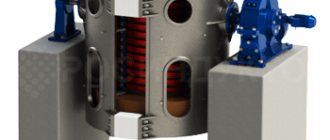
Muffle furnace SNOL
SNOL muffle furnaces are widely used for heat treatment (heating, hardening, calcination) of various materials and samples in research and industrial laboratories. Their volume can be different, depending on the purpose, starting from 1 liter, and the operating temperature can be in one of the ranges:
- moderate – 100-500°C;
- average – 400-900°C;
- high – 400-1400°C;
- ultra-high 400-2000°C.
They differ in the material from which their heating elements are made, it can be a high-quality alloy, silicon carbide heater or lanthanum chromium. The element may be partially or completely pressed. To make a muffle - working chamber, use:
- ceramics;
- fibrous material KTM;
- mullite-silica;
- corundum.
SNOL ovens are equipped with a digital microprocessor thermostat, which is used to regulate and control the temperature, which ensures the accuracy of the technological process. In this case, it is possible to set the duration of heating and holding time. Some models have additional features that allow for more complex programming.
A simple electric furnace for hardening steel and melting metals
List of materials:
— heat-resistant brick K23;
— heat-resistant oven sealant (1200°C); — power relay for turning on the spiral; — digital temperature controller; — high-temperature furnace sensor; - Kanthal wire 1.2 mm; — limit switch; — profile pipes; - sheet metal; - door hinges; - corner; - heat-resistant mesh or other finishing material; - heat-resistant paint. List of tools:
- grinder; - welding machine; - roulette; - reciprocating saw; - multimeter; - vice; - drill and more. Homemade manufacturing process:
Step one. Preparing slabs for furnace assembly
First of all, we need to assemble slabs from bricks, and from these slabs the stove will be assembled. K23 brick is lightweight, easy to cut and sand, and it can withstand high temperatures. The author easily glues the bricks together using a special heat-resistant glue that can withstand temperatures of 1200°C.
Finally, all that remains is to make grooves for the spiral. To make grooves, you can make a simple device; brick can be processed very easily, you need to try not to break it.
Step two. Winding the spiral
We are making a heating element for the furnace; the author decided to use 1.2 mm thick kanthal wire. The wire was wound onto the pipe using a screwdriver, and then the author stretched the resulting spring into a spiral.
Step three. Frame and door
We make sure to make a frame for the stove, since the brick itself is quite fragile. You will need a corner as a material; we weld the structure like the author’s in the photo. We make stable legs for the stove; you can use profile pipes.
Step four. Assembly
For aesthetic purposes, the stove can be painted with heat-resistant paint. If you paint the brick well, the paint will prevent the brick chips from falling off. The author decorated the stove with a heat-resistant mesh, everything looks good, the mesh will protect the brick from impacts and will not release large parts of the brick in case of cracking. Of course, it would be more practical to cover the entire oven with sheet metal.
We place the spiral in the groove inside the oven; it is advisable to fix it by grabbing it to the brick with wire. The author will place a limit switch on the door; it will turn on the oven only when it is closed.
On the control panel we also have a switch that will control the operation of the entire oven.
Step six. Tests
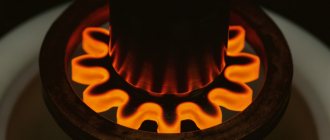
We turn on the oven; the author set the temperature to 800°C as a test. The furnace was able to reach this temperature in 19 minutes; this temperature is enough to harden some steels.
This completes the project, I hope you liked the homemade product and found useful thoughts for yourself. Good luck and creative inspiration if you decide to do this again. Don't forget to share your ideas and crafts with us!
Source
Become the author of the site, publish your own articles, descriptions of homemade products and pay for the text. Read more here.