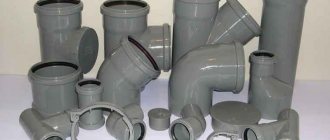
Advantages of plastic plumbing systems
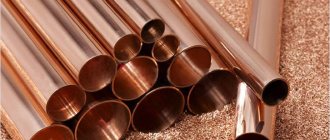
Not so long ago, all plumbing systems were made of metal pipes.
However, now this material has been replaced by metal-plastic, which has many advantages:
- ease of installation;
- resistance to various chemicals;
- environmental friendliness of the production process;
- ability to withstand high internal pressure;
- flexibility, which allows you to use fewer couplings;
- absence of corrosion and deposits on the inner surface of parts;
- long service life;
- low price.
But there are some disadvantages:
- high coefficient of expansion due to heat;
- metal-plastic is destroyed under the influence of ultraviolet radiation.
Choosing a docking method
The connection of metal-plastic pipes, as well as other types of polymer parts, is made using fittings. The assembly method depends on what type you purchased.
Let's look at each of them in more detail.
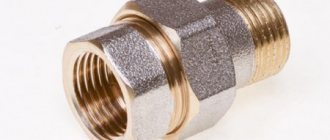
Method 1: Compression connections
In this case, connections for metal-plastic pipes are made using compression fittings made of brass. Another name for them is collet connection.
The advantage of this type of docking is that you do not need to purchase any additional tools or equipment to work. Two wrenches are enough to tighten the crimp nuts.
The fitting consists of three components:
- fitting;
- split ring;
- union nut.
Note! Connections of metal-plastic pipes using compression fittings are collapsible. If necessary, you can disassemble the plumbing system and reinstall it, making the necessary changes or additions.
Installation instructions are extremely simple:
- A piece of the required length is separated from the metal-plastic part. The workpiece must be straight at a distance of at least 10 centimeters from the cut.
- Cutting is carried out with special compression scissors or a hacksaw for metal. In the latter case, the edge will need to be cleaned of burrs. Remember that the cut must be made strictly at a right angle, otherwise achieving a hermetically sealed joint will be problematic.
- Then a nut is put on the end (its thread should be directed towards the cut) and an o-ring.
- After this, the end of the part is processed with a special tool - a reamer:
- the calibration side is used to remove the internal chamfer (to a distance of about 1 mm);
- the other side of the reamer removes the external chamfer.
- The fitting is inserted into the metal-plastic part, then a seal is put on it and the nut is screwed on. First the work is done manually, then with a wrench. Do not apply significant force to fasten, otherwise the material may be damaged.
Method 2. Connections using press fittings
This joining option is used for arranging water supply systems and heated floors. Such connectors for metal-plastic pipes are used in cases where the pipeline is walled up in a concrete wall or hidden under a screed on the floor.
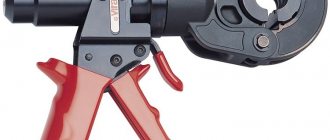
The joint turns out to be more reliable, but the installation itself requires certain skills from the master, as well as the presence of a special tool - press pliers.
The work is carried out in the following sequence:
- The end of a correctly cut pipe is processed using a reamer: the internal and external chamfers are removed.
- The calibrator checks the internal diameter of the part.
- Before installing the fitting, you must ensure that the dielectric gasket and O-rings are installed in it.
- A crimp coupling is put on the part, and a fitting with seals is inserted inside.
- Then using press jaws. Make sure that the installed nozzles match the diameter of the part on which the fitting is being installed.
Note! It is not recommended to repeatedly crimp a metal sleeve. It is advisable that everything works out the first time, otherwise leaks are possible, due to which you will have to re-install this unit.
There are varieties of press fittings with a rigidly fixed coupling. In this case, control of the fitting depth is carried out using a specially provided window.
Method 3. Docking using sliding couplings
The second and third methods of connecting metal-plastic pipes are similar, but in the latter case, in addition to pliers, an expander is used, which increases the internal diameter of the part used before installing the fitting there.
The connection is permanent, sealed and very reliable. Used for installation of underfloor heating systems, which are supposed to be filled with concrete mortar.
The work is done like this:
- The pipe is cut, after which a compression sleeve is put on it.
- The end of the metal-plastic part is expanded with an expander, then a fitting is inserted there.
- The coupling is crimped using a press.
- A reliable and durable connection is ready.
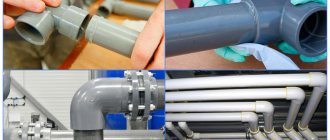
Connection of metal-plastic pipes
This is also done using fittings, but there is also one “trick” - welding or so-called soldering of LDPE and HDPE pipes. Its essence is the gluing of elements under the influence of high temperatures. With full compliance with the technology, the result is a connection that is almost eight times stronger than the surface of the pipes themselves.
But to carry it out, it is necessary to provide several conditions: sufficient free space in the area of installation of plastic pipes with your own hands, the same wall thickness and brand of both pipes, and, in addition, it has limitations in use: the mobility of one of the strands.
If such welding is not possible, electrofusion welding can be used. It is especially helpful in small areas where plastic pipes need to be welded. In addition, couplings make it possible to connect both thin-walled pipes and those with different wall thicknesses.
Connecting polymer pipes with metal ones
Sometimes it becomes necessary to join pipes made of different materials. For example, connect a local water supply system to the central metal water supply of an apartment building. In this case, you will need a compression fitting and gauge.
Note! It will not be possible to connect a plastic pipe to a metal pipe without threads. It is necessary to use only special parts designed for a specific pipeline diameter.
Installation is carried out as follows:
- Tow or a special sealing polymer tape is wound onto the threads of the metal part. The threaded part of the fitting is screwed onto it.
- The compression nut and sealing ring are pushed onto the metal-plastic part, after which the edges are chamfered.
- Then the plastic element is pushed onto the fitting, which is screwed to the metal part.
- The nut is clamped onto the fitting, sealing the connection.
When is it necessary to join dissimilar materials?
Connecting a piping system made of different materials may require:
- when you need to connect a new pipeline to an old line or riser;
- when replacing an area that has worn out;
- in the process of installing and connecting heated floors to an already operating heating system made of polypropylene;
- when installing mixed pipes from pipes of different materials (this is done to reduce costs).
In any case, for work you will need parts with the same type of connection on one of the sides (fittings). These parts are used in all types of work, ensuring the integrity and strength of structures, transition systems, bends and pipeline branches.
Pipe bending methods
In addition to joining, it is important to follow the correct technology for bending metal-plastic parts.
There are four different ways:
- Manually
. In this case, special care must be taken to ensure that a defect does not form at the bend point, which will lead to obstruction of the pipeline. - Using a spring
. This tool is sold in hardware stores. The spring is inserted inside, after which it is bent. - Using a hair dryer
. When exposed to hot air, metal-plastic bends more easily. But it should be handled carefully, otherwise there is a danger of melting the material. - Using a special pipe bender
. This is a professional tool that will help you bend a part of any size correctly and effortlessly.
How to connect metal-plastic and polypropylene
Sometimes a metal-plastic line needs to be connected to a polypropylene line. The latter, as a rule, connect boilers, washing machines, and geysers. This connection can be made using a special adapter coupling. As a rule, such parts are polypropylene on one side for connection to plastic pipes, and metal on the other side for connection to metal-plastic.
To connect polypropylene pipe products with a plastic fitting, welding or soldering will be required, while metal-plastic ones are simply screwed onto the metal thread of the shaped part.
Connection can be made using the following fittings:
- Plastic coupling adapter with internal metal thread;
- Plastic coupling adapter with external thread;
- Plastic tee adapter with internal thread;
- Plastic tee adapter with external thread;
- Plastic water socket (angle) with internal thread. Used as an adapter for connecting a mixer.
Plastic coupling adapter with internal metal thread
Conclusion
Joining polymer parts with each other, as well as connecting metal-plastic pipes with metal ones, is not a difficult, but responsible job. The tightness and durability of the water supply depends on the correctness of actions. You can learn more about this from the video in this article.
Polypropylene pipes or metal-plastic? Which material is more reliable, more practical for installation, and most importantly, more economical? In this article you will find detailed instructions on how to solder polypropylene pipes, what tools you will need for this, and how to generally install a water supply system with your own hands.
Features of pipe connection
Connection of metal-plastic pipes
Any pipes, including metal-plastic ones, are connected using fittings (rotary, splitters or for different diameters). The mechanism may be different, the only condition is that it is advisable to use press fittings only if the joint is difficult to access or when pipes are laid hidden. In other cases, it is better to have free access to the connection. Therefore, pipes are connected using collet, push or press fittings. The first option is specifically designed for connecting pipes made of different materials.
Connecting different types of pipes is necessary in the following cases:
- if you need to extend or add a new branch to the existing water supply;
- when replacing part of an old pipeline;
- when connecting “warm floors” to the heating system.
Polymer pipes are often added to old steel or cast iron pipes, since this material is much cheaper and easier to install. To make the connection reliable, special fittings for different materials are used.
Advantages and disadvantages of polypropylene water supply
It is immediately necessary to understand the question of which material to choose for the water supply system: polypropylene or metal-plastic.
There are heated debates about this among experts and each material has approximately the same number of supporters, but you should approach the issue as objectively as possible and understand all the nuances in detail, consider all the pros and cons:
- Reliability – this indicator for both materials is at a very high level. The service life of pipelines made of metal-plastic and polypropylene can reach from 70 to 100 years. Roughly speaking, the building will be dismantled sooner than the pipes will leak. Their main advantage is that they are not susceptible to corrosion and do not react with chemicals, are resistant to mechanical damage, and are plastic;
- Practicality - this criterion relates to a greater extent to the issue of installation. Here there is a slight advantage on the side of polypropylene pipes, since they are mounted by soldering. This is a more reliable method than threaded connections. They can develop leaks over time and it can take quite a long time to fix them immediately after installation, while even an inexperienced person will quickly master the technology of connecting plastic pipes by soldering. In addition, washers on fittings for metal-plastic pipes often require additional modification, which wastes time. Therefore, in terms of practicality, polypropylene pipes come out ahead;
- Economic feasibility - here the advantage is also on the side of polypropylene, since connecting fittings are much cheaper than for metal-plastic, where the price varies between 100-200 rubles
. The only plus is that there is no need to waste electricity and work at high temperatures, but this is not enough and polypropylene pipes are more economical.
After soldering the pipes, a monolithic plastic system is obtained
There is an opinion that it is much more convenient
, if it is necessary to make any changes to the design of the water supply system,
but this is not entirely true
. After a new elbow has been installed, a new outlet has been made, or other changes have been made, old fittings may remain, which remain dead weight and the owners justify being aimlessly in a suitcase with a tool “it will definitely come in handy.”
In fact, this is money that has turned into useless trash. At the same time, polypropylene compounds are carefully trimmed and discarded, as they cannot be reused. New elements of the water supply structure are quickly soldered and put into operation.
Instructions for making a press connection
This method is the most reliable and durable, the risk of leakage is minimal. The only difficulty, perhaps, is using press pliers for crimping. Each node will take approximately a few minutes, and the docking process itself consists of the following steps:
- The pipeline is cut to the required length.
- The free end is leveled with a calibrator.
- The crimp sleeve is put on.
- A fitting is inserted into the pipeline.
- Press pliers are used to crimp elements.
- A signal that the work has been completed is the appearance of characteristic rings on the coupling body.
Press connection of metal-plastic pipes
What you will need to install a water pipeline
Since polypropylene pipes have won comparison with metal-plastic pipes, the technology for working with them will be considered next. You need to start with a DIY soldering tool.
You need a little of it, but it is specific. This is an iron or soldering iron for soldering pipes and scissors for cutting them. Such a simple set can be bought at any construction hypermarket or store, or rented. The second option is somewhat more economical and will not be difficult to find. Often, small hardware stores located near your home provide the opportunity to rent soldering irons with a set of attachments for a very reasonable price. The same situation applies to scissors.
A small welding machine for pipes (iron) can be found in tool stores for a price of 2,000 rubles. This is more than enough for personal needs.
Attention! The set may contain a different number of nozzles; they differ in diameter (size).
Most used:
- 0.5 inches;
- 0.75 inches;
- 1 inch
The dimensions are stamped on the tips; you must pay attention to them before you start heating the soldering iron. The diameter of the installed pipe must match the diameter of the nozzle. Because Soldering is a one-time process, and it won’t be possible to fix it in the future; you need to make sure you have all the tools and attachments in advance.
Scissors are also a very important tool; they allow you to cut pipes evenly and quickly. If necessary, you can even cut them at a certain angle. No other cutting tool allows you to process polypropylene pipes with such precision and convenience.
Material calculation
This is very important, since correct calculation will save time, money, and nerves. There will be no need to additionally run to the store or, conversely, think about where to put the remaining material.
The calculation must begin with a careful study of old communications; it is advisable to draw their plan on a piece of paper. Then, using a tape measure, measure the length of the pipes from the riser to the mixer or from the well to the entrance to the house. If the water supply system will be installed for the first time, it is necessary to make marks at what level and the configuration of the passage of plastic pipes through the apartment or house and the diagram is redrawn on a piece of paper.
Now the dimensions of individual straight sections are transferred to the diagram, for example, from one elbow to the other, and bends are also marked; connecting fittings will be installed there; they can also be on straight sections of pipes, but in apartments corner connections are most often used. When supplying a private house, direct, conventional couplings are most often used. You also need to take into account adapters for metal and metal-plastic. Only when everything has been carefully measured and calculated can you go buy the material. It is always necessary to take it with a small margin, up to 10%
. During operation, some items may be lost or damaged.
Soldering technology for polypropylene pipes
It starts with careful preparation. It is necessary to choose a spacious place to install the soldering iron, so that nothing interferes with the delivery of pipes, couplings, and corners. This is also necessary to ensure safety, since in a cluttered room you can accidentally step on a soldering iron or knock it over, which will lead to a serious burn because the iron heats up to an impressive temperature.
Heating requires from 30 minutes to 1 hour, depending on the modification of the soldering iron. It's better to wait a little longer to ensure good soldering. Some iron models beep when they reach a certain temperature.
Now you can proceed directly to soldering the pipes. To do this, it is necessary to put a coupling on the nozzle, on the one hand, it sits on top of the outer one, on the other hand, a pipe, which heats up inside the nozzle. There is no need to be afraid to use force; polypropylene should completely cover the shoots. It is necessary to hold the pipe and coupling for some time, on average 5–20 seconds
(read the instructions for your iron)
.
This depends on the thickness of the pipe wall. After a certain amount of time, on average 8 seconds, the polypropylene elements are removed from the nozzle and connected to each other with a quick, clear movement. After this, it is necessary to hold the connected elements with force for 10 seconds. After another 4–5 minutes, the structural element will be completely ready for use. Soldering is essentially complete.
This is how the water supply system is gradually installed, after which the plastic pipes are attached to the walls using special latches; they must first be screwed before connecting the individual elements of the water supply system.
If there are hard-to-reach areas where pipes need to be soldered, it is better to hire an assistant for this. Thus, one person holds the soldering iron, the second heats and connects the pipes. This is relevant at the final stage of installation.
Don't start cleaning work right away
, if there is no experience in soldering pipes. It is recommended to buy a few tens of centimeters more pipe, as well as the cheapest fittings, and first understand how to solder polypropylene pipes most effectively, and then begin the main work with the iron.
Main mistakes when connecting polypropylene to metal-plastic
When joining different materials, it is not always possible to do everything well, especially for such different types of materials as polypropylene and metal. The most common mistakes are:
- Excessive forces during connection, as a result of which the internal cross-section narrows and the load on the joint increases;
- loose connection, which can lead to leaks and destruction of other joints as a result of pressure surges;
- absence of sealant, tow, silicone.
The need to connect MP and PP pipes may arise in different situations, for example, during an urgent repair of a heating system or plumbing. However, sometimes you need to do this in cramped conditions. Therefore, it is worth understanding the connection methods in advance.
Connection of polypropylene pipes with metal-plastic pipes
What to do if you need to connect polypropylene pipes with metal or metal-plastic ones? There are special adapters for this. On the one hand, they are attached to metal or other material using a threaded connection, on the other hand, plastic is soldered to them using standard technology.
The only difference is that you need to cut a thread on the metal and seal the connection with your own hands to prevent leakage. The best material for this is good old tow, also called sanitary flax fiber. This is a cheap, affordable, effective sealant.
Fittings with transition to thread or metal-plastic pipe
Using the same technology, adapters are installed, which will serve as the basis for connecting mixers. They look as if metal threads are fused into polypropylene.
Checking for leaks
When the water supply is installed, you can begin checking the quality of work. This is done by supplying water. The valve for the apartment or house opens, after which the faucet taps in the bathroom in the kitchen open. Must be given full load
, maximum pressure.
First of all, you should feel the joints, special attention should be paid to threaded connections. Soldered joints rarely leak if the technology has been followed. But this still happens, especially in places where it was inconvenient to connect plastic pipes. In this case, the water is shut off, and the area with the leak is redone - cut off and installed in a new way.
Before soldering, be sure to wipe the pipes dry, otherwise you can break the soldering iron and not achieve high-quality heating of the polypropylene.
If a threaded connection is leaking, you can try to tighten it with a wrench, just so as not to strip the thread. Another way out is to strengthen the seal, but to do this it is necessary to shut off the water and disassemble and unscrew the connection.
Calculate the cost of your renovation! For free!
By filling out the form and clicking the “Continue” button, our specialists will calculate the approximate cost of the work and, if you need it, they will suggest good specialists.
Calculate the cost of your renovation! For free!
By filling out the form and clicking the “Compare prices” button, our specialists will calculate the approximate cost of the work and, if you need it, they will suggest good specialists.
New technologies have long been firmly established in our homes. With the advent of polypropylene pipes, the master no longer needs bulky equipment to install the pipeline. In addition, the easy connection of polypropylene pipes with metal pipes makes it possible to use this material everywhere.
In this article we will talk about some of the advantages and subtleties of installation.
Photos of polypropylene products.
Features of installation of polypropylene pipes
Installation of additional equipment
When installing polypropylene pipes, it is necessary to take into account the thermal expansion factor
This is important for heating systems and hot water pipes. To do this, it is necessary to install expansion joints on propylene pipes
Main functions of compensators:
- Absorption of temperature changes and strong pressure surges in the heating and water supply systems.
- Maintaining the integrity of the entire system.
- Increasing the reliability of plastic pipelines.
You can also distinguish expansion joints by the material from which they are made.
You can use metal compensators, they are:
- axial bellows compensators KSO;
- bellows compensators surge arresters;
- shear compensators (KSС);
- rotary compensators (KSP);
- universal compensators (KSU).
Universal expansion joints are usually installed on small structures.
There are devices with a flexible connection made of elastic materials. The most commonly used are U- and L-shaped structures, as well as loop-shaped compensators and “snakes”.
Compensators: loop-shaped (left) and U-shaped (right)
Threaded connection with metal pipes (American)
Connecting plastic pipes using the threaded method does not provide great joint strength. In this case, greater tightness is achieved by welding elements of this design. If it is impossible to avoid a threaded connection for some reason, then American ones for polypropylene pipes are quite suitable.
This is a special detachable combination fitting, which has a metal thread on one side and a polypropylene base on the other. On one side it will be screwed to metal, and on the other it will be welded to plastic.
American women can be used several times
Why are such designs good?
In a relatively short period of time, this technology has firmly taken a leading position in the installation of domestic water pipelines.
Compared to metal and other types of plastic, polypropylene has a significant advantage.
Polypropylene in the heating system.
- Installation of this type of structure is characterized by accessibility and ease of execution. The technological instructions allow you to assemble these lines with basic knowledge and skills.
- As you know, any metal is susceptible to corrosion to one degree or another; plastic does not have this serious drawback. In this case, the warranty period can reach 50–70 years or more.
- These communications do not grow from within. Salts and alkalis do not settle on polypropylene, which is very important for modern water supply networks.
- This material can be used both in the water supply system and in the heating system.
- The price of polypropylene is an order of magnitude lower than that of metal, which results in a fairly low cost of construction.
Fittings for polyethylene pipes.
Connecting segments in a section.
Types of material
There is a fairly wide range of this product on the market. The main criteria when choosing a brand are heat resistance and ability to withstand pressure.
The most common types are:
- PN-10
– can withstand up to 10 atm, at temperatures up to 45ºС. More suitable for cold water pipes; sometimes underfloor heating can be used in the system. - PN-16
– can be used for both warm and cold water. At a temperature of 60ºС, they work stably under a pressure of 16 atm. - PN-20
- are a fairly common product, often used for the installation of hot water pipelines as they can withstand up to 95ºС and up to 20 atm. - PN-25
– designed for pressure of 25 atm and temperature up to 95ºС. The walls of these pipes have internal reinforcement and can be used for the installation of central heating and high-pressure systems.
Scissors for cutting pipes.
Important: before installing the PN-25 pipe, you should clean its edge from aluminum foil; for this, use a special “shaver” tool. Otherwise, you will not be able to fit the parts together.
Installation subtleties
When the brand of pipe for the pipeline has already been selected, it will not be superfluous to decide on the type of connection. This choice depends more on the availability of a specialized tool.
Two words about connection types
Soldering is rightfully considered the most reliable type of connection. It is customary to connect polypropylene pipes with a diameter of up to 63 mm through polypropylene couplings. The parts are soldered using a special soldering iron, which comes with a set of nozzles for different diameters.
Special adapters are also produced with the help of which a metal pipe is connected to a polypropylene pipe or a polypropylene pipe is connected to a metal-plastic pipe.
Cold crimping of pipes.
Important: soldering of large diameter pipes is carried out end-to-end without the use of adapter couplings. But in this way, pipes with a wall thickness of more than 4 mm and a diameter of at least 50 mm are spliced. Plus you need a special soldering iron for this.
The question is often asked: is it possible to connect polypropylene water pipes without welding? Such a connection is possible, but only on cold, non-pressure systems. This is done using compression fittings; in addition, the connection is additionally glued with a special compound.
Important points when welding
Advice: the price of a professional soldering iron is quite high; if you are not going to work with it constantly, then it is better to buy a small “amateur” unit that has several working attachments or rent it. This will not change the quality of the connection.
Minimum set of tools for soldering.
Each soldering iron comes with a stable stand. Professionals make most connections with the soldering iron in a stationary position. The tool heats up in 10 – 15 minutes. The connecting nozzle consists of 2 parts, this is a sleeve into which the pipe is inserted and a drone on which the coupling is heated.
Initially, the nozzle parts are installed on a cold soldering iron and only after that, it is turned on from the mains. You can work after the indicators go out, on the second heating cycle. The heating time depends on the diameter, wall thickness and type of pipe. As a rule, the soldering iron comes with a table that lists all these values.
The soldering process itself is not very difficult. The pipe and coupling are put on the corresponding nozzles and held for a specified time. After this, you need to quickly remove the parts from the nozzles and connect them until they stop.
Important: when connecting, the parts do not need to be rotated or bent; they should fit tightly and evenly. When the pipe is pushed all the way, the connection should be fixed in a stationary static position for a few seconds. The system can be put under pressure after soldering within 15–20 minutes.
Mounting the system on weight is somewhat more difficult. This requires some experience. When installing in difficult conditions, it is advisable to involve an assistant.
The whole difficulty lies in holding still the heating of the pipe and coupling, and then connecting and fixing them.
The video in this article clearly shows the intricacies of welding.
Methods for joining polypropylene pipes
If the task is to equip heating with small-diameter plastic pipes (up to 63 mm), in practice there are two ways to connect such pipes:
- socket welding - in this case, one pre-expanded end of the pipe is placed into the other;
- sleeve welding - here the ends of two elements are connected to each other using a sleeve.
In the case of joining pipes with a large diameter (from 63 mm), they resort to butt welding. This installation method does not require additional connecting elements, maintaining an excellent degree of pipe fixation. You can also use fittings of suitable size (socket welding). If there are pipes with a diameter of 40 mm, it is more convenient to use manual welding, but larger elements are usually joined using a special apparatus that pre-aligns them.
Immediately before starting installation of the heating system, it is worth once again carefully considering the entire process of assembling the pipeline. This will allow you to avoid unwanted nuances during operation that affect the final quality of the heating system assembly.
Scheme of the process of connecting polypropylene pipes
Here we will outline the main nuances of how to connect plastic heating pipes:
- The optimal heating time for a soldering iron is 5 seconds.
- The recommended melting temperature of polypropylene is 270°C. This parameter can be achieved using a special toggle switch installed on the welding machine.
- It should be noted that the technology for joining heating system pipes will vary depending on the location and time of year. So, during periods of sub-zero temperatures or when installing a heating structure outdoors, the heating time of the soldering iron pipe should be slightly increased or the temperature raised for melting polypropylene products.
- In the case of joining pipes of larger diameter, the melting time of the material will also increase slightly.
- The recommended time for fixing large-diameter elements to each other after heating is 30 seconds or more.
Next, it is necessary to consider in detail the technology of soldering polypropylene pipes:
- After reaching the required temperature, the connecting parts (coupling, pipe) are simultaneously put on the soldering iron nozzles for polypropylene pipes - for the external and internal dimensions of the cross-section of the pipes - and heated up.
- During the heating process, “flanges” are formed on the heating elements.
- As a result of the heating process, both parts are removed from the nozzles and docked with each other by uniformly gently pressing them on both sides towards each other and fixing them in this position. Any rotations or unnecessary movements when joining elements are unacceptable, as this may damage the resulting seam.
- The connected elements should be held for 30 seconds to ensure more reliable adhesion of the heating system parts. It must be added that the side must be even along the entire length of the connection.
After complete cooling, the connected parts are ready for use.
Welding process parameters
Conclusion
As you can see, connecting polypropylene pipes with your own hands does not require too much qualification. If you have a great desire, a soldering iron and materials, then this job is quite up to you.
Installation of the pipe (Fig. 10) is carried out using special compression-type brass fittings. These fittings consist of a fitting, a split ring and a union nut and provide reliable connection of pipes and fittings using a regular wrench. When the union nut is tightened, the press sleeve (O-shaped cut ring) is compressed on the pipe and a tightness is ensured between the fitting and the inner wall of the pipe.
Rice. 10. Connection of a metal-plastic pipe with a compression fitting
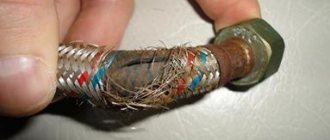
The main advantage of this connection is that no special equipment is required during installation, and if necessary, it is possible to dismantle any connection. Once assembled, the assembly can theoretically be disassembled and reassembled, but, as practice shows, it is better not to touch the connection. Therefore, in case of pipeline repair, you need to cut out the damaged part and insert a new one, connecting it with fittings. When connecting a pipe to a used fitting, the sealing gaskets on it must be replaced with new ones (Fig. 11).
Rice. 11. Gaskets on the fitting fitting
The pipe is cut perpendicular to the axis with a special pipe cutter for composite pipes, or, in extreme cases, a hacksaw with a fine tooth. Bend the pipe by hand or using a special spring - a pipe bender. Two types of springs are used: some are inserted inside the pipe (practically not used), others are put on top of the pipe. The minimum bending radius of a pipe without a spring is 5 outer diameters of the pipe being bent, with a spring - 3.5 diameters.
The Russian construction market contains almost all types of compression fittings produced in the world. Fundamentally, their designs are not much different from each other, but there is still a difference: manufacturers produce detachable and one-piece fittings (Fig. 12), but this is not the main thing. When purchasing pipes and fittings for them, manufactured in different places, you should make sure that they are compatible, since the outer diameters and wall thickness of pipes from different manufacturers, even for the same nominal pressure, may not match. In other words, it is better to buy fittings and pipes, if possible, from the same manufacturer.
Rice. 12. Diagrams of compression fitting connections from various manufacturers
When securing metal-plastic pipes, a minimum of clamps and clamps are required, since the pipes retain their shape well. The pipeline is installed using both a manifold and a tee installation scheme. When installing tee circuits (in the language of plumbers, this circuit is called a “comb”), the fittings can be connected sequentially to the pipe or you can first mount the pipeline and then cut the fittings into it (Fig. 13).
Rice. 13. Example of connecting a compression fitting marley.ru
The sequence of connecting metal-plastic pipes with compression fittings:
- Align the pipe, ensuring a straight section of at least 10 cm before and after the cut.
- Cut the pipe at a right angle according to the markings.
- Process the end of the pipe with a reamer, first with the calibration side, removing the lead-in chamfer of no more than 1 mm, then with the other side, no less than up to the mark, ensuring the correct rounded shape of the pipe.
- Place the union nut and split ring onto the pipe.
- Moisten the fitting.
- Place the pipe on the fitting so that the entire surface of the pipe end rests against the edge of the fitting. Screw the union nut by hand until it stops on the fitting. The nut should tighten easily; if this does not happen, it means you are not turning it according to the thread. Further forceful tightening of the nut will lead to damage to the thread and, as a result, to leakage of the connection and subsequent replacement of the fitting.
- Holding the fitting body with one wrench, use the other wrench to tighten the union nut 1–2.5 turns so that 1–2 threads remain visible. The use of wrenches with additional levers is unacceptable - do not apply excessive force or overtighten the nut.
To avoid fogging of pipes or to insulate them, special corrugated hoses, most often made of foamed polyethylene, are put on the pipes. If for some reason the corrugation was not installed, but the need for it arose, then it can be installed later. To do this, the corrugated pipe is cut lengthwise and placed on the pipe, after which it is secured with tape.
Figure 13 shows the installation of a tee fitting; in fact, the range of compression fittings is quite rich, it allows you to assemble a pipeline of almost any complexity.
| Nipple with internal thread (transition to pipe fittings) | Nipple with external thread (transition to pipe fittings) 16×1/2; 20×1/2; 20×3/4; 26×1; 32×1 | coupling 16; 20; 26; 32 |
| Elbow with internal thread (transition to pipe fittings) 16×1/2; 20×1/2; 20×3/4; 26×1; 32×1 | Elbow with external thread (transition to pipe fittings) 16×1/2; 20×1/2; 20×3/4; 26×1; 32×1 | Elbow (connection of two metal-plastic pipes) 16; 20; 26; 32 |
| Tee with internal thread (transition to pipe fittings) 16×1/2; 20×1/2; 20×3/4; 26×1; 32×1 | Tee with external thread (transition to pipe fittings) 16×1/2; 20×1/2; 20×3/4; 26×1; 32×1 | Tee with identical fittings 16; 20; 26; 32 Transition tee from 16–20–16 to 26–32–26 |
| 16; 20; 26; 32 | Elbow (water socket) 16×1/2; 20×1/2 | Double angle for fastening mixer and other appliances 16×1/2; 20×1/2 |
| 16; 18; 20; 26 | 16; 18; 20; 26 |
Fittings are marked according to two indicators: by the outer diameter of the metal-plastic pipe being connected and by the size of the thread with which the fitting is attached to a metal pipe, fitting, ball valve or other pipe fittings. For example, in the explanations to Figure 14 for a nipple with an internal thread there are numbers 16 × 1/2, indicating that a metal-plastic pipe with an outer diameter of 16 mm is attached to this fitting on one side, and pipe fittings with a 1/2 thread on the other side inches.
It is impossible to connect metal-plastic pipes by welding. For these purposes, fittings of various types are used:
crimp, press fittings, push fittings. The former provide ease of installation, the latter – reliability and resistance to various influences. Push fittings provide a number of benefits:
- Pipeline installation with a minimum of tools;
- Easy and quick installation;
- Not subject to corrosion;
- Items that have become unusable can be replaced;
- The seals are very reliable;
- The products are environmentally friendly.
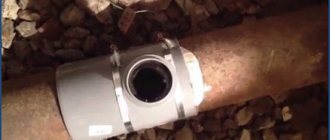
The advantages of this method: closed installation of the pipeline is allowed. That is, it can be hidden in the walls, filled with construction mixture (concrete). These fittings are very reliable. However, to install them you will need a special press tool. At the same time, the quality of the connections is very high; installation requires a minimum of parts. Therefore, such installation work is ultimately very economical.
To connect metal-plastic products and press fittings, you need: crimp couplings, a press tool, a metal cutting knife or a hacksaw.
The algorithm of actions is as follows:
- The required pipe size is determined and measured. Then the product is cut. The resulting concave edges are processed with a calibrator to avoid roughness, burrs, and deformations. A crimp sleeve is placed on the product;
- A fitting equipped with a rubber seal is inserted. The coupling is crimped using a special press tool. Ultimately, a pronounced ring should appear on the coupling. Keep in mind that you can only crimp a fitting once.
In stores you can find a wide variety of press fittings, including couplings already attached to the fitting. In this case, we act in accordance with the following instructions:
- The metal-plastic pipe is cut to the required size, calibrated, and the edges are processed.
- Then you should place it on the fitting fitting, controlling the tightness of the fit through special holes in the coupling.
This connection method is used when installing heating systems, water supply systems, and “warm floor” systems. The technology is quite simple. To better assimilate the information, we recommend that you watch the corresponding training video.
The advantages of this method: quick assembly, no need to use special equipment.
To implement this technology, you need: threaded fittings, metal cutting scissors or a hacksaw, a calibrator, a tape measure, a set of wrenches, and a knife necessary for stripping.
The algorithm of actions is as follows:
- A diagram of the location of metal-plastic pipes is drawn up indicating all sizes. As in the above technologies, the required length of the product is measured and cut, then its edges are processed using a calibrator;
- The clamping ring and nut are removed from the fitting, then they are put on the pipe, which is then put on the fitting fitting. The latter is aligned relative to the fitting fitting;
- We return the pressure ring to its previous position, tighten the nut manually at the very beginning, then with a wrench. You can tell that the nut is tightened by a specific cracking noise. The main thing is not to overdo it in tightening the nut, as there is a danger of stripping the thread.
These two pipeline elements, made of different materials, can only be connected to each other using a threaded connection. That is, from the side of the metal-plastic product there will be a nipple, and from the side of the polypropylene product - a combined coupling with the necessary thread. These pipeline elements cannot be soldered together. You will learn more detailed instructions by watching a special training video.
Connection with metal products
To implement this method, adapter fittings will be required. A thread is cut on the metal element of the pipeline, then the standard actions already described in the upper subsections are performed. Transitions from one diameter to another, branches, and turns are also made using special fittings.
This technology for metal products is appropriate for arranging an open water supply system. However, it is not recommended to use it if it is necessary to install heating systems and hidden metal pipeline systems.
How to connect pipeline elements to a tap?
On the shelves of specialized stores you can find the widest range of fittings: tee fittings, fittings with a thread size sufficient for connection to a tap, drain or other fittings. The corresponding fittings allow you to connect the pipeline elements and the tap. Such a wide variety of fittings makes it possible to assemble a pipeline of any degree of complexity.
We have described the main methods that tell you how to connect a pipe with various elements. The result of installation work depends solely on the level of your efforts and the quality of materials and tools.
Connection using press fittings
Corner press fitting on the pipeline
You can connect metal-plastic pipes with your own hands in several ways, one of them is the use of press fittings. This connection is reliable, but not separable. This is the method that experts recommend when laying hidden pipelines, since leakage at the connection point is almost impossible.
To carry out the work, you need a special tool - press pliers. It can be operated either manually or using electricity. You also need to stock up on special scissors for cutting pipes, a calibrator, a chamfer remover, and a straight fitting (if you need to connect pipes of different diameters or make a turn in the route, then other varieties are used).
Connecting metal-plastic pipes using press fittings
The sequence of work is as follows:
- Using scissors, cut the pipe to the required length.
- Then we process the end. First, use a calibrator to align the edges and chamfer the inside. Then we use a chamfer remover to process the outer side.
- We carefully inspect the fitting, especially the O-rings. If a defect is noticed, it is better to replace it. If everything is normal, then we put a crimp coupling on the pipe. Insert the fitting fitting into the pipe until it stops.
- Then, using press pliers, we compress the coupling. If you are using an electrical device, do not hold on to metal elements. In this case, it is best to carry out work with rubber gloves.
Connection leaking
The correctness of the work performed can be checked by the shape of the coupling; it should look like regular rings. In this case, repeated crimping cannot be carried out. Such actions can lead to the formation of cracks, which means possible leaks.
Non-separable compression fittings
Connections made using press fittings can last up to 50 years. At the same time, they can easily withstand high pressure. But, as already mentioned, such connections are not separable.