Choosing a location
Before starting work on arranging a latrine, you should carefully consider the question of where it will be located. First of all, you should maintain the distances that regulations require the restroom to be separated from various objects.
These distances are shown in the table:
| Object on site | Minimum permissible distance, m |
| House, basement, cellar | 12 |
| Well, borehole or natural water source | 25 |
| Bathhouse, separate shower | 8 |
| Shed for animals and birds, cowshed, etc. | 4 |
| Fruit trees | 4 |
| Border of the site, bushes | 1 |
The water source available on the site should be located above the place where the toilet will be - then it will not be polluted by the water flowing from its side. The direction of groundwater flow should also be taken into account, to identify which a special study is carried out. The latrine should be located downstream of the well or borehole.
All of the above applies to pit toilets. But you need to think about your neighbors in any case, that is, regardless of the type of restroom.
It won’t be very good if you build a structure near a neighbor’s barbecue or children’s sports equipment. You need to choose a corner without constant occupancy and install the cabin so that it is turned towards the neighbors with the back side, and not the door.
Types of toilet designs
According to their design, latrines are divided into the following types:
With cesspool
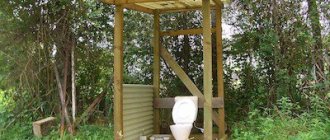
The most simple solution: a hole up to 2 m deep is dug, and a booth is installed on top of it. With this design, sewage will seep into the ground, which determines the high requirements for the location of these toilets.
Country toilet with cesspool
A toilet with a cesspool can only be built if the groundwater in the area does not rise above a depth of 2.5 m.
The filled pit must either be filled up after dismantling the cabin, or emptied using a sewage disposal machine.
Powder closet
In this option, waste is not dumped into a pit, but into a container located below. After each visit, they need to be sprinkled with a small amount of peat, ash or sawdust, that is, “powdered,” which explains the name of this structure.
The powder, firstly, prevents unpleasant odors from spreading, and secondly, it limits the supply of oxygen to the waste, as a result of which, after special biochemical processes, it can be used as fertilizer.
Powdered closet without a cesspool for a summer residence
Since the walls of the storage container are impenetrable, much less stringent requirements are imposed on the placement of the powder closet.
Even installation in a house is allowed, provided that it (the toilet) is properly equipped with ventilation. For the same reason, the minimum depth of groundwater (it constantly fluctuates throughout the year) does not matter.
There are different types of country toilets. A dry toilet for a summer residence can be liquid, chemical, electric, and so on. For an overview of options, see the article.
We will look at the types of electric toilets and their advantages here.
How to make a peat dry closet with your own hands, read in this topic. Pros and cons of such closets.
Backlash closet
This option also has a storage tank with impenetrable walls, but it is located away from the toilet and is connected to it by a waste pipe. To function, such a toilet requires a connection to the water supply, as it needs to be flushed. The contents of the container are pumped out as they are filled.
Usually, to accumulate wastewater, they use not just a container, but a septic tank - a structure in which wastewater goes through several stages of purification. As a result, the output is relatively clean water, which can be safely discharged into the ground. Thanks to the removal of water, the need to pump out the sediment remaining in the septic tank is less frequent.
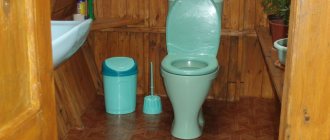
In this case, the toilet itself can also be placed in the house.
Dry toilet
This is the most expensive toilet option, but also the least troublesome. Usually produced ready-made, that is, the owner does not have to build a cabin. Waste does not fall into the ground, as it accumulates in a special container. At the same time, the problem of their disposal can be solved in different ways:
- using a special filler that needs to be changed periodically;
- using chemical reagents or special microorganisms;
- using electrical equipment: they are simply dried with a compressor (in composting dry closets), after which they can be used as fertilizers; or are burned by a heater for 40 – 70 minutes. (along with paper).
Liquid dry toilet for a summer residence
We will look at the most common option - a toilet with a cesspool.
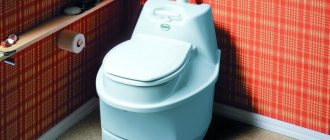
New – electric toilets
This is one of the newest developments by scientists advocating for the environmental friendliness, convenience and warmth of our plumbing rooms outside the city.
It is a device that separates waste into liquid and solid when sewage enters it. The liquid will then have to be discharged into the sewer, and solid waste will be compressed and placed in bricks in a container. Other models of electric toilets even burn such “presses” inside themselves.
Among the disadvantages are special installation conditions, the presence of sewerage, hoods in the toilet room, access to constant electricity and the cost of it, and the high cost of the equipment.
One person produces approximately 400 kg of liquid and 100 kg of solid “natural waste” per year. In the conditions of urban civilization, the question of what to do with this “wealth” has been resolved.
But what to do with it in a country house where there are no sewer pipes?
That is why in Russian villages, and even more so in dachas, wooden toilets with cesspools are still being built.
Many people who are building their own country houses wonder how to arrange it. And those who have them dream of exchanging their “houses of thoughtfulness” for something more modern. Some even try to arrange a toilet like in a city apartment with a toilet. But the drain pipe has to be led into a concrete feces storage facility, the so-called “rings”, buried on the site. And still, a sewer truck, once a year or more often, must come and clean this storage facility.
Recently, many new ways of constructing a country toilet have appeared. In any specialized store, a sales consultant will tell you in detail how toilets are arranged in the country, and will offer a dozen alternative options for a wooden “birdhouse” with a cesspool. At the same time, the variety of country toilets can be reduced to two main types - dry toilet and dry powder closet. Each of them has its own advantages and disadvantages.
What types of toilets are there in the country?
Country toilets can be divided into two large groups:
- with a cesspool;
- without a cesspool.
Each type of toilet has its pros and cons; in some cases there will be no other choice but to install a device without a cesspool. This may be due to the location of the site, as well as the proximity of groundwater.
Without cesspool
One type of toilet that is not equipped with a pit for collecting sewage is a powder closet. Its name hints at the fact that it does not use water for flushing. The absence of a pit does not mean that the toilet has no waste collection tank at all. It is located directly under the seat. Every time after visiting the toilet, the waste is covered with organic substances, such as peat. After processing, the output is a natural fertilizer that can be used in the garden. Most often, the design of such a toilet consists of two containers. One of them is smaller and fits in a larger container.
The smaller one is designed for collecting solid waste. Holes are made along the perimeter of its walls through which the liquid will flow into a large container. The latter makes a natural drain from the toilet into the ground using a hose. After filling the tank, it is taken to the compost heap, where it can acquire the required characteristics along with other waste. There are ready-made designs for such restrooms on sale. If you want to assemble the toilet yourself, then you need to think about a mechanism for removing the smaller container. This can be done directly in the toilet stall or provide a separate door, for example, in the back of the structure.
With cesspool
Pit latrines are the most common and easiest latrines to make. They imply the presence of a depression in the ground. The size of the pit under the latrine may vary depending on needs. To prevent the walls from crumbling, they are reinforced with bricks, filled with concrete, or simply placed inside a large plastic barrel. In some cases, they choose to place old car tires inside. If such a restroom is used only during the season, then some people prefer not to bother with strengthening the walls.
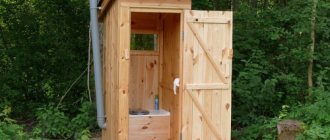
A small house is being built above the recess. The restroom can be made from various materials. Most often, a wooden structure is chosen from available materials. Filling the hole takes some time, so cleaning it will not be expensive and may be necessary after a few years. Everything will depend on the intensity of use of the toilet. A toilet with a pit cesspool is considered not the best solution because of the smell that it creates. But this issue can be solved with the help of ventilation pipes in the restroom.
The pipe rises to a level that exceeds the highest point of the roof by 50 cm. A deflector must be installed at the end, which will provide air rarefaction and create draft. Clean air is taken in directly through the opening in the toilet room. It is important to be careful that there are no additional inlets, as the system may lose its effectiveness.
Some owners provide forced ventilation in restrooms. It works by blowing, throwing air from the room outside. To do this, a fan is inserted into a window or other hole in the toilet wall, which carries out the operation. You can turn it on a few minutes before going to the toilet or organize it to turn on automatically when you close the restroom door. For such a system there must be a source of inflow so that a low pressure zone does not arise inside the toilet.
Advice! Installing forced ventilation in the toilet does not eliminate the need to build ventilation directly for the cesspool under the toilet.
Dry toilet
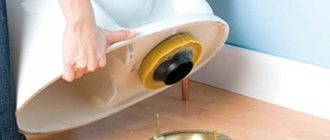
A dry toilet is one of the types of toilets without cesspools. There is no need to build them; you need to plan in your budget the amount for its purchase. That being said, there are several different restroom options. One of them is sold immediately with a finished cabin. It is made of plastic and can last for a long time. Another type of dry toilet is a small container with a toilet seat. It is necessary to build a small room for it. The essence of the functioning of such a toilet is that active bacteria process waste, decomposing it into sludge and water. A water drainage system may be provided for the dry closet. Dry sediments are used as fertilizers for fruit trees.
Combined option
The combined version of the toilet can be a building with several entrances. They can be made to differentiate visitors by gender. Usually they have one cesspool, if they are of this type. An outdoor shower can also be built in the next cabin. The drainage from it is directed to a cesspool or to an open space with a filter base if it is visited infrequently. The toilet may be adjacent to a small closet where gardening tools will be stored.
How to insulate a toilet
When insulating a toilet, the question arises: how to insulate it? Outside or inside? Most people prefer the first option. There are several reasons for this.
- Space saving. Of course, thermal insulation materials take up very little space in the room. But the area of the toilet is very small. Therefore, even a slight decrease in it immediately catches the eye, creating the illusion of inconvenience and discomfort.
- Reducing unpleasant odor. Many thermal insulation materials are highly porous. And the unpleasant odor, characteristic of most toilets, quickly permeates the material, making it very uncomfortable to be in the toilet, especially on hot summer days.
On the other hand, it is believed that it is much easier to insulate a toilet from the inside with your own hands. In this case, even a person who has no experience in such work can prepare a toilet for winter.
When you decide on the insulation method, you can move on to the next step - choosing the appropriate insulation.
How to insulate a toilet
Insulating a toilet can be done using a variety of materials. For example, polyurethane foam is very popular. It is applied to an external or external wall using special equipment, hardens in a matter of seconds and provides excellent protection against heat loss and drafts.
High humidity, exposure to ultraviolet radiation and frequent temperature changes are not capable of causing significant harm to it. But in this case, you will have to invite a specialist with the appropriate skills and equipment. Therefore, although the whole process will take a minimum of time, it will cost you quite a lot.
To save money, most people prefer to do the work themselves. And in order to get a warm outdoor country toilet, they choose sheet materials.
This can be thick drywall, mineral wool (slab) or polystyrene foam. They are quite effective, but at the same time they are relatively cheap, and their installation on the walls takes a matter of hours.
Polyurethane foam
PPU is a sprayed insulation material that can be easily applied to any base. With its help, a homogeneous surface without seams is created. This material is not afraid of temperature fluctuations, ultraviolet radiation, and humidity. It requires a minimum of time to apply. However, insulation using polyurethane foam requires special equipment, so it is carried out by specialists.
Minvata
Slab or roll material requires reliable waterproofing. If moisture gets into the layers of this insulation, its thermal performance will deteriorate. A simple solution for moisture protection is durable polyethylene film. To fix mineral wool, a wooden sheathing is required: the beams are attached to the walls in increments of 50-60 cm. The slabs are laid between them, and waterproofing is fixed on top, as well as sheets of plasterboard or OSB.
Foam plastic or Penoplex
Polymer boards are attached to the walls using an adhesive. For greater reliability, they are additionally fixed to the base with special dowels. Next, the surfaces are reinforced and plastered. GCR is also suitable for finishing.
Insulation of a toilet during construction
If insulation is carried out during the construction of a toilet, then the heat-insulating slab material can be mounted inside the frame. The foam is simply fixed between the beams. Next, it is sheathed on both sides with boards, clapboard or any finishing material.
Another convenient way is to install toilet walls from sandwich panels. They are insulation in a metal braid. They are easy to install and easy to maintain. But the cost of such a design will be slightly higher than that of the other options outlined above.
We equip the bathroom: plumbing fixtures
Plumbing fixtures should be protected, first of all, from displacement during the shrinkage of a log building. Accordingly, by protecting the installations from displacement, we also provide protection against depressurization. To achieve similar results, we recommend using suspended plumbing fixtures: cantilever plumbing fixtures.
The load on plumbing can be reduced by using load-bearing steel frames. A special installation is also sold for bidets and toilets, to which plumbing fixtures are screwed. The outside of the installation is decorated or covered with plasterboard sheets. Water drainage in this device occurs through corrugated pipes, so movement of the logs of the house structure is not dangerous.
We already know how to ensure reliable protection of a structure made from natural building materials in conditions of high humidity, and how to properly create amenities in a wooden house. In addition, the tandem of a properly equipped ventilation unit and the treatment of wood with special protective compounds will ensure the safety of natural raw materials for many years.
A bathroom in a private house has long ceased to be a novelty, since modern technologies make it possible, without special expenses, to equip a restroom no worse than in an apartment. However, houses are built from different materials, and here the technical conditions for installing a bathroom may vary. If everything is more or less clear with houses made of brick or aerated concrete, then a bathroom in a wooden house has a number of differences that need to be paid attention to.
How to insulate a toilet yourself
Before you start, make sure you have all the necessary materials:
- thermal insulation material in sufficient quantity;
- polyethylene (dense, construction);
- fastening profile (wooden or metal);
- self-tapping screws and self-tapping screws.
The tools you will need are a hacksaw, a knife and a tape measure. To begin, take careful measurements and cut the selected thermal insulation material into sheets of suitable size. Further actions depend on which method of insulation you have chosen: external or internal. Let's start with the external one, as the more common one.
Sheet material is attached to the walls. To begin with, it can be secured with ordinary nails or self-tapping screws. Polyethylene is applied on top of it. Then, using the fastening profile, secure the material to the wall.
The step between the profile can be 60-80 centimeters - the load on it will be quite small.
As you can see, there is nothing complicated here. By the way, if you do not use drywall, but polystyrene foam, you can even do without polyethylene, because it perfectly resists moisture. But drywall, absorbing moisture, swells greatly, which can cause damage.
Mineral wool slabs begin to rot after contact with water and will not last as long as you would like. Therefore, high-quality moisture insulation is a prerequisite for the durability of insulation.
If you choose internal insulation, then you should proceed in almost the same way. Only polyethylene is laid directly on the wall, and on top of it is heat-insulating material, which is attached using a profile and self-tapping screws.
The work is as simple and easy as possible. It is enough to spend just a few hours on all the work, from measurements to the final inspection, and you will be guaranteed a warm toilet in the winter at your dacha. Of course, now it will be much more pleasant and convenient to use.
Rules for placing sanitary rooms
Many homeowners rightly believe that one bathroom is not enough. When calculating the quantity, you can rely on the following recommendations:
- at least one toilet and bathroom on each floor;
- It is optimal to have a separate sanitary room and toilet in a one-story house;
- If there are a large number of rooms, it is better to equip a bathroom for each.
To select the location of the bathroom in a private house, take into account the location of the water supply inlet and all water distribution.
We should not forget about the need for ventilation equipment in the bathroom. To facilitate installation work, the toilet should be positioned so that one wall is external.
Experts advise adhering to the following rules when planning a bathroom in a private home:
- in new housing construction, the size is determined at the very beginning at the design stage. The number of plumbing fixtures, furniture and related devices that are planned to be placed is taken into account;
- sanitary rooms cannot be placed above living rooms;
- ergonomically place one bathroom above another in a storey building;
- the exit from the toilet room can be directly to the bedroom;
- if the bathroom is located near the kitchen or dining room, its entrance is located on the opposite side of these rooms;
- It is not customary to place a bathroom or toilet above the dining room or kitchen.
Construction of a cesspool
To collect waste, you can use any of the possible schemes for arranging a cesspool:
- from a plastic or metal container;
- with brick walls;
- from reinforced concrete rings;
- from ready-made factory-made septic tanks;
- from car tires.
In this case, we use ordinary working red brick. This scheme for arranging a cesspool is considered very profitable, since it requires a minimum amount of costs with high efficiency. To build this structure with your own hands, you need:
- Dig a small pit, the dimensions of which are 0.8 x 0.8 m and the depth is 2 m. Such a pit is quite enough for a country toilet for at least 10 years, even if you use it. Construction of a cesspool
every day. - Place a layer of gravel or sand at the bottom of the pit, which will act as a filtration field.
- Lay the brick. To do this, use cement-sand mortar. At the same time, leave a gap between the bricks of 2-3 cm.
- After laying each row, check the verticality of the walls.
- Lay the last 3 rows of bricks without gaps.
How to make a bathroom in a wooden house - stages and rules of construction
Convenience in the yard is becoming a thing of the past, and it is impossible to arrange a bathroom in the house without certain knowledge and skills of related professions. When constructing bathrooms, certain rules and sequences of actions are followed. It is important to follow them so as not to commit rash actions and not to redo anything later.
Sequence of construction work:
- determine the location of the bathroom, its dimensions;
- arrange sewerage;
- equip ventilation;
- connect the water;
- lay waterproofing;
- install plumbing;
- doing the finishing.
The functionality and ability to use the sanitary unit for a long time depend on compliance with the installation rules. Builders in a wooden house are faced with shrinkage, especially seasonal ones. This phenomenon should be taken into account when leaving free space or using dampers for communications. It is recommended to construct a bathroom in a wooden house using a sliding frame.
This is a metal profile product that does not react to shrinkage of the house. Vertical marks are marked on the wall with a cord, maintaining a distance of 10 cm from the floor and 40–70 cm from the ceiling. The space under the ceiling is subsequently used for installing ventilation and electrical wiring elements. Grooves are made on log walls, and strips of durable metal are inserted into them.
Vertical elongated holes for screws should be made in the metal strips so that they move freely along these grooves. Special washers are used for the screws for the profile; they are not tightened too much. The entire structure based on a metal profile should move freely vertically without reacting to shrinkage, which will protect the bathroom from deformation.
Practice has shown that for ease of use of a combined bathroom, it must have a minimum area of 3.8 m2, a separate bathroom - 3.2 m2, toilet - 1.5 m2. If space allows, larger bathrooms are installed or several are made. To build a home bathroom, it is recommended to adhere to the following rules:
- to facilitate ventilation of at least one of the walls, choose an external one;
- the bathroom should be located away from the kitchen and dining room, preferably under the stairs, not far from the bedroom or dressing room;
- the bathroom should not go into the living spaces, be located above them or above the kitchen.
Toilet foundation
All household toilets must be placed on a solid foundation, which must be made in the form of a columnar structure. To fill it with your own hands, you need:
- In the corners of the future structure, dig holes 0.8 m deep and 0.2-0.3 m in diameter. Schemes of a columnar foundation for a toilet
- Pour a small amount of crushed stone into their bottom.
- Install formwork on the surface of the pits, which should rise 15 cm above the ground surface. To do this, you can use boards or a metal pipe of a suitable diameter.
- Pour the concrete mixture, which should consist of cement, sand, crushed stone and water.
- Before the concrete hardens, install a metal rod in each foundation column, which can later be used to secure the walls and frame of the wooden toilet house.
Installation of toilet walls
To create a stiffening frame for the future bathroom, use a wooden beam with a cross-section of 100x100 mm. Before using the material, be sure to treat it with an antiseptic solution.
- Install the lower bars, which will serve as the base for the frame. Secure them with metal foundation studs and nuts. Drawing of a rectangular outdoor toilet
- Use metal angles and wooden spacers to install columns at the corners of the structure.
- At the location where the door is installed, secure additional vertical bars and a wooden lintel.
- To give this structure the necessary rigidity, fasten all vertical elements with horizontal jumpers.
- Use tongue and groove boards as external and internal cladding. Attach them to the frame in a horizontal position using self-tapping screws.
- Install sheets of foam or mineral wool between the columns of the frame inside the sheathing. Their thickness should be at least 5 cm, and preferably 10 cm.
Final stage
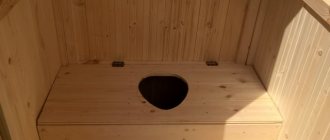
To arrange the floor in the toilet, use boards 40 mm thick. Also install a kind of podium where the hole in the cesspool should be placed. To give it a more aesthetic appearance, additionally use a lid from a real toilet.
Ready-made toilets for a summer cottage made of wood
Arrange the roof of the structure from boards 4 cm thick. For waterproofing, use a sheet of roofing material, which is laid on a wooden covering. After this, install slate on the roof. Don't forget to allow for a slight slope of the slope. To do this, make one wall of the toilet 15 cm lower than the other.
Also, be sure to install massive doors that will prevent frost from penetrating inside the outdoor bathroom. Paint the structure itself with regular paint, which will significantly extend its service life.
Bathroom with metal walls
You can very easily build a simple toilet for your summer house out of metal with your own hands. It is characterized by the following advantages:
- to make such a toilet, you do not need to have specific knowledge in the construction industry;
Metal frame for the future toilet - Cheap materials can be used to construct metal walls;
- This structure can be installed in just one day;
- If necessary, a metal outdoor bathroom can be easily moved to another place on a summer cottage. At the same time, the finished structure does not weigh much, so such a rearrangement will not take you much time and effort.
Despite some advantages, a metal toilet is not the best structure that can be installed on a summer cottage. This is especially true when the owners plan to use it in winter. First of all, metal has high thermal conductivity. Therefore, in a structure in which this material is used as enclosing structures, it will always be cold or hot, depending on the time of year.
Choosing a wastewater treatment system
The most common method for summer residents is biological treatment.
This method is based on the life process of special bacteria placed in a well or septic tank. Usually used:
- anaerobic,
- aerobic cleaning system.
- The bottom of the wells must be sealed with roofing material or waterproofing (several layers), or cement.
- The joints of reinforced concrete rings must be made airtight. To do this, use cement mortar or liquid glass.
- The well is equipped with a tightly fitted lid with an inspection hatch.
- The contents are discharged at the level of the lower ring or using a sewer truck.
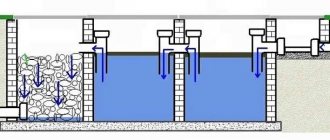
They involve the use of a septic tank - a special container in which the above-mentioned microorganisms decompose the waste of our life. After this, the wastewater enters the soil through the drainage (if the soil does not absorb moisture well enough, then the wastewater goes to the place of filtration, i.e., to the nearest ditch).
It must be taken into account that the septic tank must be at least 5 meters away from the house, and 20 meters from the well. The volume of the septic tank should be three to four times the daily water consumption.
A biological treatment system can be organized in a simpler way - by installing a well made of reinforced concrete rings or one large container:
Organization of water supply
In order to fully operate a warm country toilet, it is necessary to ensure a constant supply of water to it. There are two options here:
Alternative
The most expensive cost item when operating a warm toilet in a country house is heating. Is it possible to move away from traditional methods of heating a room? It is possible if you use the old antiquated method of processing sewage. It is based on the natural decay of feces with the release of thermal energy. To do this, you will have to enhance the effect with the help of natural material, which even in a calm state generates heat. This is peat, and such a toilet is called peat.
True, in such a toilet you will have to install a large-volume toilet, or you will have to make a large pedestal, about 100 liters. Peat is poured into it (you can use sawdust). Feces end up in the toilet, where under the influence of bacteria they begin to rot, releasing heat along with peat. In fact, this is the same dry toilet, only in the latter the role of chemicals is played by peat and bacteria in it. But if the dry closet needs to be cleaned at least once a month, then the peat can be changed once a year. At the same time, the resulting rotted sediments are very good fertilizers, one might even say of high quality.
Attention! To remove the unpleasant odor and steam released during the decomposition of sewage, it is necessary to provide the toilet with ventilation. In principle, a high exhaust from the pipe will solve this problem.
In addition to the advantages described above, a peat toilet has other positive aspects.
We use bricks for construction
If you make a winter toilet out of brick with your own hands, it can be used at any time of the year in the presence of cold, snow, rain or, conversely, high temperatures in summer. This material for the construction of a bathroom building has the following advantages:
- This building material has high thermal insulation properties. This allows you to create
A brick toilet
provides the most comfortable indoor conditions both in winter and summer. In this case, there is no need to additionally apply thermal insulation; - The brick walls are very strong. They will not be destroyed by strong wind or other mechanical stress;
- there is no need to perform additional finishing of brick walls;
- a structure that is built of brick has a long service life. It can be used for 50 years.
In addition to these advantages, a brick toilet has significant disadvantages. First of all, making such a structure with your own hands is not so easy. You need to be able to do masonry, build a solid foundation, the quality of which determines the durability of the toilet.
Bricklaying Tools
The brick structure is stationary, which is not always relevant in the conditions of a summer cottage. Often there is a need to move it to another, more favorable place. Also, erecting brick walls and other structural elements of such a warm toilet will require much more money than using wood or metal.
A guide to assembling a spacious outdoor toilet
Project
The main task before starting to design a building for an outdoor toilet is to choose a place for its installation. This is especially important if the restroom has a cesspool. The toilet should be at a minimum distance of 5 meters from the house. It is advisable to make it larger so that unpleasant odors do not come into the home. Particular attention should be paid to wells or other water storage tanks. It is important that waste does not leak into them under any circumstances. To do this, it is necessary to provide a distance of at least 30 meters. If there are fruit trees nearby, then it is also necessary to maintain a gap of 5 meters to them. It would be convenient to locate the toilet closer to the road from where the sewer truck will approach, but a distance of 5 meters must also be maintained to it. The toilet must be 2 meters or more away from the neighbor’s fence.
After choosing a place for the restroom, you can decide on the size of the future building. There are several rules that apply to outdoor toilets. For example, the height of the toilet should not be too high. If it exceeds 2.5 meters, then due to the high windage the toilet will simply overturn. If the height of the restroom roof is below 2 meters, then there may not be enough air in it and there will be some difficulties for tall people to visit. In order to make it convenient to turn around, the width of the outdoor toilet should be at least 1 meter. The depth of the toilet is also an important factor in order not to rest your knees on the door, so it is calculated from a minimum value of 1.2 meters. Below is a drawing of a country toilet, which shows all the required dimensions.
Note! For brick latrine buildings, the maximum room height can exceed 2.5 meters without fear of damaging the structure.
Sewage and water systems
Installation of utilities in a home made from natural products must be carried out with the obligatory installation of special damping devices, or it is necessary to create compensation gaps during the installation process (see), which can prevent displacement of the installed outlets/feeds during the process of shrinkage and movement of the house.
The procedure for constructing a sewer drain in a log house is practically no different from similar work in a brick building, the only exception being the method of fastening and creating compensation gaps. To prevent displacement of sewer pipes, the exit of the line from the house is equipped with a reinforced concrete or brick gutter, which is laid at the base of the foundation of the building.
The pipe for discharging used water into the sewer system should not be tied to a chopped structure, only be supported on a solid foundation. If the restroom is located on the top floor of the building, then the pipes should be mounted on elastic hangers. To be on the safe side and protect adjacent rooms in the house from water and moisture leaks, it is recommended to make the floor in the restroom a couple of centimeters lower than the level of the other rooms, in order to prevent the spread of water.
The water supply in the restroom of a wooden structure also requires special attention, since this network is subject, in addition to leaks when the structure shrinks, to freezing at sub-zero temperatures. This situation can be prevented by several methods, which we will consider in more detail below.
Water pipes must be insulated using thermal insulation products, which are available in retail sales. It is also worth worrying about insulating the base of the floor with a layer of expanded clay and vapor barrier film. The lowest point of the water supply line must be equipped with a drain valve in order to drain residual water in the event of a long-term lack of demand.
What to build from
After choosing the specific size of the restroom, you can decide on the material from which the construction will be carried out. His choice will also depend on the expected period of use of the country toilet.
Tree
Wooden toilet stalls are the most common. This is due to the fact that latrines can be built from leftover material that is stored after building a house. The advantages of this solution include:
- high construction speed;
- ease of repair;
- ease of ventilation;
- possibility of moving the structure;
- light weight;
- possibility of independent construction.
It takes about a day to build a toilet box made of wood, taking into account the preparation of all the necessary parts. The main thing in the design of the restroom is the main frame, which consists of a beam measuring 10 by 10 cm. When the frame is ready, it is simply sheathed with available boards. Repairing such a restroom is not difficult. It will be enough to replace the leaky part. Even roofing felt can be used as roofing for a restroom if it is placed at an angle on a continuous sheathing. The wooden structure of the restroom is quite lightweight, so several people can move it to a new place.
Metal
Building a metal toilet will require skills in working with a welding machine. At the same time, it can be built much faster than a wooden version of the restroom. The advantages of such a restroom will be:
- long service life;
- ease of maintenance;
- low project price;
- possibility of movement;
- resistance to various loads.
A metal toilet is a base that is covered with one of the roofing materials. Most often, corrugated sheeting or slate is used for this. The first can be secured with self-tapping screws or aluminum rivets.
Blocks
As blocks for constructing a toilet, you can use sand-lime brick, foam block, shell rock, etc. The advantages of just such a project can be considered:
- ease of insulation;
- coolness in the hot season;
- resistance to any type of load;
- presentable appearance;
- long service life;
- ease of shape selection.
Even an inexperienced builder can lay a toilet. There will be an opportunity to practice on the restroom before implementing larger projects. It would be convenient for such a toilet in the country to make a cesspool under it, which will eliminate the need to constantly remove waste. This toilet will cost more than the restroom options above. In addition, for such a restroom it is necessary to take care of a high-quality foundation that can support the weight of the structure.
The procedure for constructing a warm toilet
The construction of a warm toilet in the country begins with laying the foundation. If the cesspool has already been dug and landscaped, then you can begin making the foundation. There is no need to make it with a large depth, since the total weight of the structure will not be too large. A square and a rectangle are marked for the toilet. Pegs are driven into the corners and a fishing line or rope is stretched between them. Using a tape measure, the size of the sides, as well as the diagonals of the future restroom, is checked. This will align the corners. You can also use the most ordinary square. The width of the trench for the latrine, which is dug according to the marks, should be from 20 to 30 cm.
It is necessary to go deeper by at least 50 cm. The walls of the trench under the latrine are compacted. A layer of crushed stone 10 cm thick is poured onto the bottom. Medium-grained sand is laid in the same layer. It must be compacted well so that the load is evenly distributed over it. The foundation of the latrine should rise 15–20 cm above the ground. Therefore, the construction of a small formwork from logs will be required. It can be set both vertically and horizontally, which will facilitate the further construction of the restroom. The reinforcing mesh is placed in the trench and raised by 5 cm so that the solution gets under it. The solution is poured and the upper end is leveled with a trowel.
It will take from two weeks to a month for the restroom base to gain strength. Everything will depend on weather conditions. The next step is to build the floor for the restroom. It can be made of wood or monolithic. For the latter, you will need to install wooden supports, lay waterproofing, install reinforcing mesh and fill the space with concrete mortar. In this case, in the middle with an offset to the rear wall it is necessary to leave a hole for the toilet. For this you can use a wooden frame. A small rectangle is knocked down and placed in place of the hole. Before constructing the walls of the restroom, it is necessary to ensure waterproofing. Bitumen mastic is applied to the foundation and a double layer of roofing felt is laid. It can be used for laying bricks or installing a wooden frame.
The last step will be insulating the walls of the restroom. For these purposes, penoplex would be an excellent material. It can be fixed to a brick wall using special umbrellas. After this, it is plastered with further finishing. The roof should also be insulated. To do this, penoplex sheets are attached from the inside and covered with a vapor barrier. After this, the ceiling of the toilet can be lined with clapboard or other material. Particular attention should be paid to the door. A warm toilet cannot be closed with a simple wooden shield. You will need to purchase a full-fledged wooden door for the toilet. If the restroom will also be used in winter, then you can install a small heat fan inside that can be turned on from inside the house. This can be done in a few minutes per visit, which is quite enough to raise the temperature to a satisfactory level.
Note! You can build a warm toilet for your dacha not only using brick or other stone. It is easy to make a restroom from wood or metal, but then you will have to put more effort into insulating the restroom. It will be necessary to ensure that the cesspool does not have any cracks through which weathering would occur. A video about the construction of such a toilet can be seen below.
Examples of finished projects
One of the simplest solutions for country toilets, which are used everywhere, is the construction of a “birdhouse”. This is the name given to a standard rectangular restroom. Most often it has a pitched roof, which is made of slate. Below you can see a drawing indicating the dimensions of just such a restroom. Among the disadvantages, it is worth noting that the restroom is unstable to loads, as well as the need for additional upholstery material that will eliminate drafts.
If you want something more intricate, then you can build a triangular toilet. It is called a hut. This is exactly what it resembles with its shape. The triangle is one of the most stable shapes, so such a toilet can withstand both wind and snow loads. Unlike the previous option, snow cover will not be able to accumulate on such a latrine. Below is a drawing showing all the dimensions of the restroom. You should not save when choosing the width of the toilet. If you make it too small, then it will be almost impossible to stand up to your full height in the restroom.
A more complex toilet option for making in the country is a diamond-shaped toilet. It is also called a hut. Such a restroom will require significant consumption of building material. But with such a toilet you can be sure of stability even in strong winds. Another solution would be to build a restroom in the shape of a small house. It usually has a gable roof and is constructed from any type of materials.