I copied it here so I don't forget
Author: Semyon160 Source: nissan4x4-club.ru
Looking at the suffering of all-wheel drives of all kinds and classes with cables, I decided on this opus. More precisely, suffering with cable sealing. I can offer you a simple and reliable way to loop a cable, and you can put a hook, an earring, and anything else into the loop. All you need is a strong flathead screwdriver and... Your car
All dimensions are approximate and are given for an 8 mm cable, which I have been using for many years, so I can give them from memory.
The end of the cable should be without kinks, even, preferably evenly cut off. To chop it off evenly, it is enough to put it on an iron base (a rail, for example, in its absence, I use a 3 kg sledgehammer) and hit it in the same place with the sharp end of the hammer, or the corner of its “butt” (I don’t know how called). 10-15 blows - the cable is cut off.
Now we divide the cable approximately in half in thickness. “Approximately” - because one strand will be extra (There are either 7 or 9 strands). To divide we use a screwdriver.
IMMEDIATELY AND FOREVER: When working with cables, use gloves or mittens and be VERY careful and gentle when working with the ends of the cable - this wire will penetrate any mitten.
We unravel the cable by about 60-80 cm (the longer, the more reliable the seal, although it only seems so). When dividing, you will have one more strand - a rope strand. Since it does not obey the laws of metal wire, we separate it into a separate “stream”, but do not cut it off yet. In PHOTO 03 it is clearly visible
Now we proceed directly to making the loop: we separate the two separated parts of the cable at a distance of 15-25 cm from the whole cable and direct them towards each other and fold them. The hooks and earrings need to be taken care of at this stage. We begin to wrap one part around the other. In this case, a solid cable is formed on a loop; to do this, we make sure that the halves of the cable fit into each other’s hollows remaining after “unbraiding”. PHOTO 4 and PHOTO 5 indicate the WRONG position, the cable “does not fold”, respectively, return to the position indicated in photo 5 and start braiding in the other direction. At the first turn it should look like this: PHOTO 6 Thus, slowly, we wrap the “shoulders” of the loop with free “tails” to the “base”. PHOTO 7 When “EVERYTHING!”, PHOTO 8 rests on an unbraided section of the cable, you need to try very hard and wrap the “tails” another turn, for this you may have to apply force and “stretch” the loop to the sides. PHOTO 9. When In this case, the TAILS SHOULD LIE IN THEIR PLACES.
So, what should happen:
The cable, beautiful and shiny, ends in an equally beautiful loop, but at its base 30-40 cm of “tails” stick out in DIFFERENT DIRECTIONS, that is, at an angle of 180 degrees. Well, now the most interesting part (in any case, I was amazed at the simplicity of the idea).
Remember, we needed your car? It’s even better if he’s ALREADY planted in the shit to the very... No, not to the very top, we need his tow hook, or better yet, the towbar ball. Let's begin. You put the loop on the towbar, insert a screwdriver into the loop (a pry bar, a crowbar - depending on the thickness of the cable), grab the screwdriver on both sides with both hands and pull your mobile out of the swamp. PHOTO 10 At the same time, the screwdriver begins to screw into the cable, rotating around it - help it, and do not forget to pull out the freeing rope strand and hold the “tails”. PHOTO 11, 12. Strange, but the “tails” are happily woven into the cable! True, for this they need to be corrected. Well, that’s the whole trick... When the “tails” run out, you need to carefully close them up - you can flatten the tube, and I just wrap it with electrical tape, because there is no load here. PHOTO 13, 14 Once in the fields I just wrapped them with a rag so that they wouldn’t bulge and didn’t inject drugs. We take out the screwdriver and finally cut off the annoying strand of rope. ALL! The cable can be used for many more years.
How to make your own crimp for steel cables.
Steel cables can be spliced in various ways - crimping, welding, soldering, glue, braiding, etc. Here I'll use a short piece of copper tubing from a scrap pile to create an end loop on the 3/16" (4mm) cable. Crimping kits start at about $3 at big box stores, while ferrules typically cost more and use a special tool to compress. However, scrap metal is often freely waiting for its use in this case too! If your task is to make crimps and lack special tools, copper tubes are perhaps the cheapest option.
Why is this detail in construction?
Typically, such devices are used where work is carried out under heavy loads, so only high-strength and high-quality metals are always used for the manufacture of clamps. Manufacturers produce these devices strictly in accordance with standards. The design of the clamps is very simple. They consist of two hex nuts and a steel bow. Professionals recommend installing at least three clamps on one cable; this is enough for safety and reliability of fastening. If the load is higher than the clamps you have chosen can withstand, then you should take a different type of this clamp rather than increase the number.
Only high-quality and high-strength steel is always used for production. This is necessary to ensure a reliable connection at both ends of the elements. For greater reliability and strength, the clamps are often additionally coated with another protective layer. For these purposes, galvanic galvanization is used. The advantage is that with its help the device is provided with maximum resistance to external environmental influences. It also provides excellent protection against corrosion.
Although the design of this device is simple, you still need to read the instructions before use. Any tool or device has its own nuances that must be taken into account in the work. If the steel cable clamp is not installed correctly, the element may simply break. The end of the cable is inserted into the arc and secured inside using a special lock, in this case hex nuts. The nuts are twisted in different directions, and the cable will be between them. When fully twisted, the ends should be tightly pressed together.
How to tie a loop on a tow rope?
Tow ropes sold at auto parts stores are most often equipped with metal hooks or carabiners. Thanks to them, the procedure for attaching the cable to the car eye is quick and easy.
What if your tow rope is not equipped with such a useful element? Or, due to the lack of a cable, do you have to use a piece of parachute line or cord that is at hand?
How to tie a tow rope to an eye so that you don’t waste precious time trying to untie a tightly tied knot?
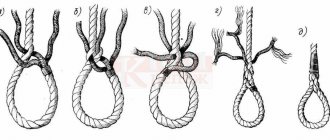
We recommend that you familiarize yourself with several methods of tying knots: arbor, tow, Eskimo and simple half-bayonet.
Their advantage over other numerous knots is that they are simply knitted, do not tighten and do not damage the cable.
They do not unravel spontaneously, but if necessary, they can be easily and quickly untied.
Gazebo knot (bowline) Towing knot Simple half-bayonet Eskimo knot
Remember that one end of the tow rope must be secured to the left eye of the towing vehicle, and the other to the right eye of the towed vehicle.
Thanks to this, the driver moving in tow has a significantly improved view of the space in front of the towing vehicle, and with this method of fastening the cable itself will be located almost parallel to the axis of the car, which can significantly reduce the force of jerks.
See also:
- Trailer-dacha – Kupava 813400
- What does ignition timing mean?
- Trailer – Bellwood cottage
- What does engine chip tuning give?
- How to bleed the brakes correctly?
- Tractor transmission: general device
Steel cable clamp - classification
Clamps come in different types. They are divided according to purpose, material used and design. You can also formally designate different lengths; the most popular is a cable clamp of 3 mm, 5 mm in diameter, but in special cases sizes up to 40 mm are used. Each species also has different subspecies. Clamps, which are divided according to purpose, are ordinary and reinforced, and according to the material used - steel and copper; an aluminum cable clamp is also popular; a galvanized steel version is used in particularly harsh operating conditions. Clamps, which are divided by design, are flat, arc-shaped, single and double.
Regular clamps are the most common. Typically, they are made from galvanized steel of class 2. In appearance, such clamps resemble closed loops at the base, which have two strong bolts. This type of product is for household use and is not intended for heavy loads. The reinforced version speaks for itself, its design is more thoroughly worked out, the shutter mechanisms are reinforced, and therefore the scope of their application may be more responsible.
Flat types of clamps are often made of high-strength carbon steel. The surface of these devices is galvanized. Their diameter can range from 2 to 40 mm. In shape, such clamps resemble a pair of plates that are connected to each other with a bolt and nut. They are typically used for splicing steel cables or other standing rigging. They are also quite suitable for creating loops at the end of the brace. Professionals recommend installing at least two clamps on one connection.
Flat clamps can also be classified as single or double. The main difference is the number of bolts available. Single clamps are fastened with one bolt, and double clamps are fastened with two bolts. In terms of application, such clamps are not particularly different.
Arc-shaped clamps are made of a cylinder that is bent in an arc, and fastening occurs using two bolts that are located at the ends. Devices of this type are most often used for connecting metal cables, but it is quite possible to use them for making loops. This type of clamps is more industrial; they are designed for heavy loads. A typical standard arc clamp can withstand a load of about 97 kilograms.
How to braid a steel cable correctly - Metalworker's Guide
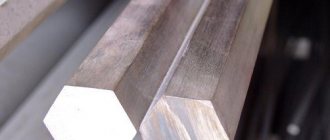
When making standing rigging for a sailing vessel, you can use a 7x19 stainless steel cable. In cross section it looks something like this:
The traditional sealing of the ends of such a cable by braiding a wire with a thimble is performed without special tools and provides high strength and reliability of the rigging. Here we describe a version of “crane” weaving, which gives a very dense and compact fire.
Tools
For work you need: a pair of worn flat screwdrivers with “clogged” edges, one of which is sharpened “to a cone”, pliers, or better yet, tongs, a hammer, a roll of masking tape and gloves. It is very advisable to have in addition a small angle grinder with a cutting disc and a solid vice.
An example of sharpening screwdrivers, hereinafter referred to as “piles”.
For example, they work like this. Preparing to punch the first strand.
Weaving technology
We prepare the cable - we make a mark at the end from a couple of turns of masking tape and cut off the protruding parts of the strands. We measure three or four hoses from the end of the cable (full turns of any strand) and make another mark in this place. Up to this point the cable will unravel into strands. After this, we try on the thimble to the cable, roll it along the cable and find the place of the top mark in the middle of the thimble.
We securely fasten the middle of the thimble to the cable with nylon.
how to braid a steel cable
To do this, it is convenient to use strands of scrap nylon ends, which are always available on the boat.
We bend the cable around the thimble and secure it in a vice.
Securely (!) fasten the cable to the thimble. The appearance of the product will depend on this. I use a nylon heel folded in half, drawn in a figure of eight, tightening the cable loop around the thimble. Once again, this must be a really tight and reliable fastening that does not allow the cable to move relative to the thimble.
We fix the thimble in a vice so that the “tail” is on the left. This is the “front” side of the future fire. We are looking for the first strand, it is shown by the arrow. We weave this strand up to the thimble and punch it under two strands of the cable on the other side of the fire “along the descent” - from left to right. In the same place, but under one strand, we break through the strand adjacent to the first on the left (the second). The braided strands are numbered clockwise.
It will look something like this.
The ends of the braided strands must be secured with marks made from a couple of turns of masking tape.
We turn the fire to the other side, or approach it from the other side :).
In the depths of the fire there is strand number six, adjacent to the first, unravel it and punch it under two strands so that it comes out adjacent to the first. On this side, the punches go “against the descent,” that is, from right to left. This is easier to do if you punch the cable with piles and insert a strand into the punching hole at a higher level, then push it into place.
The next strand, number five, goes in the same place, but under one strand.
Again we return to the “front” side of our fire.
Strand number three is inserted in the same place where the first and second ones made their way, but “against the descent.” The photo shows how this is done using a pile.
Under the same strand where the third was pierced, a fourth is drawn, but on the other side - “along the descent”, and UNDER the third.
The core (it can be distinguished in the photo and in life by the different direction of the lay) breaks through in the same way as the fourth strand, and comes out side by side. Options and personal creativity are possible here; the core can come out beautifully to the first strand :).
This completes the first fire punching. We check the correct location of the strands, tighten the slack, cut the core, and push the strands into place with a hammer.
Second punch
In order for the “crane” fire to gain the necessary strength, three or four punches are enough. The second and subsequent punches are made against the descent - from right to left, through one strand under two.
It is necessary to monitor and eliminate an unpleasant feature by tightening the strands - the strands collected in the first punching slide quite easily relative to each other, and come out of their places with further punchings, the fire “swells” and becomes loose. On a thick cable, a thick mark around the first punch helps a lot, holding the strands in place.
For the same reasons, it makes sense to start the second punching with the loosest strand. It could be the fourth one, which we punched last, or some other one, depending on the situation.
https://www..com/watch?v=jsfll_7CdEQ
We consistently punch the strands counterclockwise and complete the punching with a “lock”.
The completed punching looks like this - all strands come out through one, all are on the same level.
We hammer the fire with a hammer and make a third punch, repeating the technology of the second.
After wrapping, we cut the strands and tape the place where they exit the cable with black electrical tape.
After installing the cables and tightening them under the working load, it makes sense to tightly wrap the entire fire with the same electrical tape or nylon heel.
This activity requires some skill; the first fires usually turn out unsightly, but each subsequent one is more beautiful than the previous one. So it makes sense to practice on scraps.
When working with piles on a dense cable, the core wires are often affected; this must be monitored when punching and corrected.
Well, safety precautions must be at their best - protecting your eyes from steel strands flying around, even if covered with marks, sharp piles and great effort require attention and good hand protection.
how to tie a steel cable into a loop
Looking at the suffering of all-wheel drives of all kinds and classes with ropes, I dared to do this opus. More precisely, the agony of sealing the cables. I can offer you a simple and correct way to attach a cable to a loop, and you can attach a hook and an earring and anything else to the loop.
All you need is a solid flathead screwdriver and... Your car
How to braid a cable: diagram and step-by-step instructions
Any rope or cable, although it is made of good quality and strong steel, can unravel or even break at any moment.
Despite the apparent complexity of the repair, it can be done by anyone, even those without special skills.
The most unpleasant thing in the current situation is the possibility of a collision with it anywhere and precisely when such an accident is absolutely not expected.
Therefore, it will be useful to know how to properly braid a steel cable. Moreover, this does not require any special tools or special skills. In the future, it will be possible to weave both a hook and an earring into the cable.
At the same time, the structural strength will be at a high level, and it will serve you for many years. It is advisable to wear protective gloves before starting work, as the sharp ends of the steel cable strands can seriously injure your hands.
Specialized and wedge clamps - what are their features?
Many construction jobs cannot be done without a strong clamp. Construction has always been characterized by the presence of a large number of operations. You definitely need to lift something up, pull a load, and in this case it’s building materials; you often have to fix various objects. For such work you need strong spring-loaded clamps. Not only do they allow you to connect the cables, but you can also attach a load to them. Such devices are not very different from standard clamps.
In addition to the usual metal arc, they have a pair of levers that are equipped with movable brackets. This design solution helps ensure a highly durable and durable connection. With its help, you can securely fasten any object to a cable of different thickness. Lately, wedge clamps have become the most popular among specialists. This is an excellent connecting element for copper and aluminum wires, the cross-section of which can range from 35 to 100 square millimeters. Only this type of clamp is good for connecting steel-aluminum devices. Such devices consist of a body and a wedge, which is wear-resistant. Forged cast iron steel is used to make the body, and the wedge itself can be made of bronze or various aluminum alloys.
If it is necessary to install aluminum or steel-aluminum wires in bolted clamps, where the cross-sections are very large, then it is necessary to use special gaskets that are made of soft aluminum tape. The use of such an addition in work will give the fastening the greatest mechanical strength. It is important to remember that after installation, such clamps must be tightened again ten days later . The lift should be done like this. The first step is to press the hinge part of the aluminum housing, then you need to insert a steel anchor, and then the aluminum housing is inserted again using a steel mechanism.
How to tie a tow rope. Gazebo, towing, Eskimo knots and a simple half-bayonet
Using a tow rope collecting dust in the trunk, you can always pull out a car stuck in the mud or tow it to the nearest car service center.
Tow ropes sold at auto parts stores are most often equipped with metal hooks or carabiners. Thanks to them, the procedure for attaching the cable to the car eye is quick and easy.
What if your tow rope is not equipped with such a useful element? Or, due to the lack of a cable, do you have to use a piece of parachute line or cord that is at hand?
How to tie a tow rope to an eye so that you don’t waste precious time trying to untie a tightly tied knot?
There are several ways to tie knots: bower, tow, Eskimo and simple half-bayonet.
Their advantage over other numerous knots is that they are simply knitted, do not tighten and do not damage the cable.
They do not unravel spontaneously, but if necessary, they can be easily and quickly untied.
Arbor knot (bowline)
Towing unit
Simple half bayonet
Eskimo knot
Remember that one end of the tow rope must be secured to the left eye of the towing vehicle, and the other to the right eye of the towed vehicle.
Thanks to this, the driver moving in tow has a significantly improved view of the space in front of the towing vehicle, and with this method of fastening the cable itself will be located almost parallel to the axis of the car, which can significantly reduce the force of jerks.
Good luck to you! No nail, no rod!
How to make cable clamps with your own hands?
Cable clamps are used in many industries. There is no industry where they would not find application. But often ordinary household work cannot be done without such a small device. Car owners especially need them. You will need a small diameter metal tube, a couple of metal plates and several bolts and nuts. The metal tube must be bent into an arc. The diameter of the pipe must be such that the cable that is planned to be used can fit into it. The cable must be inserted into the hole in the pipe until the end appears outside.
Then the end must be pulled out of the pipe to a distance of 10-15 cm, then the end of the cable and the cable itself will need to be covered with plates from below and above, and the plates must be tightly connected to each other using strong bolts. This device is well suited for making loops. If you need to connect two cables to each other, then you need to choose a tube with a larger diameter. It must be taken into account that two cables need to be inserted into one hole, but only in different directions. The plates are also selected taking into account the diameter of the cables. Such a clamp will always come in handy in household chores, just keep in mind that it is not suitable for heavy loads, but it is quite possible to try to use it as a tug.
When carrying out rigging, installation and construction work, there is often a need to fix and lengthen the steel ropes used, as well as create loops and eyes at their ends. For these purposes, rope clamps (cable clamps) are used.
A rope clamp is a device used to fix and secure a steel rope.
This type of rigging is not intended for work related to lifting, moving, holding and lowering loads. Its main purpose is to ensure strong tension on ropes and cables during the installation of structures and to secure objects in a stationary position, for example, on a vehicle platform during transportation.
Clips (rope clamps) are used in conjunction with a pear-shaped asymmetric thimble to secure the rope in a device for splicing the rope.
The size of the steel cable clamp is determined by the diameter of the rope used.
Knots for tying two cables
Oak knot
Sailors use it only in exceptional cases, when there is a need to very quickly tie two cables together. Although connecting plant cables with an oak knot is quite reliable, it has a serious drawback: a tightly tightened knot is very difficult to untie later, especially if it gets wet. In addition, a cable tied in such a knot has less strength and during operation creates a danger of catching on something during its movement.
Its only positive qualities are the speed with which it can be tied and its reliability. To connect two cables, their ends need to be folded lengthwise together and, stepping back 15-20 centimeters from the edges, tie both ends as one whole with a simple knot. Do not try to tie synthetic cables and fishing line with this knot: it crawls on them.
Flemish knot
This is one of the oldest maritime knots, which was used on ships to connect two cables, both thin and thick. In fact, this is the same figure eight, tied at both ends. There are two ways to tie this knot. First, make a figure eight at the end of one of the cables tied together. Towards the exit of the running end, insert the running end of the second cable and repeat figure 8, tied on the first cable.
After this, grab each two ends, left and right, and begin to tighten the knot evenly, trying to maintain its shape. To final tighten the knot, pull the root ends of the cables. To connect two cables with a Flemish knot using the second method, place the running ends of the cables being connected parallel to each other so that they touch each other approximately along the length of one meter.
At this point, tie a figure eight with two cables folded together. In this case, you will have to carry it around and thread it into the loop along with the short running end of one of the cables and the long main one. This is precisely the inconvenience of the second method of tying the Flemish knot. The connection of two cables with a Flemish knot is considered very strong. This knot, even if tightly tightened, does not damage the cable, and it is relatively easy to untie. In addition, it has excellent quality - it does not slip and holds securely on synthetic fishing line.
Water node
The connection of two cables with a water knot is considered no less strong. To tie it, place the ropes to be tied with their ends facing each other so that their ends run parallel and touch each other. Holding the running and root ends of two different cables in one hand, begin to knit an oak knot with them, but instead of one run-out of the root end, make two.
Before finally tightening the knot, make sure that one pair of ends comes out of the loop from the top, and the second from the bottom, as shown in the diagram. The water unit is simple and reliable. It has not found wide use in the navy, because with strong draft it becomes so tight that it is very difficult to untie it.
Mother-in-law's knot
Mother-in-law's knot
Some people, when tying two ropes together, somehow manage to tie a so-called “mother-in-law” knot, which is somewhat reminiscent of a woman’s knot. If in the latter the running ends come out of the knot on one side, then in the mother-in-law knot they come out from different sides diagonally.
The “mother-in-law’s” knot is just as insidious as the woman’s (if not more). It should not be used under any circumstances.
Straight knot
Straight knot
Archaeological finds indicate that the Egyptians used it approximately three thousand years BC. The ancient Greeks and Romans called it Nodus Hercules - the Hercules or Hercules knot, because the mythical hero Hercules tied the skin of the lion he killed on his chest with it. The Romans used the straight knot to stitch wounds and heal broken bones. It consists of two half-knots, sequentially tied one on top of the other in different directions. This is the usual easiest way to knit it.
Sailors, who have been using this knot since ancient times to tie cables, use a different tying method (Fig.b). Weavers who use a straight knot to tie up broken threads of yarn tie it in their own, special way, convenient for them (Fig. c). When there are large loads on the connected cables, as well as when the cables get wet, the straight knot is greatly tightened. How do you unravel a straight (reef) knot that is so tight that it cannot be untied and will have to be cut?”
A straight knot, even if wet and tightly tightened, can be untied very simply, in 1 - 2 seconds. Tie a straight knot as shown in diagram (d). Take ends A and B in your left hand, and ends C and D in your right hand. Pull them strongly in different directions and tighten the knot as tightly as possible. After this, take the root end of A in your left hand (to prevent it from slipping out of your hand, make a couple of slings around your palm).
Take running end B in your right hand (it can also be wound around your palm.). Pull the ends sharply and firmly in different directions. Without releasing end A from your left hand, clench the remaining part of the knot into your fist with your right hand, holding it with your thumb and forefinger. Pull the root end A to the left - the knot is untied. The whole secret is that when ends A and B are pulled in different directions, the straight knot turns into two half-bayonets and completely loses all its properties. It also comes undone easily if you take the root end G in your right hand and pull the running end B strongly to the left. Only in this case, the end of G must then be pulled to the right, and the remaining part of the knot (half bayonets) - to the left. When untying a straight knot in this way, remember that if you pulled the running end to the right, pull the main end to the left and vice versa. When untying a straight knot, one should not forget that with the same force it was tightened, one of its running ends must be pulled with the same force.
Thief's Knot
Thief's Knot
At first glance, it is almost no different from a straight knot and it seems that it is akin to it. But if you look closely, it becomes clear that the running ends of the thief's knot come out of it diagonally. The thief's knot, like the woman's and mother-in-law's knots, are shown for clarity in order to emphasize their similarities and differences with the straight knot.
It is not recommended to use these four knots, as they are unreliable for connecting two cables.
The origin of the name “thief's knot” is curious.
It appeared on English warships at the beginning of the 17th century.
The theft of royal property and the theft of personal belongings of sailors on British ships were considered commonplace. In those years, sailors on warships stored their simple belongings and food, mainly in the form of biscuits, in small canvas bags. Naturally, the bag cannot be locked, it can only be tied.
As a rule, sailors tied their personal bags with a straight knot. The thieves, mostly recruits who were not yet accustomed to the starvation ship rations, having stolen other people's biscuits, could not correctly tie the knot with which the bag was tied. They knitted something similar - a knot that the sailors began to call a thief's knot.
There is a second version about the origin of this name:
to prove the act of stealing from a bag, the owner deliberately tied a knot very similar to a straight one, and the thief, not paying attention to the trick, tied the robbed bag with a straight knot. But be that as it may, the origin of the node itself, like its name, is connected with the Fleet.
Surgical knot
Surgical knot
They are still used by surgeons to tie ligature threads to stop bleeding and to stitch tissue and skin. Nowadays, medicine has not yet abandoned the use of nodes, and doctors skillfully use them. During abdominal operations, surgeons have to apply sutures made of catgut (a special material obtained from the mucous layer of the intestines of a ram or sheep), which resolves after 3-4 weeks.
When tying, the catgut slips, and when making knots on it, surgeons use special clamps. During microsurgical operations, doctors use extremely thin suture material - a synthetic thread 10-200 times thinner than a human hair. Such a thread can only be tied using special clamps under an operating microscope. These threads are used when stitching the walls of blood vessels, for example, when replanting fingers, or when stitching individual nerve fibers. They mainly use woman's, straight, bleached, surgical knots and the so-called “constrictor” knot.
When tying a surgical knot, first make two half-knots one after the other with two ends, which are then pulled in different directions. Then another half-knot is tied on top, but in the other direction. The result is a knot very similar to a straight one. The principle of the knot is that the first two half-knots prevent the two ends from moving apart while another half-knot is knitted on top. This knot is convenient to use when there is a need to tighten and tie some elastic bale or burden with a rope and the tightened first half of the knot on the rope, without letting go of its ends, has to be pressed with your knee.
Academic node
Academic node
It is very similar to a surgical knot, differing only in that instead of one second half-knot, it has two of them. It differs from its, so to speak, progenitor - the direct knot - in that the running end of the cable is wrapped around the running end of another cable twice, after which the running ends are led towards each other and wrapped around them twice again. In other words, there are two half-knots below and two half-knots on top, but tied in the opposite direction.
This gives it the advantage that when there is a heavy load on the cable, it is not as tight as a straight knot and is easier to untie in the usual way.
Flat knot
Flat knot
It has long been considered one of the most reliable knots for tying cables of different thicknesses. They even tied anchor hemp ropes and mooring lines. Having eight weaves, the flat knot never gets too tight, does not creep or spoil the cable, since it does not have sharp bends, and the load on the cables is distributed evenly over the knot. After removing the load on the cable, this knot is easy to untie.
The principle of a flat knot lies in its shape: it is really flat, and this makes it possible to select the cables connected with it on the drums of capstans and windlass, on the welps of which its shape does not interfere with the even placement of subsequent hoses. In maritime practice, there are two options for tying this knot: a loose knot with its free running ends tacked to the main or half-bayonets at their ends (a) and without such a tack when the knot is tightened (b).
A flat knot tied in the first way (in this form it is called a Josephine knot) on two cables of different thicknesses almost does not change its shape even with very high traction and is easily untied when the load is removed. The second tying method is used for tying thinner cables than anchor and mooring ropes, and of the same or almost the same thickness. In this case, it is recommended to first tighten the tied flat knot by hand so that it does not twist during a sharp pull. After this, when a load is applied to the connected cable, the knot creeps and twists for some time, but when it stops, it holds firmly. It unties without much effort by shifting the loops covering the root ends.
As already mentioned, a flat knot has eight intersections of cables and it would seem that it can be tied in different ways; there are 256 different options for tying it. But practice shows that not every knot from this number, tied according to the principle of a flat knot (alternating intersection of opposite ends with under and over), will hold securely.
Ninety percent of them are unreliable, and some are even dangerous for tying ropes designed for strong traction. Its principle depends on changing the sequence of intersection of connected cables in a flat knot, and it is enough to change this order a little, and the knot acquires other negative qualities. Before using this knot in practice for any important task, you must first remember its diagram exactly and connect the cables exactly according to it without any, even the most insignificant deviations. Only in this case will the flat knot serve you faithfully and not let you down. This marine knot is indispensable for tying two cables (even steel ones, on which significant force will be applied, for example, when pulling out a heavy truck stuck in the mud half a wheel with a tractor).
Dagger knot
Dagger knot
In foreign rigging practice, this knot is considered one of the best knots for connecting two large diameter cables. It is not very complex in its design and is quite compact when tightened. It is most convenient to tie it if you first lay the running end of the cable in the form of a figure 8 on top of the main one.
After this, thread the extended running end of the second cable into the loops, pass it under the middle intersection of the figure eight and bring it above the second intersection of the first cable. Next, the running end of the second cable must be passed under the root end of the first cable and inserted into the figure eight loop, as the arrow indicates. When the knot is tightened, the two running ends of both cables stick out in different directions. The dagger knot is easy to untie if you loosen one of the outer loops.
Herbal knot
Herbal knot
Despite its name, this elementary unit is quite reliable and can experience heavy loads. In addition, it can be easily untied in the absence of traction. The principle of the knot is half bayonets with other ends (a). Sometimes we have to tie two belts: or two ribbons, well, let's say, reins. For this purpose, the “grass” knot is very convenient (b). It can be tied by slightly changing the “mother-in-law” knot or starting with half bayonets, as shown in diagram (a).
When you tighten the “grass” knot by the root ends, the knot twists and takes on a different shape. When it is completely tightened, the two running ends point in the same direction.
Packet node
Packet node
Its name suggests that it is convenient for tying bags and bundles. It is simple, original and designed for quick knitting.
The packet knot is somewhat reminiscent of the grass knot. In terms of strength, it is not inferior to the latter.
Fisherman's knot
Fisherman's knot
In Russia, this node has long had three names - forest, fishing and English. In England it is called English, in America - river or waterway junction. It is a combination of two simple knots tied with the running ends around the alien root ends. To tie two cables with a fisherman's knot, you need to put them towards each other and make a simple knot with one end, and pass the other end through its loop and around the root end of the other cable and also tie a simple knot.
Then you need to move both loops towards each other so that they come together and tighten the knot. The fisherman's knot, despite its simplicity, can be safely used to tie two cables of approximately the same thickness. With a strong pull, it is tightened so tightly that it is practically impossible to untie it. It is widely used by fishermen for tying fishing line (not synthetic) and for attaching leashes to fishing line.
Snake knot
Snake knot
This knot is considered one of the most reliable knots for tying synthetic fishing gear. It has quite a lot of weave, is symmetrical and relatively compact when tightened. With a certain skill, you can even tie the strings of a piano with it.
To do this, the place where the string is tied must be thoroughly degreased and coated with shellac. The snake knot can be successfully used to tie two cables made of any materials when a strong, reliable connection is required.
weaving knot
weaving knot
In weaving, there are about two dozen original knots for tying up broken threads of yarn and for connecting new spools. The main requirements imposed by the specifics of production on each weaving knot are the speed with which it can be tied, and the compactness of the knot, ensuring the free passage of the thread through the machine. Experienced weavers are truly virtuosos at knitting their ingenious knots.
They tie up a broken thread in just a second. They have to do this without stopping the machine. Almost all weaving knots are designed primarily for instant tying, so that in the event of a thread breakage, uninterrupted operation of the weaving machines is ensured. Some of the weaving knots are very similar to sea knots, but differ from the latter in the way they are tied. Some weaving knots have long been borrowed by sailors in their original form and serve them reliably.
The weaving knot can be called the “brother” of the clew knot. The only difference is in the method of tying it and in the fact that the latter is tied into a krengel or into a sail, while the weaving knot is knitted with two cables. The principle of the weaving knot is considered classic. Truly this is the epitome of reliability and simplicity.
Versatile knot
Versatile knot
This knot is similar to a weaving knot in its principle. The only difference is that in a tied knot the running ends point in different directions - this is very important when tying threads of yarn. It is not inferior in either simplicity or strength to a weaving knot and is just as quickly tied.
This knot is also famous for the fact that on its basis you can tie the “king of knots” - the bower knot.
Polish knot
Polish knot
It can be recommended for tying thin cables. It is widely used in weaving and is considered a reliable knot.
Clew knot
Clew knot
It got its name from the word “sheet” - a tackle that is used to control the sail, stretching it by one lower corner if it is oblique, and at the same time by two if it is straight and suspended from the yard. The sheets are named after the sail to which they are attached. For example, the fore-sheet and main-sheet are the gear with which the lower sails are set - the foresail and mainsail, respectively. Mars-sheets serve to set the topsails, jib-sheets pull back the clew angle of the jib, and foresail-sheets pull back the clew angle of the foresail, etc.
In the sailing fleet, this knot was used when it was necessary to tie the tackle into the fire of the sail, in the middle, such as the topsail-fox-sheet. The clew knot is simple and very easy to untie, but it fully justifies its purpose - it securely holds the clew in the sail's crank. Tightening tightly does not damage the cable. The principle of this unit is that the thin running end passes under the main one and, when pulled, is pressed by it in a loop formed by a thicker cable. When using a clew, you should always remember that it holds securely only when traction is applied to the cable.
This knot is knitted almost in the same way as a straight one, but its running end is passed not next to the main one, but under it. The clew knot is best used for attaching a cable to a finished loop, krengel or thimble. It is not recommended to use a clew knot on a synthetic rope, as it slips and can break out of the loop.
For greater reliability, the clew knot is knitted with a hose. In this case, it is similar to a brass knot; the difference is that its hose is made higher than the loop on the root part of the cable around the splash. The clew knot is a component of some types of woven fishing nets.
Windlass knot
Windlass knot
Just like the clew knot, it got its name from the name of the gear - the top sheet, which is used to stretch the clew knots of the lower edge of a straight sail when setting the top sails. If the single sheets of the lower sails are tied with a clew knot, then the top clew and boom halyards, top halyards and boom halyards, as well as top halyards are tied with a top clew knot. The clew knot is more reliable than the clew knot because it does not immediately untie when the pull on the cable stops.
It differs from a clew knot in that the loop (or krengel) is surrounded by the running end not once, but twice, and is also passed under the main end twice. In the days of the sailing fleet, the front clevis knot was widely used when working with gear. It was used when it was necessary to take some kind of gear into the fire, for example, top sheets and top sheets.
Usually they tied the bram-gins in the bram-halle and the gins in the topenant of the lower yards. The windlass knot is also reliable for tying two cables of different thicknesses. It holds well on synthetic cables of equal thickness.
Docker node
Docker node
In maritime practice, it often becomes necessary to attach a much thinner cable to a thick rope. There is always such a need when a ship is moored to a pier, when one or several mooring lines need to be supplied from the deck. There are several ways to attach the casting end to a mooring line that does not have a light, but the most common is to use a dock knot.
To tie this knot, the running end of the thick cable to which you intend to attach the thin cable must be folded in half. Insert a thin cable into the resulting loop from below, make one run around the root part of the thick cable, pass it under the thin cable, then over the running end of the thick cable and, passing under three cables, insert it into the loop.
The docker's knot is reliable enough to use the throwing end to pull (or lift onto the deck from the shore) a heavy mooring line, and it quickly unties. It is best used as a temporary knot.
Furrier's knot
Furrier's knot
It seems strange that this wonderful knot, long known to furriers, has still remained unnoticed by sailors. His scheme speaks for itself. It is relatively simple, has enough crossed ends and is compact.
In addition, the furrier's knot has an excellent property: designed for strong traction, it is tightly tightened, but also untied without much difficulty. This knot can be successfully used for tying synthetic cables and fishing lines.
Liana knot
Liana knot
This knot, although not widely used in the navy, is also one of the original and reliable knots for tying cables. It is unique in that, with a very simple interweaving of each end separately, it holds tightly under very strong traction and, moreover, very easily unties after removing the load on the cable - just move any of the loops along the corresponding root end and the knot immediately falls apart.
It does not slip on synthetic fishing line and can be successfully used by anglers.
Hunting knot
Hunting knot
In our time, inventing a new knot is almost incredible, since no more than 500 of them have been invented over five thousand years. Therefore, it is no coincidence that the invention of a new unit by retired English doctor Edward Hunter in 1979 caused a kind of sensation in maritime circles in many countries.
British patent experts, issuing Hayter a patent for his invention, recognized that the unit was indeed new. Moreover, it holds perfectly on all lines, including the thinnest synthetic lines. Essentially, a hunting knot is a successful interweaving of two simple knots tied at the ends of the cables. Dr. Hunter did not pursue the goal of inventing a new knot, but tied it completely by accident.
Since the surname Hunter means “hunter” in English, we called this knot a hunting knot.
Sea knots
Types of Rope Clamps
There are clamps for ropes and cables of the following types:
1) U-clamp
The clamp is a threaded bolt. The threaded ends of the bolt are inserted into the clamping element. When the steel clamp nuts are tightened, the element presses the cable against the bolt.
2) Flat cable clamp
Manufactured from carbon steel. Consists of a clamping element, a clamping plate, screws and nuts with metric threads. Depending on the number of screws in the design, the flat cable clamp can be single (simplex), double (duplex) and triple (triplex). Tightening the nuts clamps the cable between the plates.
3) Tubular clamp
Aluminum ones are used for ordinary cables, copper ones for acid-resistant ones, and stainless steel clamps are used for working in aggressive environments. The tube clamp is an aluminum flattened hollow cylinder.
Recommended for connecting cables to each other, as well as for making loops at the ends of the cable. Tubular clamps for steel ropes are compressed using a press or hand pliers. They are one-time non-removable elements.
Depending on the design and installation method, clamps for metal cables are divided into:
- wedge
- bolted
- screw
- jammed
- pressable
- canine
General information about cables
In the field of agricultural and transport engineering, in the construction, oil and coal industries, in the riverine industries, ropes and cables made of stainless or ordinary, but at the same time reliable and durable steel are used. They are usually used as the basis for various transport, lifting and road mechanisms. If you look closely at a steel rope, you will notice that it is a flexible metal product consisting of strands of steel wire twisted together. The number of strands in each individual cable can be different, as well as the number of wires from which each of them is twisted. A zinc or aluminum coating is often applied to the cable over the strands, which improves its anti-corrosion qualities. A galvanized pipe (or a stainless steel equivalent) coated with such a special compound will last much longer than without it. If you don't know how to braid a steel cable, the diagram below will definitely help you.
Inside a steel rope there is usually a core, the main task of which is to prevent transverse deformation from developing in the product and preventing twisted strands of wire from falling toward the center. This is a mandatory attribute of any rope or cable made from organic, metal, natural or synthetic materials. In other words, the core is the internal framework for its strands. Knowing the device or cables will help you understand how to properly braid the cable yourself.
Types of materials and coatings
Most often, cable clamps are used in work with large weights and heavy loads, so their production is subject to strict product quality control standards. Clamps for steel cables are made exclusively from high-quality and durable materials: steel, copper, aluminum, stainless steel.
In addition, rope clamps can be galvanized. Galvanized clamps have additional protection against corrosion. When working in adverse weather conditions and aggressive environments, stainless steel cable clamps are used.
Installation of rope clamps and fastening
When using arc clamps, it is recommended to install at least three clamps on one rope. If the load is higher than these types of clamps can withstand, then you need to use another type of this clamp, and not increase their number.
The rope clamp is installed on the steel cable so that the jumper of the clamp is always on the load-bearing side of the rope. A clamp bolt is located on the tail part of the rope or cable. The long part of the cable is bent so that the minimum required number of clips can be positioned to create a strong loop. The distance between the clamps and the length of the free end of the rope from the last clamp must be at least 6 rope diameters.
Operating rules
Before starting work, you need to check the strength of the rope clamps. After the first application of load on the cable, the tightening torque must be checked again and adjusted if necessary. It is necessary that products are regularly inspected and tested. This is necessary due to the fact that during operation the products are subject to wear and overload, which will lead to deformations and changes in the structure of the material. Rope end clamps should be inspected at least once every six months, and even more often if the products are used in harsh working conditions.
It is not allowed to bend or adjust the shape of the clamp, as this will deteriorate the quality of the product and reduce its ultimate strength.
The following factors can negatively affect the tightness of the clamps on the cable:
- the nut sits tightly on the thread, but not tightly in relation to the jumper;
- the thread is clogged with dirt, oil, and corrosion products, preventing the necessary tightening of the nut.
Tips for choosing
Before choosing a specific product, you need to make sure of its quality. To do this, you should pay attention to the following points:
- the clamps must be legibly marked;
- there should be no visible burrs, cracks, grooves or other manufacturing defects on the surface;
- clamps must be selected in accordance with the characteristics of the cables used;
- The type of material/coating of the clamp must correspond to the external factors and conditions in which the work is performed.
All specified types of rope clamps are designed and manufactured to order. You can select and order them in our catalog of rigging products.
There is a steel cable, but it is short, how can I lengthen it with the same cable?
First, you need to decide what specific cable it is (diameter) and what the load will be on it.
There are many options for connecting cables.
If the cable is in PVC braid and you are going to lengthen it by soldering, then first you need to remove that very braid, then degrease it, tin it and solder it.
But I would like to point out right away that soldering cables is designed for a small load and is not durable.
I usually use special cable clamps, they look like this
Clamps are selected taking into account both the diameter of the cable and the load.
It is better to connect with a loop.
That is, we insert one end of the cable into the clamp, make a loop (pass it through the cable.
And tighten the nuts on the clamps.
The same actions are performed with the second cable, which is the extension cord.
But first, let the free end of the cable into the loop, and then install the clamps.
If the load on the cable is significant, then release the end of the cable (on the loop) longer and install 2, if necessary 3, clamps on each loop.
To prevent the cables from fraying in the area of the loops, I usually install these thimbles in the loop.
If you use thimbles, then the end of the cable is passed through them; the clamps are installed later.
The thimble is also selected taking into account the diameter of the cable.
If there are no clamps, in principle the loop can be fixed with wire, but this is the worst option, clamps are much more effective, plus the knot will be collapsible.
- Author: Maria Sukhorukikh
Rate this article:
- 5
- 4
- 3
- 2
- 1
(0 votes, average: 0 out of 5)
Share with your friends!
How to knit a metal cable
Home comfort June 2, 2015
Any rope or cable, although it is made of good quality and strong steel, can unravel or even break at any moment.
Despite the apparent complexity of the repair, it can be done by anyone, even those without special skills.
The most unpleasant thing in the current situation is the possibility of a collision with it anywhere and precisely when such an accident is absolutely not expected.
Therefore, it will be useful to know how to properly braid a steel cable. Moreover, this does not require any special tools or special skills. In the future, it will be possible to weave both a hook and an earring into the cable.
At the same time, the structural strength will be at a high level, and it will serve you for many years. It is advisable to wear protective gloves before starting work, as the sharp ends of the steel cable strands can seriously injure your hands.
General information about cables
In the field of agricultural and transport engineering, in the construction, oil and coal industries, in the areas of river and sea transport, ropes and cables made of stainless or ordinary, but at the same time reliable and durable steel are used. They are usually used as the basis for various transport, lifting and road mechanisms.
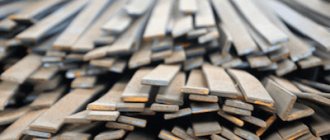
If you look closely at a steel rope, you will notice that it is a flexible metal product consisting of strands of steel wire twisted together.
The number of strands in each individual cable can be different, as well as the number of wires from which each of them is twisted.
A zinc or aluminum coating is often applied to the cable over the strands, which improves its anti-corrosion qualities.
A galvanized pipe (or a stainless steel equivalent) coated with such a special compound will last much longer than without it. If you don't know how to braid a steel cable, the diagram below will definitely help you.
Inside a steel rope there is usually a core, the main task of which is to prevent transverse deformation from developing in the product and preventing twisted strands of wire from falling toward the center.
This is a mandatory attribute of any rope or cable made from organic, metal, natural or synthetic materials. In other words, the core is the internal framework for its strands.
Knowing the structure of steel ropes or cables will help you understand how to properly braid a cable yourself.
Types of steel cable structures
Steel cables are divided into three types of laying:
- single;
- double;
- three-strand.
In single cables, the wire of a single strand with one cross-section is twisted in a spiral into several layers. Typically the number of layers is from one to four. In double cables, several strands are twisted around a core. In the manufacture of three-strand cables or ropes, several cables with different or identical sections are used.
Types of cables by degree of flexibility
There are steel cables:
1. With increased flexibility. In them, 24 wires are twisted around each core. There are 144 such thin wires in total.
2. With standard flexibility. Twelve wires are located around the core. There are a total of 72 wires in such cables.
3. Low-flexible cables. Only 42 wires are used in their production.
Types of cables according to lay direction
1. Cross - strands are twisted into a cable in the direction opposite to the direction of laying of the wire.2. Unilateral - the direction is the same.3. Triple - type 1 lay is used, but the wires and strands are twisted in different directions.
4. Combined - in such products, left- and right-hand directions of lay are simultaneously used.
In addition, cables are divided into rotating and low-twisting. The material from which the core is made also divides them into organic, single strand or steel wire.
Now you can consider in detail how to braid the cable yourself. Tools needed to complete the job:
- screwdriver;
- pliers;
- wire cutters;
- metal scissors;
- wire;
- gloves.
How to braid a rope?
The process diagram and algorithm are not as complicated as it might seem to an inexperienced person.
1. We cut off the ends of the cable as evenly as possible, and if the ends of its strands are bent or uneven, then we unravel each strand a little and cut off the defective areas with scissors or wire cutters.
It is convenient to chop off the ends by placing them on a metal rail or on a sledgehammer and striking the same place with the sharp edge of a hammer. As a rule, after 10-15 such blows, the ends of the cable are cut off.2.
We unravel the cable into strands at least half a meter from the edge.3.
We determine the diameter of the future loop we need and, measuring this distance from the edge of the unbraided cable, take 2 strands. You need to add 3-5 cm to the diameter of the future loop, since it will definitely decrease in size when weaving.
We make a loop from the selected strands, wrapping them.4. Either end of the thread is untwisted and wound into intertwined strands. The other one needs to be wound in the opposite direction.
If the length allows, then from the resulting three strands you can weave a pigtail, alternately weaving the threads.5.
The third strand is twisted around the braid, then a loop is woven into it, and a turn is made around the braid again. During the weaving process, the wires are passed in such a way that the previous one always goes towards the next one.6. Then all the ends of the wires are hidden inside the pigtail, and the resulting two strands are hidden inside using a screwdriver or pliers.
7. It is advisable to tighten the resulting braid with clamps in two or three places.
You can use ordinary wire, which is tightly wrapped around the cable and then pulled tightly with pliers. The protruding ends of such a clamp are also hidden inside the pigtails so that they do not interfere.
At the end of the work, it is advisable to isolate the location of the operation, for example, with insulating tape. It will help to fasten the ends of the steel wires together and will prevent future damage to the hands of the person who will use this cable.
When talking about how to braid a cable, you should remember: in order to get a strong and reliable connection, during laying it is necessary to lay the strands symmetrically and apply even pressure on them. Periodic crimping of the twisted strands will be an additional guarantee that the entire structure will receive sufficient strength.
Making a loop on a steel cable
Often, in addition to solving the problem of “how to braid a cable,” the need arises to form a loop at its end. For example, when repairing a guy wire on a tow rope or on an antenna, it becomes necessary to lower something to a depth, such as a submersible pump.
Since the steel cable or rope is quite rigid, simply tying it with a knot at the end will not work. In this case, there is nothing else left to do but braid the cable into a loop. And there is nothing complicated about this either.
The same goes for braiding a cable with steel wire.
Work process
1. The ends of an ordinary seven-strand cable are cut evenly with a grinder or chopped off with a hammer (its sharp part).2. We unravel the cable by 50-70 cm and use a screwdriver to divide it into two parts.
One produces three strands, and the other four.3. We twist the strands of both parts together.4. We make a loop with a diameter of at least 10 cm.5.
We bend the first four-strand part towards the other, which we place in the bends of the main cable.6.