A little about the history of Oselkov marble
Touchstone marble first appeared in Russia during the time of Peter I. Later, in particular, thanks to the work of Giacomo Quarenghi (1744-1817), V. I. Bazhenov (1738-1799), Charles Cameron (1745-1812), Bartolomeo Francesco Rastrelli (1700 -1771), V. P. Stasov (1769-1848), Auguste Montferrand (1786-1858), K. I. Rossi (1775-1849), finishing with artificial marble became widespread in the interiors of noble estates, palaces and churches.
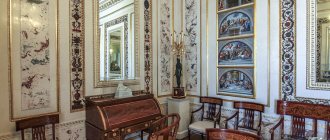
“New Cabinet” of Emperor Paul I.
The technique acquired the name “oselkovy” thanks to the “oselkovy” used in surface finishing - a stone block that has abrasive properties and has been used since ancient times in Rus' for grinding, sharpening and straightening tools (razors, knives, scythes, iron planes, etc.). ). The touchstone does not belong to any specific rock; this name refers to different rocks containing small grains of quartz. Most often, sandstone collected from river banks was used as a touchstone, which is why the touchstone is also called “water stone.”
What is donkey marble from a technology point of view? If you ask this question to an architect or restoration technologist, they will immediately tell you that ashlar marble is a type of decorative plaster finishing in interiors that imitates the finishing of natural marble and is made with compositions based on gypsum, animal glues and dry coloring pigments. If you talk to experts for another five minutes, they will reveal to you a “terrible secret” that the technologies of touchstone marble have long been completely lost. The loss of technology is reported by many print and online sources, especially foreign ones. However, this does not prevent craftsmen from successfully performing work from ashlar marble. Let's try to figure out whether there is a contradiction here.
Initially, the scagliola technique was not used en masse, but by unique masters who achieved amazing results in the beauty and strength of the material, thanks to experiments and numerous tests of various recipes. Naturally, the artist wants his creation to be unique, so each master tried to invent his own personal technology and recipe. All sorts of components were added to the composition for oskelet marble - chalk, sugar, grape juice, citric acid and much, much more. Experts say that in Russia in the 18th century, about three hundred technological variations were known, and at least a hundred were used, and since these were individual author’s techniques, often in competitive conditions, kept in the strictest confidence, many of them disappeared along with the authors. In this sense, the technology can be considered lost - all the abundance of approaches and recipes has not been preserved. However, despite the huge variety of different compositions for sandstone marble, the basic technique is always the same - this is the application of a composition of gypsum, adhesive solution, and dry pigments to the surface to be finished, followed by grinding and polishing, and even without any tricky additives. The resulting coating will be nothing more than stone marble, and what additives to use and whether they were used is a personal matter for each master, just like 200-300 years ago, so the statement about the loss of technology can be considered not entirely correct.
Double-height oval hall of the Elaginsky Palace in St. Petersburg.
The technology, of course, exists and is being used, it will continue to exist, but, unfortunately, purely theoretically. The art of making stone marble is, without a doubt, dying - such finishing does not fit into the conditions of modern construction due to the high cost, labor intensity and duration of the technological process. The remaining masters can be counted on one hand, but those who will replace them cannot be counted.
However, as long as there are still orders for recreating touchstone marble or for its restoration at Historical and Cultural Monuments, the technology is being applied. Now we will look at it in detail. It should be borne in mind that Oselkov marble has little in common with the finishing of the so-called “Venetian plaster”, as well as with cast marble. The difference is primarily in the end result. Touchstone marble is an imitation, but the imitation is beautiful and noble, often not inferior in beauty and sophistication to natural stone, unlike many modern materials, after the use of which surfaces and products look like cheap plastic.
Resin based marble
This polymer artificial stone has several other names: liquid stone, acrylic stone or cast stone.
The basis of such marble is resin (polyester, acrylic and others). Fillers and pigments are added to the resin in varying quantities. Stone chips, quartz sand, metal salts and other chemical compounds are most often used as fillers.
Products made from cast marble are quite common and often replace products made from traditional materials.
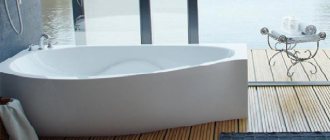
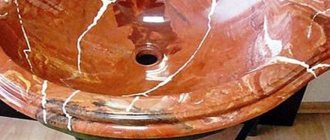
Artificial marble is ideal for all kinds of finishing work. Plumbing fixtures made of cast marble no longer seem like an unnecessary luxury to most people. First of all, it is necessary to note baths and kitchen utensils. Window sills made of this artificial material also compete with plumbing fixtures in terms of demand.
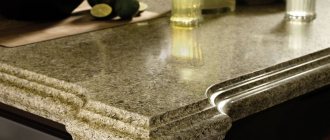
Returning to bathtubs made of cast marble, it can be noted that their surface is always perceived as warm. It does not react with household detergents. In addition, such baths are “not prone” to the formation of difficult-to-remove deposits. The cast marble countertops can be washed with one movement of the hand.
A marble table can be made of any size and various configurations. Therefore, most often for their manufacture it is necessary to make new formwork each time.
Window sills also belong to the group of especially popular products. The artificial material does not lose its geometry even under adverse weather conditions. Window sills made of artificial marble are much more reliable in operation than traditionally produced ones. The constant development of production technology makes marble window sills more and more affordable.
Bases for facing with artificial marble and their preparation
Before the widespread use of cement in construction as a binder, i.e. Until the end of the 19th century, cladding with ashlar marble was carried out on brick or wooden surfaces. The main requirements for the foundation were strength, stability, and absence of deformation.
Later claddings with oselkov marble, which were actively used in finishing the Moscow metro or, for example, Stalinist high-rise buildings, were already applied to concrete bases or a plaster layer made of cement or complex (lime-cement) mortar.
In part, the implementation of cement-based foundations was justified by better strength characteristics, the fashion for cement and its recognition as the most promising building material, but one of the reasons for the use of cement was that as the pace of construction production increased, the quality of lime, the main type, gradually decreased binder used throughout the centuries-old history of construction. Technologically correct production of lime with a long period of slaking and aging in lime pits did not ensure the proper speed of construction production. The accelerated production of lime and the industrial production of fluffed lime reduced the quality of lime as a binder, and the need to “reinforce” lime mortars with cement became obvious.
In the photo: columns lined with ashlar marble in the building of the Federal State Statistics Service (“Rosstat”), designed by Le Corbusier. The bases of the columns are made of extremely high grade concrete, which is very difficult to process even with modern diamond tools.
Columns of the Rosstat building on Myasnitskaya Street.
It was during the construction of the Moscow metro and Stalinist high-rises that official technologies for the production of artificial artificial marble were approved. It must be said that they are not so different from the technology of the 18th-19th centuries, perhaps only in the use of new materials that were not available in the old days - metal mesh for reinforcement and cement as an additive to limestone soil.
Finishing of wooden structures with oselkov marble
Wooden bases for facing with artificial marble must be durable. Before applying marble on a wooden surface, it is necessary to perform reinforcement. Wooden shingles were traditionally used for reinforcement, as well as for plastering work; later craftsmen began to use metal mesh of the “chain-link” type, painted with anti-corrosion compounds or galvanized. Before attaching the shingles or mesh, the wooden structure was covered with felt for better heat and sound insulation.
The fastening of both the metal mesh and the shingles must ensure a distance from the main structure of at least 1.5-2 cm. When restoring or producing newly-made marble on wooden surfaces, antiseptic and biocidal treatment of wood is also carried out with special compounds that are presented on the market in our country. time in a large assortment.
Oselkovy marble on brick and concrete bases
Brick and concrete bases must be cleaned of dust, dirt, remnants of plaster or old paint, as well as oil and grease stains before facing with ashlar marble. It is also useful to notch the surface for better adhesion to the ground, as well as treating the surface with acrylic primers to remove dust and strengthen the surface layer of the structure, enhancing adhesion to the surface.
Production of cast artificial marble
Before starting work, you need to immediately prepare all materials and consumables, as well as buy or rent tools and equipment for marble production.
Equipment
First of all, you need matrices - forms for pouring the marble mixture. Polyurethane molds have proven themselves best - they are very durable and do not deform, although they are not cheap.
Table top mold
You will also need:
- components for mixing the composition;
- construction mixer;
- Sander;
- capacity;
- gelcoat sprayer or mold brushes.
Composition of raw materials
The main components are polyester resin (gelcoat) and marble chips (flour) in a 4:1 ratio. Cement, gypsum, lime, and quartz sand are also used to improve strength and improve performance characteristics.
Important! If desired, cement can completely replace the polyester resin in the composition, but the reliability of the finished marble will decrease.
In this case, the “recipe” for the solution will be as follows:
- sand – 2 parts;
- cement – 1 part;
- small stone chips – 25% of the total volume;
- water – 0.2 parts;
- plasticizer – 1% by weight of cement;
- pigment – 1% by weight of cement.
Oselkovy marble – cladding technology
Laying down the soil
Composition of the soil for cladding with semolina marble:
| Components | Ratio of components (in parts by weight) | ||
| on brick and concrete | on brick and wood | woodworking | |
| Cement | 1 | 1 | — |
| Lime (dough) | — | 1 | — |
| Gypsum | — | — | 1 |
| Sand | 3-4 | 5 | 2 |
| Water | to the required thickness | ||
The primer for cladding with semolina marble is usually applied in two layers. The layer thickness (total) must be at least 15 mm.
The first layer of soil is called spray. It is made with a liquid solution with a layer thickness of no more than 5 mm. After this layer has set, apply a second layer of soil from a thicker solution. If the soil contains cement, then the soil is moistened 2-3 times with water the next day after application, in order to avoid too rapid drying and the appearance of cracks and peeling. Wetting of the surface is carried out daily for a week or more.
If the primer for marble when facing wooden surfaces is based on gypsum, then wetting the surface does not slow down the setting - these are the properties of gypsum, therefore, to slow down the setting, the gypsum mixture is sealed with an aqueous adhesive solution (2-2.5%), using one of the animal glues ( bone, flesh, casein, fish).
In the past, sheep wool or asbestos fibers were added to cement or complex compositions for additional reinforcement of the spray layer. In modern conditions, it will be very useful to add fiberglass fiber to the solution used for spraying (0.6-1 kg per 1 cubic meter of solution).
Deviations of the surface covered with soil from the vertical or horizontal by more than 2% are not allowed.
It is necessary to ensure good adhesion of the finishing layer of sandstone marble to the soil. To do this, the surface of the soil is not rubbed down, but remains rough and a mesh 3-4 mm deep is scratched onto it.
Do not apply the finishing layer until the primer layer is completely dry. The soil dries out within one month, and the optimal air temperature in the room is 18-20 degrees. At higher drying rates, cracks may appear. Drafts must also be completely eliminated.
The necessity of strict adherence to these technological conditions is one of the reasons for the low demand for finishing with sandstone marble on modern construction sites. Customers often cannot afford such extended periods, and compliance with temperature and humidity conditions is hardly possible in the conditions of dynamic construction and constant movements of workers and construction equipment around the site.
Applying the front layer of gypsum stone marble
Shield and shovel are the two main methods of applying a facing layer of gypsum marble over a layer of soil. In turn, the panel method can be overhead or bulk.
For any application method, the following technological operations are performed:
· installation of beacons on the surface to be finished;
· mixing dry ingredients;
· preparation of an aqueous adhesive solution;
· mixing gypsum dough;
· applying plaster test.
Some tools for working with touchstone marble.
Installation of beacons (marks) on the surface to be finished
First, the entire surface to be finished is drawn into rectangles. The dimensions of these rectangles should be the same as the dimensions of the shields that will be used in the future. Plaster marks are installed at each intersection point of four adjacent rectangles. These marks are subsequently removed after laying the front layer of finishing, and the places where they are installed are sealed with color-matched marble paste.
Mixing dry ingredients
To perform the work, a workbench 2-3.5 m long, 1-1.5 m wide, and a convenient height is used. The workbench must have a smooth surface and be resistant to moisture, and also be sufficiently stable and durable, so craftsmen often use a solid slab of natural marble or granite, as well as thick laminated plywood as a workbench tabletop.
First of all, samples are made. The size of the samples should give a complete picture of the final appearance of the front surface - its color, tone, pattern and degree of polishing, therefore it can be different, however, in restoration standards the size of the samples is established - 25 x 25 cm and 40 x 50 cm. A full cycle of all operations up to the stage of polishing and waxing. Then they begin to prepare a mixture of the compositions that were used in the manufacture of the selected samples. Currently, samples are produced, as a rule, before the start of work or at the stage of negotiations with the customer.
The mixture is prepared immediately for the entire scope of work from materials from one purchase batch. The main material is high-strength gypsum. Currently, as a rule, G-16 gypsum produced in Samara is used; EUROGIPS Kartonpiyer molding gypsum produced in Turkey has also proven itself very positively. The quality of these gypsums is sufficient for the production of Oselkov marble; it is important that the gypsum is fresh and dry - we have the sad experience of making Osel marble cladding from wonderful Samara gypsum, but it had lain for a couple of months in the winter in a metal container. The result is disastrous. The required fineness of grinding of these gypsums, as a rule, corresponds to the requirements for gypsum for sandstone marble, however, craftsmen are accustomed to always monitoring the degree of grinding - sometimes low-quality delivery batches come across. The grinding fineness should correspond to:
- through a sieve of 64 holes per 1 square. cm passes completely;
- on a sieve with 900 holes per 1 square. see the balance should be no more than 10%.
The quality of gypsum is also always determined by external signs. Signs of good quality gypsum:
1. Mix a small amount of plaster and make a cast on the glass. The casting is dried, hardened, and then separated from the glass. The surface of the casting that was in contact with the glass should be glossy and not friable;
2. The batch of gypsum must be white, without foreign inclusions and grains:
3. Hardened plaster breaks with a characteristic crack;
4. The gypsum mixture becomes warm a few minutes after mixing with water;
5. When the mixture settles after mixing the gypsum, no separation of the mixture into gypsum and water is observed.
The color, tone and pattern of artificial marble is obtained through the use of dry pigments. To obtain marble of a certain pattern and color, various natural dry pigments are used: soot, ultramarine, various ocher, mummy, chromium oxide, red lead and others. Currently, modern synthetic dry pigments are also successfully used, which have a number of advantages - high light resistance, a significantly richer color range compared to natural pigments. Pigments are added in an amount of 0.25-15% of the gypsum weight, depending on the desired color and tone; the addition of pigments should not affect the strength of the coating.
Modern dry pigments.
The dry mixture is prepared as follows: the gypsum is scattered on a workbench in a layer 6-8 cm thick, and the necessary pigments are sifted through a sieve on top. The mixture is then mixed and, if necessary, sifted twice through a 625-hole sieve per square centimeter and, if necessary, ground in a hand mill until a uniform color is obtained.
Preparation of an aqueous adhesive solution
For the solution, high-quality light glues of animal origin are used - bone, fish, flesh, sturgeon, casein. The percentage of glue in the aqueous solution should be 1-2.5%. Dry glue is soaked for 12-16 hours in cold water, in a container that is not subject to oxidation. After this, it is dissolved until the final state, in which the lumps completely disappear. Use a wooden spatula for mixing. Dissolved glue does not last long - no more than two days.
Preparation of gypsum dough.
Mixing gypsum dough
Bulk panel method
Let's consider the bulk panel method. In layers 0.5 to 5 cm thick (depending on the design), dry gypsum mixtures of the desired colors are poured onto the workbench. First, a mixture of the main color is poured, then a mixture of the vein colors, then a mixture of transition colors.
Similar layers crumble on top of the first three. The number of layers poured can be from three to twenty-five, with a thickness (total) of up to twenty centimeters, but the thickness of the layers should be different. This is necessary to achieve the naturalness of the subsequent drawing.
Shields measuring approximately 80 by 120 cm are laid out quite close to the workbench, close to one another. Shields can be made of wood, moisture-resistant plywood and other suitable materials. Burlap is placed on the shields, the size of which should be slightly larger than the size of the shields. To ensure that the burlap does not interfere with installation, its edges are tucked under the shield. The number of shields must correspond to the area of the simultaneously covered surface. Usually 10-12 shields are placed.
For cladding curved surfaces, for example, round columns, flexible mats made of planks are used instead of panels. The planks are connected with straps or thick fabric.
The bulk method is used if you want to get a complicated pattern. The mixture is transferred from the workbench to the shields. To do this, use a flat scoop. In this case, the unfolded layer should be rotated in a vertical plane by 90 degrees if possible - this is necessary to form the future pattern. The layer of the mixture should be twice the calculated thickness of the marble and be from 1.5 to 3 cm thick. After leveling the mixture on the boards and covering it with burlap (or gauze), the mixture is poured with an adhesive solution from a watering can until the mixture is completely saturated.
Overlay method
It differs from bulk dough in that instead of dry mixtures, ready-made gypsum dough is placed on the boards.
The dough is prepared in different colors, in necessary accordance with the approved sample. It is laid on shields with burlap. First, the dough of the main color of the coating is laid, then the dough corresponding to the marble pattern (veins, inclusions) is laid. The front surface of the marble will be the surface on the side of the shield. The dough is leveled using wooden or aluminum slats, reinforced along the edges of the board. The panels are numbered in order to lay the marble on the surface in a certain order by number.
Gypsum dough using the overhead method of making a “touchstone”.
In this way, you can get marble with a fine pattern. You can complicate the design by pressing lumps of marble dough of the desired colors into the mass laid on the boards. Touchstone marble is also often found, having inclusions of natural stones, in particular natural gypsum or onyx.
Applying gypsum test to the surface
Panel overlay method of applying marble
The prepared soil is coated with liquid gypsum with a layer thickness of no more than 2 mm. The dough is already laid out on the boards. Workers apply a shield with gypsum dough, starting from the bottom, resting against the bottom of the shield, and quickly and forcefully press the shield to the surface covered with soil. After this, the shield is removed, the burlap remains, the applied gypsum dough is pressed through it and leveled in order to ensure its maximum contact with the ground and the removal of air bubbles, which, if necessary, are removed using punctures. When laying the panels, you must follow a checkerboard pattern. The drawing is corrected by hand, especially along the borders of the shields.
Applying donkey marble using spatulas (spade method)
Before laying, the soil is lubricated with liquid gypsum with a layer thickness of no more than two millimeters. It probably doesn’t make sense to describe in detail the trajectory of the master’s hand with a spatula clamped in it in order to understand the essence of the process of applying plaster, which is that the dough is transferred in a certain way from one spatula to another and turned over in such a way that when applied with a spatula onto the surface to be finished, the desired pattern is obtained. The base color dough is applied by hand. In order to obtain marble with veins, several layers of dough with a total thickness of about 20 cm are laid on a workbench. This layer is cut into pieces, which are thrown or overlapped, then leveled. After overlaying, the space between the sketched pieces on which the most pronounced pattern is filled is filled with dough of the main color.
Cleaning and sharpening of ashlar marble
Cycles and scratches are used to clean the surface. Wait for the dough to set, and after 2-3 hours, clean it. The result of cleaning and sharpening should be the elimination of minor irregularities and the appearance of the color of the marble.
Shard of Oselkov marble.
Surface sharpening begins the next day after cleaning. For this, a tool called sherhebel is used. First, the thickness of the cladding layer to be removed is determined in order to bring the coating thickness to the design thickness, while you need to focus on the previously installed marks and beacons, which must first be cleaned. In hard-to-reach places where it is not possible to sharpen with sherhebel, chisels are used. In the process of removing the excess layer of marble, the surface is periodically checked using rules, slats, and templates. After bringing the coating thickness to the design level, the marks and beacons are removed, and the places where they are installed are sealed with gypsum dough of the appropriate color. After the gypsum has hardened in places where additional arrangements have been made, the surface is finally cleaned. Curvilinear surfaces are cleaned with planes; homemade plane pieces with the appropriate profile are used.
After sharpening the surface, you can begin the final finishing of the ashlar marble. Perhaps finishing is the most important stage of the entire technological process, because as a result, marble acquires an extremely attractive appearance, similar to the appearance of natural polished marble, and sometimes, thanks to its seamlessness and unusual color scheme, the appearance is even superior to natural marble in terms of decorativeness.
Cladding surface finishing
Finishing of ashlar marble involves repeated cycles of grinding, polishing and puttying the moistened surface. This long and painstaking work, performed only by hand with low pressure on the surface, leads to a gradual compaction of the initially soft material - gypsum, which in the process acquires strength comparable to the strength of soft rocks of natural marble (strength - 1.2 - 1.6 MPa and average density – 1100 – 1300 kg/m3).
We can have an excellent understanding of aerodynamics, know about Bernoulli’s laws, what a Laval nozzle and Mach number are, know how airplanes fly, and yet, looking at them, ask the question: “How does this colossus fly? » From the same series is the topic of gradual hardening of artificial marble as a result of its finishing. It seems that everything is clear, but the fact that under the hands of a master the plaster turns into stone is difficult to accept. However, in fact, this is exactly what happens.
Touchstone marble finishing.
Rough grinding and puttying of sandstone marble
Primary grinding is performed with natural abrasives - pechora or pumice. For reference, let us explain that pechora is a whetstone of natural origin, which was developed in Russia in the 19th century. in the region of Pechora - a city in the Komi Republic of the Russian Federation, well, pumice is volcanic glass with a porous structure.
The surface subject to grinding is periodically moistened with water, grinding is carried out in all directions with uniform pressure on the block. During the grinding process, any dirt that appears is constantly removed with a damp sponge. Grinding continues until traces of sharpening and scratches disappear. After grinding is completed, the marble surface is washed with water and all moisture is collected with a sponge.
The dried surface is then puttied. Puttying is necessary to eliminate minor defects, seal holes and cavities, and minor scratches. For puttying, gypsum dough of the desired color is used, and a 5-6% adhesive solution is used to mix the dough. The putty mass is applied with a brush. After it is absorbed, it is leveled, and excess putty is removed with a wooden spatula. A spatula is also used to putty individual areas of the coating, or recently, craftsmen have successfully used unnecessary plastic cards for these purposes. Important - the thickness of the putty layer should be as minimal as possible.
Puttying of oskelet marble.
The surface is sanded again after two to three days. Only the grinding should no longer be rough, but finer. If the surface is not yet ready for finer grinding - the putty has a thick layer, noticeable scratches and cavities are observed, then grinding is repeated with coarse abrasives (pechora or pumice). If the putty layer is not thick, then use slate (black) No. 1.
Slate is a natural material related to slates. Slate is a natural stone with a layered structure that can split into thin sheets. In the old days, natural slate plates were used for roofing. In addition, slate plates have obvious abrasive properties. Modern artificial roofing material - slate (usually wavy) has the same name as natural slate.
The entire finishing sequence (puttying and sanding) is repeated as much as necessary. The surface should be flat and smooth. After which the surface is wiped, all moisture is removed. This can be done with a sponge.
Fine grinding of the surface of ashlar marble
After completing all the cycles of rough grinding and puttying the surface and drying it for two to three days, a thin layer of putty is applied again, which is then sanded with thick slate No. 2 (gray), again while wet with water. Movements when grinding should be smooth, circular, intersecting, with uniform pressing force. The surface is periodically wiped with a sponge. 4-6 hours after finishing sanding and drying the surface, the marble is glued with an 8-10% solution of glue applied with a brush until completely saturated.
After one or two days, the wet surface is polished with slate No. 2 (gray) and polished with whetstone No. 1 (green). Before each grinding, the surface must be puttied. Polishing is carried out until the appearance of “velvety” – a certain specific shine. As a result of all these operations, a dense surface is obtained, without cavities, pores and scratches.
Marble polishing
After polishing, the surface of Oselkov marble is once again covered with a glue solution, and it is dried for a couple of days. Then polishing begins with hard stone (black), which continues until a matte shine appears. Polishing is carried out on a moistened surface, so that it does not heat up; heating the surface is unacceptable. After polishing with black touchstone, the surface should be shiny, but if spots without shine are observed, then the surface is again covered with an adhesive solution and polished again after 1-2 hours. The entire cycle is repeated until the entire surface acquires a uniform shine.
Another interesting abrasive material that is used for polishing profiled and hard-to-reach surfaces is a perennial herbaceous plant - horsetail. Horsetail has high abrasive properties, which have been used in Rus' for centuries, for example, for cleaning metal utensils.
It should be noted that in addition to traditional abrasive materials - pechora, slate, stones, you can use modern “sponges” for polishing natural stone, and even moisture-resistant sandpaper, but for some reason the effect of their use is worse. Also, attempts to mechanically treat the surface with grinders did not lead to anything - the degree of polishing is significantly worse than when polishing with whetstones; it can be used at the stage of rough grinding, but it does not make sense, because rough grinding is not the most significant part of the technological process.
Waxing the surface of oskelet marble
The surface, polished and dried for 6-8 days, is given a mirror shine using wax-rosin mastic. This mastic is very often used for various restoration works - for the restoration of paintings and natural stone. Professional restorers consider wax-rosin mastic one of the best materials. There are even those who use only it for anti-corrosion protection of the underbody of their cars, not trusting modern materials. Wax, as is known, has excellent preservative properties and adds visual shine; however, the wax coating is fragile and has a low melting point. Adding rosin to wax increases the strength of the mixture and the melting point, that is, it gives durability to the coating.
Composition of wax-rosin mastic:
Natural wax 1 part by weight
Rosin 0.3 parts by weight
Gum turpentine 2 parts by weight
The wax is grated on a large kitchen grater, rosin is crushed into powder, the whole thing is poured with turpentine and heated in a water bath while stirring until a homogeneous mass is obtained. The mastic is applied to the surface with a canvas rag, then immediately rubbed until shiny with a soft cloth - felt or suede.
The final addition of shine, as well as surface care during operation, can be done using a wax paste of the following composition:
Natural wax 1 part by weight
Laundry soap (40%) 0.2-0.25 parts by weight
Gasoline until desired consistency is obtained.
Before rubbing marble with this paste, you need to wipe the surface with a small amount of vegetable oil.
The surface of ashlar marble after polishing and waxing.