The old water supply in the apartment has rotted. Sweat on the pipes, fistula after fistula; turn off the water and then turn it on again - rust pours out of the taps. And there are plans to renovate the kitchen and bathroom, and the old pipes are scary to look at, let alone touch or breathe. It needs to be changed, but the work is expensive. Is it possible to replace the apartment water supply with your own hands? Yes, you can, and without any permits or registrations. You will only need to negotiate with the DEZ mechanic to shut off the water supply to the risers for a maximum of an hour; Most likely, you will be able to handle it in about 10 minutes. Or warn your neighbors, if not harmful, and shut it off/restart it yourself.
Replacement procedure
Replacement of the water supply system is carried out in a certain sequence. Work “by eye” and “as you go” when done unprofessionally often ends in a leak. The work plan is something like this:
- Selection of material for new pipes.
- Selecting a hot and cold water distribution scheme.
- Development of a water supply scheme for an apartment.
- Calculation of pipe diameter according to the selected material and design.
- Preparing the installation tool.
- Purchase of materials.
- Assembling sampling and accounting units, installing them on risers and registering.
- Dismantling old pipes and plumbing fixtures.
- Connection of HMS and aquastop, if provided.
- Connecting a flask filter (required with HMS).
- Installation of hot and cold water pipes.
- Installation and connection of plumbing, old or new.
- Test water supply; elimination of identified defects.
- Installation and connection of the boiler.
How to install plumbing in a private home
Installation of water pipes
After drawing up a layout diagram for the plumbing of a private house, you can proceed to the direct installation of utilities. Ready-made installation diagrams must contain not only the exact coordinates of the placement of pipes, fittings, and plumbing elements, but also their dimensional parameters. It should be taken into account that incorrect selection of pipeline diameters reduces the efficiency of utility networks. To install plumbing, the master must have the skills to read engineering drawings. Installation of plumbing in a private house is carried out after completion of the construction of the frame and arrangement of the roof.
Rules for performing work on installing plumbing in a private home:
- the entry point of the pipe for supplying water to a private house is placed at a distance of at least 1.5 m from the exit point of the sewerage system, gas main or heating network;
- Immediately behind the wall where the water entry point is located, you need to set up a water metering point. It is better to combine this unit with a piping that provides the ability to supply an increased volume of water (this may be necessary when extinguishing fires and in other cases);
- departmental shut-off valves are placed before the water metering unit, and after it an in-house shut-off valve is installed;
- the diameter of water pipes is calculated taking into account the planned volumes of water consumption and the number of plumbing elements for water consumption;
- the installation of internal pipelines and sewerage in a private house is most often carried out in the basement;
- for long-distance water supply systems of a private house, it is necessary to provide for the installation of three circulation pumps, two of which are necessary to ensure water supply at minimum and peak water consumption, and the third serves as backup equipment;
- The slope angle of the internal water supply of a private house depends on the diameter of the pipes and is indicated in the plumbing layout diagram.
Read material on the topic: How to choose pipes for water supply
Installation of an external sewer system
Rules for arranging external elements of water supply and sewerage of a private house:
- laying of pipes in the ground should be carried out at a depth exceeding the freezing point;
- when sewer pipes intersect with water pipes, the latter are laid at least 0.4 m above the sewer pipes. To protect cast iron and plastic pipes from mechanical deformation, special casings made of durable steel are installed at the intersection points. The length of such a casing should exceed 10 m (in each direction) for sandy soils and 5 m for clay-based soils;
- pipeline intersections must be designed at an angle of 90 degrees;
- when laying water supply and sewerage systems in parallel, the distance between the outer walls of pipes with a diameter of up to 20 cm should be more than 1.5 m.
Installation of internal and external utilities in a private home is a complex process, the success of which largely depends on a professionally drawn up plumbing diagram. For the normal and safe functioning of the water supply or sewerage system, it is necessary to strictly comply with the requirements of SNiP.
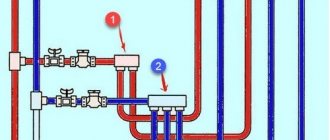
HMS, flask filter and aquastop
The HMS, or hydromagnetic system, has long been used in industry to prepare water for filtration. In everyday life, this device, without going into details, transforms impurities in water into a thin suspension, which then settles in the filter in the form of sludge and is periodically removed. HMS is absolutely harmless, does not require power supply or maintenance during operation, but it does require the installation of an antimagnetic water meter (these are more expensive) and, following the water flow, a combined flask filter.
The flask filter consists of three sections connected in series: the first collects sludge, the second removes chlorine, and the third carries out fine water purification and softening. The latter (no one drinks tap water for a long time) is especially important for the boiler of a washing machine.
GMS (1), main flask filter (2) and avkvastop (3)
HMS with flasks cost a lot, but they protect not only equipment, but also health. Complain or not, be indignant - don’t be indignant, but drinking water remains firmly in the top ten most scarce resources in the world, and there are no global programs capable of bringing its quality to the level of at least the middle of the last century, and are not expected. In general, saving drowning people is the work of the drowning people themselves.
Aquastop is also a useful device, it also does not require power supply or maintenance, but its function is different. When there is a sharp increase in current (breakthrough) of water, the aquastop is triggered and its valve cuts off the entire apartment from the riser. Aquastops come in different systems, including electrodynamic ones, so an antimagnetic counter is also needed when installing an aquastop.
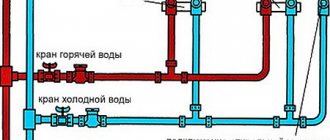
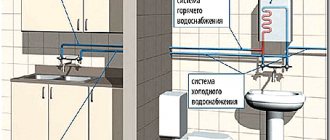
Do-it-yourself water distribution in an apartment
How to properly install water in apartments? Let's consider step by step the most common wiring diagram today:
- First of all, the main valve is installed on a common riser.
- At the second stage, a so-called water metering unit is installed, which includes a coarse filter, as well as a valve (return) and a meter that measures water flow.
- Then a hydromagnetic system (HMS) is installed. The main task of such a system is to process foreign particles that are in the water. The processed particles form a sediment, which is removed through a mechanical filter.
- After installing the cleaning filter, it is necessary to install the Aquastop safety valve.
Thus, the installation of water supply communications in the apartment is carried out. The meter must be equipped with antimagnetic protection. Any person who does not have special construction knowledge and skills can independently install pipes in an apartment. If necessary, you can always contact a specialist who will carry out all the work correctly and give a guarantee for the finished pipeline.
Pipe selection
A new water supply system in an apartment begins with the selection of pipes. Steel has outlived its usefulness in everyday life, and you have to choose from metal-plastic, plastic and soldered copper. This stage of work is perhaps the most critical - the wrong choice will negate all efforts, expenses and hassle.
Copper
One thing you can say right away about copper water pipes is that their promoters don’t know what they’re talking about. Or they know, but don’t set it for themselves. Firstly, copper oxide forms on copper in contact with water - the same verdigris that Tom Sawyer talked about to Huckleberry Finn. Yes, humans need copper, but in insignificant quantities in the form of a microelement, and not as part of a strong poison. As a counterargument, they say that copper and chlorine form a protective film from water. Absurd for anyone who even remembers school chemistry.
Secondly, copper solder contains tin. White tin, a soft metal, over time turns into another, as chemists say, allotropic modification - gray tin, friable powder. That is, by installing copper pipes (very expensive), we thereby 100% guarantee leakage. And payment for the work of a company specializing in copper pipes, since it is impossible to solder them correctly yourself.
Metal-plastic
Metal-plastic pipe
Metal-plastic pipes are quite expensive, but you can connect them with your own hands without experience. Metal-plastic water supply is assembled on special threaded units with gaskets or crimp fittings. In addition, metal-plastic pipes can be smoothly bent. Hydrodynamic resistance and pressure losses in metal-plastic are very small.
To insert a pipe into a fitting, you need a pipe cutter, press pliers and a set of reamers (reamers) for the diameter of the pipes. With their help, the work is easy, and using improvised means is a complete guarantee of leakage. In addition, the life of gaskets in fittings is limited, and over time the joint begins to drip. Therefore, it is unacceptable to bury metal-plastic in walls, and it is strongly recommended not to hide it in grooves.
It is recommended to install metal-plastic water pipes in separate open areas, where minimal resistance to water flow and the ability to simply and quickly repair the joint are important: when connecting a boiler, washing machine, sink, etc. Adapters from metal-plastic to other types of pipes are always on sale.
Plastic
Plastic apartment water supply has now become a standard, but there are different plastics. To make the right choice, you need to know their properties and features.
Polybutylene (PB)
Flexible plastic with good thermal conductivity for plastic. Maintains temperature up to 90 degrees. A properly soldered joint is absolutely reliable. Quite expensive. Used for installing heated floors.
Polyethylene (PE)
Cheap, but for hot water supply you need polyethylene reinforced pipes; ordinary polyethylene no longer holds 60 degrees. It is impossible to bend and glue, the soldered joint reliably holds a pressure of no more than 3.5 atm, and the water pressure in the city water supply can be up to 6 atm (0.6 Mbar) for cold water and 4.5 atm for hot water, so there is still the possibility of a sudden breakthrough. Hydraulic resistance, however, is the least of all.
It seems that polyethylene pipes are bad for everyone, but they have an advantage that can be worth all their shortcomings: they are not afraid of freezing. The ice plug bursts them apart, and when it melts, they shrink again and don’t burst, even if you crack. Therefore, the installation of polyethylene water supply is strongly recommended in unheated, seasonal and underground areas. There is no alternative to polyethylene. But with a constantly filled system, an aquastop is necessary.
PVC
The properties of polyvinyl chloride (PVC) are quite well known: chemically resistant, inexpensive, heat resistant up to 80 degrees, easy to glue, but not very durable and afraid of ultraviolet radiation. Joints, both soldered and glued, are more fragile than solid material, so the danger of a breakthrough remains and aquastop is needed. Replacing individual sections of glued PVC is, of course, more difficult than for collapsible metal-plastic, but easier than for soldered joints: by heating the joint with a household hairdryer, the joint can be pulled apart and then glued back together. In general, this is a budget option or for a novice craftsman, with the length of the main branch from the riser to the farthest water collection point no more than 10 m and with no more than 7 extraction points.
Propylene (PP)
Laying residential water supply pipes with polyisopropylene pipes (propylene) is now generally accepted. The material is not very expensive, durable, resistant, soldered joints retain all the qualities of the base, heat resistance - up to 130 degrees, correctly soldered holds up to 12 at. The hydraulic resistance is higher than that of PVC, but still the accumulation of plaque in the lumen is minimal, and with HMS it is excluded. There are only two disadvantages to doing it yourself:
- It does not glue, and soldering requires special equipment and strict adherence to technology.
- It has a fairly high coefficient of thermal expansion. A tile walled up in a wall or hidden in a groove can bend and break, so when laying each pipe you need to put on a stocking made of Merylon or synthetic padding, which makes the work more expensive.
However, today the propylene pipeline is the only one that can be done once and for all and forgotten. Therefore, we will dwell on the soldering of propylene separately, especially since the soldering of other plastics differs only in lower temperatures (110-130 degrees for polyethylene and about 150 for PVC).
Soldering propylene
Soldering cut end-to-end with a homemade soldering iron (iron) (see figure on the right) is unacceptable:
- Contaminants accumulate on the “sausage” inside, and a pipeline assembled in this way is more susceptible to clogging than a steel one.
- The water pressure, pushing the pipes apart, tends to break the joint. At 16 degrees in the pipe and 20-25 outside, after about three months the fatigue threshold of the material is exceeded, and the joint leaks.
Incorrect soldering of propylene pipes
The assembly of the propylene pipeline is carried out using fittings for soldering - straight (for connecting pipe sections), corners, tees, crosses. The pipe, heated to the point of softening, is inserted into the ferrule of the also heated fitting, and the joint hardens. In this case, the water pressure, on the contrary, presses the pipe against the holder from the inside, providing strength, and only sealing is left to the fused zone. The fairly high rigidity of propylene does not allow the clamp enclosing the pipe to expand elastically. It is this connection design, combined with the properties of the material, that makes the propylene pipeline suitable for walling into walls for decades.
The soldering itself is simple: the soldering iron tips “male” and “female” (internal and external) are respectively inserted into the fitting and put on the pipe. Turn on the soldering iron and wait until its temperature indicator shows 250 degrees or the signaling device gives a signal. The pipe and fitting are quickly removed (removed), inserted into each other and wait, without moving the joint, until it cools down. That's it, you can continue soldering. You can study the soldering process in more detail here.
Note: a more or less decent soldering iron for propylene costs at least 2000 rubles. and is not suitable for anything else, but does not wear out from work. Therefore, there is no need to buy it; it is better to rent it.
In general, recommendations on which pipes to choose for water supply in an apartment can be summarized as follows:
- For hidden wiring in a typical apartment, in grooves or monolithic, it is definitely propylene.
- For long branches with a large number of water points - open metal-plastic or in channels with removable covers.
- For country houses, seasonal housing for rent, country houses with remote outbuildings, swimming pools, greenhouses, etc. – polyethylene.
- For budget repairs or in areas with water shortages, low pressure in the water supply, and poor quality water - PVC.
Metal pipes
Today, metal pipes are not as popular as before, however, they are still used to distribute water in the apartment. To organize water supply, 3 types of pipes are used:
Pipes made of stainless or galvanized steel are reliable and durable, but are heavy and difficult to install
Cink Steel. This material has high strength characteristics and also has an anti-corrosion layer that protects pipes from rusting. The shelf life of such pipes can reach 25 years, which is a pretty good indicator. The integrity of the anti-corrosion layer may be damaged as a result of exposure to mechanical factors. The main disadvantage of galvanized steel pipes is their large mass, which makes it difficult not only to install the system, but also to transport the parts.
Stainless steel. Stainless steel is a material that is distinguished (like galvanizing) by a high strength coefficient and corrosion resistance. The service life of these products can reach 50 years during normal use. Products made from this material are not afraid of mechanical stress. The main disadvantage of these products is their high cost. Installation of a stainless steel pipeline is a rather complicated procedure due to the weight of the individual parts.
Copper. Copper pipes are the most expensive of all, so they are conventionally classified as an elite class. Copper communication is characterized by good resistance to destructive corrosive influences, and its service life can reach 80 years or more. Separately, it is worth mentioning the aesthetic appeal of a copper pipeline - such a design looks presentable and can decorate the interior of a room. Among the disadvantages of copper water supply, it can be noted that copper alloy is a ductile material, therefore it has weak strength, as well as rather complex installation, which includes soldering with a gas torch.
Wiring diagram
Comb collectors
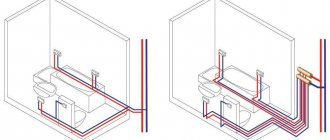
There are two schemes for indoor water collection: sequential and parallel. In a sequential scheme, the disassembly points are connected to a common pipe through tees. This scheme is the most economical, but with a long wiring length, a large number of analysis points and/or with low water pressure, it is not suitable, as it greatly reduces the pressure.
In this case, water collection is done according to a parallel circuit from the “comb” collector, see Fig. A comb is an assembly of bypass valves, from each of which there is a solid branch to its own disassembly point. Valves regulate pressure separately at points. The branches on the points are made of metal-plastic or polyethylene: in this case, their low hydraulic resistance plays a role, and when laid in one piece they are quite reliable.
Pipe laying methods
water supply unit in the apartment
Water distribution in the apartment can be done with your own hands, leaving it open, or walled up in grooves. The first method is less time-consuming and cost-intensive - pipes made of any material are suitable, simple clips are used for fastening to walls, and the joints are always accessible for maintenance.
But open sections of the pipeline can spoil the design, so they are often hidden in walls or floors. Hidden installation has a number of conditions that affect the choice of pipes. They must have a low coefficient of thermal expansion, or be able to freely deform when heated.
It is necessary to provide free access to joints for preventive inspection and repair, and replacement of plumbing fixtures. It is most practical to wall up pipes without joints.
Metal-plastic, polybutylene or cross-linked polyethylene are suitable.
Before purchasing, you need to make sure that it is permissible to lay pipes in a hidden way by studying the attached certificate.
It is best to place reinforced products in walls that have an expansion coefficient that is 5 times less than non-reinforced ones. Additionally, they are placed in protective covers or plumbing corrugations. This compensates for temperature deformations on the DHW branches and prevents the appearance of condensation in the cold water supply sections.
Development of a water collection scheme
You need a water supply diagram in an apartment first of all for yourself, so as not to get confused, not to miscalculate and then to know exactly where everything is - no special permission is required for this work. But when registering the meter, the water utility inspector may ask to look at the diagram, so you need to draw it correctly.
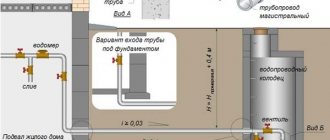
Complete water supply diagram for a private house
A complete scheme according to all the rules is a serious job for a knowledgeable specialist; for example, in the large picture there is a water supply diagram for a private house with a summer kitchen, which is necessary for the project to be approved. But to replace pipes in an apartment, you don’t need to bother so much; it’s enough that the diagram is clearly visible and understandable:
- Hot and cold water pipes, their type and lumen diameter.
- Metering devices.
- Emergency valves and drains.
- Shut-off valves.
- Parsing points indicating consumers.
- Backup branches and devices.
- Direction of water flow.
In order for all this to be clear not only to yourself, or to yourself a year later, certain rules must be followed when drawing. Let's look at examples, see Fig. On the left - more or less ok, but with some comments, on the right - incorrect:
Simplified water collection diagrams with ERRORS
- The diagram on the right is made in isometry - for beauty, or what? The intersections of the pipes confuse her, and she does not give an idea of the actual location of the analysis points: the washing machine and the boiler come out under the floor.
- There are also too many arrows indicating current where it is already clear where it flows, which also confuses the diagram.
- In the same place, shut-off valves with metering devices are depicted unclearly and not according to the rules.
- There, the type and diameter of the pipes are not indicated.
- In the same place - who, where and when saw that water was supplied to the boiler from above, and the toilet was flushed through the low tide?
- But in the diagram on the left, it is clear even to a non-specialist that the boiler (6) is a backup one. The comment will be: “Where is the check valve when it’s hot? Without it, when the supply stops, the boiler will drive itself into a hot riser if valve (10) is not closed.” But this is essentially the case and with full understanding.
Correct simplified diagram of plumbing in an apartment
An example of an arbitrary, not according to the rules for drawing up design documentation, but a completely clear and no-nonsense water collection scheme is shown in the following figure. This is also an example of parallel water withdrawal; where the combs are, it’s clear.
What will you need besides pipes and fittings?
A properly assembled plumbing diagram should take into account not only the location of pipes and plumbing in the bathroom, but also include a number of devices necessary for the normal functioning of communications and equipment. Usually they are concentrated in an area close to the entrance to the apartment in a special plumbing closet. Such devices include:
- main shut-off valves;
- filtration units (coarse and fine cleaning);
- reducing and check valves;
- metering devices;
- aquastop watchmen.
- distribution manifolds, taps, pressure gauges;
Main valve (input shut-off valve)
Shut-off valves at the entrance to the apartment.
Separates apartment networks from house networks - the laying of distribution communications begins with it. It has only two functions - to open or block the flow of water. Therefore, it is not necessary to overpay by buying a more expensive valve with smooth adjustment - a simple ball valve is quite enough.
However, the choice of the main locking device should be approached with particular responsibility, since its task is not only to ensure the possibility of carrying out preventive maintenance or repairs on the local network, but also to quickly cut off water in the event of emergency situations. The reliability of the main valve should not raise any doubts. Therefore, do not save money by purchasing it; purchase products from well-known brands (BUGATTI, FIV, GACOMINI, VALTEC) from reliable sellers.
Filtering devices
With today's abundance of expensive plumbing fittings and appliances, the question of the need to install at least a minimum set of filter units no longer arises. Saving on relatively cheap preliminary water treatment systems is fraught with rapid wear and tear and breakdown of more valuable things.
The minimum set includes coarse filters (mud filter) and fine filters. Their purpose is to extract suspended impurities from a flowing liquid. The working element of the mud collector is a fine mesh mesh with a throughput capacity, most often in the range of 100-300 microns. Accumulated dirt is removed by cleaning the mesh insert. To do this, it is removed from the device body or washed through the appropriate drainage fitting (flushing models).
The functioning of fine filters is similar, only the working element is a cartridge made of polypropylene fiber or thread. Cartridges allow you to retain impurities from 5 microns to 20 microns, being consumables that are renewed after loss of throughput.
In addition to the mandatory mechanical filters, it is also recommended to complete the apartment wiring diagram with a HMS unit. What it is? It stands for a hydromagnetic system designed to convert some of the impurities into colloidal suspensions, so that they can then be deposited on a fine purification cartridge. The device contains a permanent magnet, is energy independent and does not require maintenance.
Regulating devices
The first of these in importance is the pressure reducer. Its task is to limit the pressure inside the local water supply network to a given comfortable value of 3-4 bar. It also helps protect sanitary fixtures from water hammer, the pressure of which can increase like an avalanche to 10-12 bar. To protect against critical loads, you can additionally install a piston or membrane type hydraulic shock absorber.
Check valves help set the direction of fluid flow. I install them not only in the plumbing cabinet, for the correct operation of the meters, but at the cold water inlet of the boilers. They prevent water from draining into main pipelines when its supply is interrupted. Otherwise, water will flow out of the boiler, and its heating element, turning on “dry”, will quickly burn out.
Metering devices
Their type and method of installation must be approved by the management company. The updated version of SP 30.13330.2012 “Internal water supply and sewerage of buildings” requires the placement of water consumption meters in places convenient for maintenance and control. In this case, it is necessary to select products that allow their planned positioning in plumbing units or cabinets. The meters can be designed for universal or only horizontal installation. If devices of the second type are placed vertically, then the accuracy of their readings is impaired.
The device's environment also affects its measurement uncertainty. Thus, manufacturers prescribe the need for straight pipes before and after meters to prevent the formation of vortex flows that distort the readings. The recommended sizes of such inserts are indicated in the passport of a specific device model. Usually, in front of the water meter, they must be at least 5 in length, and after at least 3 in length, the diameters of its standard flow area.
Water meter installation kit
The working equipment of the water consumption meter necessarily includes a mesh filter-dirt and a check valve. The mud trap is installed after the main valve, but before the meter. Its task is to protect the device from mechanical suspensions. A check valve completes the assembly. It prevents the outflow of water into the riser when it is empty, thereby preventing the reset of accounting readings.
Important! Installing taps or filters with flush fittings before water meters can cause problems when registering them. As a last resort, it should be possible to seal all discharge openings.
Emergency devices
Even wiring made in accordance with all the rules from first-class material is not immune from accidents on water supply lines. Therefore, in order to protect the property of your apartment from floods, as well as the apartments located below, the scheme includes special automatic devices for protection against leaks. They come in two main types - with a simple mechanical drive and with an electromechanical drive.
1. The first type is distinguished by its affordable price and simplicity of design. Its typical representative is Aquastop (500-600 rubles). It is triggered when there is a sharp increase in water flow. For example, if the flexible hose of a washing machine bursts, the valve will cut off the supply almost instantly. 2. Electromechanical “aquastops” are already complex, expensive systems with prices of about 8-10 thousand rubles (Aquaguard, Neptune, Hydrolock). They consist of several blocks: a controller, sensors, and an electric drive (faucet or valve). They can be powered from a 220V household network, autonomous sources, or a combination. Their main advantage is that they can track both intense water spills and minor leaks.
Other auxiliary devices of sanitary cabinet
Pressure gauges. It is advisable to install at least a couple of pieces on each of the HV and GV branches. One at the entrance to the apartment or after the pressure reducer (if any), the second after the filter (filters).
Pressure gauges in the plumbing in the apartment.
By the pressure difference of the pressure gauges, you can monitor the degree of contamination of the screens or replaceable cartridges. To install devices, you can use special tees, but, often, it is easier to use some devices that are already equipped with pressure gauges or have mounting holes for them. Such devices can be taps, filters, manifolds, pressure reducers.
Collectors-distributors. They are also called combs. They are an integral part of the water supply system, assembled using a collector wiring diagram. Structurally, the combs differ in the diameter of the connection to the supply line (½", ¾", 1″) and the number of taps, starting from two.
Distribution manifold.
Manifolds can be equipped with shut-off ball valves or control valves for each branch (in the case of a tee system, the valves are placed directly in front of the final sanitary fixtures). In addition, if desired, pressure gauges, gearboxes, and emergency automatics are installed on the combs.
Pipe calculation
Before you finally select the pipes, you need to calculate at least approximately their diameter. This is not needed for “smartness” - the narrower the pipe, the cheaper it is, on the one hand. On the other hand, too small a diameter of the water supply pipe will cause turbulence of the flow in it. In this case, the throughput of the pipe drops sharply, and at normal pressure at the inlet the tap will barely ooze.
Accurate calculation of the pipeline is a matter for highly qualified specialists, but for a city apartment, so that it flows normally, you can figure it out yourself. The initial data is:
- The minimum permissible pressure is 0.3 at.
- Pressure loss per 1 m of 16 mm propylene pipe – 0.05 at.
- The average pressure loss per unit of fittings and fittings for apartment wiring is 0.15 at.
- Pressure loss in the sampling and metering unit – 0.25 at.
- At normal pressure values at the entrance to the riser of 1.5-4.5 atm in a 12 mm pipe, periodic turbulization is inevitable, but in 16 mm pipes it is not observed.
- The headroom for the farthest point is at least twofold.
It remains to find out the pressure (pressure) at the inlet, and you can determine whether, with sequential wiring, such a popular pipe will have enough pressure for the farthest tap or whether you will have to take a wider and more expensive one. The pressure at the bottom of the riser can be obtained from a pressure gauge in the basement or from the building operator; then subtract 0.6 atm per floor. You can also estimate the neighbors based on the same 0.6 atm/floor: if, say, three floors up the taps are still flowing, then we have a good 2 atm. But in high-rise buildings this trick does not work: in order not to increase the cost of apartment wiring excessively, they make separate risers for the lower and upper floors and even for the lower, middle and upper floors.
Calculation example: second floor of a nine-story building; Residents of the upper floors do not complain about the water. We have at least 4 atm of pressure. 11 units of fittings (5 tees, 6 elbows, 1 valve) give 1.65 atm losses. The length of the pipe from the riser to the far wall of the kitchen is 6.5 m, which is another 0.325 atm of loss. In total, with the selection and accounting unit, we have 0.325 + 1.65 + 0.25 = 2.225 atm losses. This is too much, you need to check the pressure with a pressure gauge and, most likely, take a main pipe of 20-25 mm, or route it in a parallel pattern from the comb, otherwise you may remain “dry” in the dry summer weather.
Note: from here it is clear how important it is to straighten the pipes and how undesirable it is to lengthen them and clutter them with fittings.
The dependence of losses in pipes and fittings is nonlinear: they depend on the flow speed, which, in turn, depends on the cross-section of the pipe lumen. A slight increase in the diameter of the pipe sharply reduces losses, so the usual wiring for apartments with a 20 mm pipe with bends to 16 mm points works well in most cases. In difficult cases, an accurate calculation can be made according to SNiP, internal water supply and sewerage systems of buildings. There are all the necessary formulas and nomograms; the calculation can be done by a person with an engineering education of any profile.
You just need to keep in mind that in this regard there are already three SNiP with the same index: 2.04.01-85, 2.04.01-85 (2000) and 2.04.01-85 * “Updated edition of SNiP 2.04.01-85 (Domestic water supply and drainage systems in buildings). The correct one is the latest SNiP.
Installation
Let's move on to installing the water supply. Here, too, there are subtleties associated with installing connections with your own hands - different for each type of pipe.
You can learn more about the intricacies of installing water supply systems from the video in this article.
Galvanization
Problems can be caused primarily by sealing connections. To make it durable, use Tangit Unilok - or sanitary linen impregnated with paint (as an option - silicone sealant). Impregnation prevents organic fiber from burning out during prolonged heating and from rotting when in contact with condensation in cold water.
Linen soaked in paint lasts indefinitely
Metal-plastic
A typical mistake when installing it on compression fittings is cutting pipes with a hacksaw instead of a pipe cutter and neglecting the calibrator. If a pipe that is cut unevenly and retains its ovality after unwinding from the coil, with the internal chamfer not removed, is put on the fitting fitting, it tears the sealing rings out of the grooves.
As a result, the hot water connection starts to leak after just a few heating and subsequent cooling cycles.
Correct cutting and calibration of metal-plastic pipe
Polypropylene
Connecting it with solder fittings also has several subtleties:
- The heating time must be measured exactly according to the table below. Otherwise, you will either get a leak or an influx of molten plastic inside the pipe;
Heating and cooling times for polypropylene pipes and fittings
- Before soldering, pipes with aluminum reinforcement must be cleaned using a shaver (if the foil is close to the outer surface of the pipe) or a trimmer (if it is located between two layers of polymer of approximately the same thickness). The instruction is related to the low resistance of aluminum to alkaline environments: corrosion of the reinforcing layer when it comes into contact with water will lead to delamination of the pipe. Stripping allows you to weld the fitting directly to the inner layer of polypropylene;
Pipe with external reinforcement stripped using a shaver
- Soldering temperature for polypropylene is 260 degrees. On a soldering iron with a thermostat you need to set exactly this value.
By the way: polypropylene without reinforcement has an exceptionally high coefficient of expansion when heated (13 times more than steel). Therefore, polypropylene eyeliners are mounted on sliding clamps or clips that will not interfere with their extension.
Such a clamp will not prevent the pipe from elongating when it heats up.
Tools, materials, dismantling old
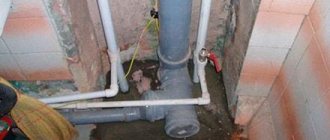
Special tools for assembling residential pipelines are described above. To purchase materials, of course, you will need to calculate the footage, nomenclature and quantity locally. Dismantling old pipes is done in the usual ways. It is better to do this after installing and registering the water meter, so as not to turn off water to the floors for a long time.
We will give only one piece of advice: do not use valves with a lever. It is made of silumin or plastic and tends to break off at the most inopportune moment, just when you urgently need to close it. Take ball valves with a butterfly handle. The round, grooved handles also do not break, but wet or sweaty hands slip on them.
How the plumbing works in a private house
Water pipes
- this is a type of engineering communications responsible for providing a private home with water. Its purpose is to organize stable transportation of water to water collection points. The operation of the water supply system of a private house is ensured by a set of functional equipment: these are pumping stations, storage tanks, filters, circulation pumps, etc.
Read material on the topic: Circulation pump for heating: how to choose
No less important systems of a private house are sewerage systems, providing
removal of sewage and used water resources with subsequent cleaning.
Internal engineering systems of a private house
Water delivery and sewage disposal are carried out through pipelines using plumbing and special equipment, which are located inside a private house. The place where water enters and drains exit is usually located in the foundation of the building.
Plumbing that ensures the operation of the water supply inside a private house:
- water supply entry point;
- water metering and distribution unit;
- plumbing for heating water (boiler or boiler);
- pipelines for supplying cold and hot water to points of consumption in a private home;
- water supplies to main places of consumption;
- water supply plumbing (faucets, shower, sink, etc.).
Internal sewerage plumbing:
- pipelines from places of water consumption;
- sewer riser;
- point of sewerage exit from a private house.
External water supply and sewerage system
Plumbing for external networks of a private house:
- external pipelines;
- sewer wells (inspection, rotary, filtration, inspection, etc.);
- cleaning systems;
- well, well or other structure for collecting water;
- pump or pumping station.
To organize the water supply system of a private home, the following types of pumps are used:
- submersible - devices that are immersed in a well or well below the water surface;
- surface – devices used to equip pumping stations located on the surface;
- fecal – devices designed for pumping liquids containing particles of a certain fraction.
House water supply and sewerage project
The reliability of the plumbing and utility networks of a private home largely depends on the professionalism of the designers. The calculation of the water supply and sewerage project is carried out before the construction or reconstruction of the house begins. There are often examples where developers carry out design work on their own. If for a small dacha with a simple network and simple plumbing this option may exist, then for a private house with a modern layout the design work should be carried out by engineers who are well acquainted with modern technologies and plumbing innovations. The simplest engineering communications project for a private house involves the location of the kitchen adjacent to the bathroom, in which a common sewer riser can be used.
For a private house with several bathrooms located on different floors, you will need a more complex system with different risers.
To draw up an engineering project for the plumbing of a private house, it is necessary to carry out a number of preparatory measures.
- Determine the source of water supply.
For a private country house in places where there is no possibility of connecting to a centralized water supply, water can be taken from a well, equipped well, or nearby reservoirs.
- Draw up an engineering topographic plan of the site,
and also analyze the composition of soils and the depth of groundwater.
- Determine the volumes of water that need to be supplied per day and the amount of waste water to be discharged.
These calculations are required for the correct selection of plumbing fixtures for a private home.
- Determine which treatment facility will be used to supply water to a private home.
The most preferable option is to install ready-made septic tanks, which are produced by various manufacturers. In some cases, due to the characteristics of the site and the groundwater level, it may be necessary to install local treatment or install a storage septic tank.
After completing the procedures described above, specialists select the necessary equipment and plumbing for a private home, and also draw up a detailed design of water supply and sewerage systems.
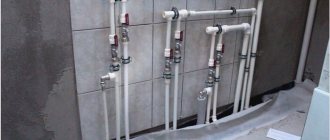
Accounting and control
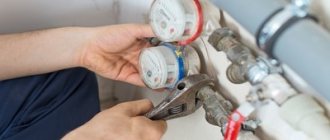
The sampling and metering unit consists of a shut-off valve, a coarse filter, a water meter and a check valve. Assembled as shown in the picture. Each device indicates the direction of water flow for it; it must be observed during assembly.
Water supply sampling and metering unit assembled
The unit is assembled with waterproofing of the connections using FUM tape and is also connected to the riser, having first shut off the water; Before supplying water, you must remember to close the shut-off valve. This is the only operation, and a short-term one, that requires turning off the water supply to the neighbors on the riser.
Separate meter units are needed for cold and hot water. It is highly desirable that the counters and valve handles be highlighted in color. Meter readings must be clearly readable without any additional operations (removing the hatch, etc.), so it is often necessary to pre-assemble part of a solid pipeline, sometimes in a rather bizarre configuration, to connect the metering devices to the riser. In addition to pipes and a soldering iron, for this you will need transition couplings from plastic to metal MPV - an internal threaded coupling. The plastic is connected to the metering units using MRN - external threaded couplings.
Meters are sold sealed, but this does not mean that you can immediately call the water utility and pay for water according to consumption. The factory seal is there (the Russian land is rich in craftsmen) so that no one can get into the meter and twist or file anything there. The factory seal must be protected; Without it, the meter is considered unusable, as well as without a certificate for it.
To install water meters, you need to notify the water utility and call its inspector. You can use water before he arrives; the inspector does not need zero readings; he will record the initial ones and seal the meter and filter drain with his seal. Payment for water according to consumption will be made after registration of metering devices.
Read about the process and nuances of installing water meters here.
GMS, aquastop, filter
Although the design of the HMS is non-separable and does not allow water to be stolen with its help, and this device is not subject to sealing, connecting the HMS to the meter is unacceptable: the meter’s turbine can become clogged with sludge. The HMS with a bulb filter is connected after the metering devices; filter - immediately after the GMS. Aquastop can be connected immediately after the filter, but if it is electrodynamic, the magnetic field of the HMS can cause its false operation, but there is no point in placing the aquastop far from the riser: it does not react to a breakthrough before it.
Types of water supply wiring diagrams in an apartment and their features
The apartment water supply project (it doesn’t matter whether you ordered it from specialists or made a drawing on paper by hand) should reflect the location of the toilet, bathtub and sink, as well as the connection method, diagrams, methods of laying inlet and outlet branches. Therefore, you must understand the basic principles of piping assembly, regardless of whether you install communications yourself or seek help from professionals.
What is a point?
When calculating the cost of a job, the contractor and the client usually mean different things by this term. In this regard, it is recommended to clarify what work is included in the price per point. In addition, study the final estimated cost of work on installing water supply in the apartment.
When installing water supply in an apartment, the price can be fixed subject to standard operating conditions in a normal room. It includes the inlet (outlet) from the plumbing connection point: an installed faucet for local use or a sewer inlet in the bathroom.
Plumbing installation is not included in the price for installing the point. This is explained by the fact that, for example, connecting a dishwasher and a hot tub are very different in labor costs. Therefore, the cost of these works must be calculated separately.
Appliances such as washing machines and dishwashers are equipped with one water supply, that is, the water point will be single. In the case where two supplies from cold and hot water are needed (for example, a boiler or mixer is used), it is considered that this is a double point. The cost of work per point can be increased by a long length of pipe laying, non-standard or hidden water supply in the apartment, as well as other features of the work.
What types of pipe lines are divided into?
In total, there are three types of water supply distribution in an apartment, through which water flows from the riser or main pipeline to the consumer:
- collector;
- tee (sequential);
- with pass-through sockets.
If you live in a multi-story building, then your wiring diagram will be:
- tee (sequential);
- or collector.
These two schemes have both pros and cons and can be used depending on the conditions. Moreover, you can combine two schemes in one apartment.
- Tee (sequential) water supply circuit.
- Collector distribution of water supply pipes.
For creating and installing a pipeline in a standard apartment, this scheme is best suited. It is presented in the form of a common pipe to which the existing devices (cold water consumers) are connected in series. The hot water supply system is installed in the same way.
The main pipe is selected with a larger diameter compared to other water supply pipes, because it acts as a collector. Plumbing fixtures are connected using tees, which is why this scheme is called a tee.
This system is easy to create not only in theory, but also in practice. In old Soviet apartment buildings, the standard water distribution in the apartment is used, a photo of which you can see below. Its main advantage is the small number of water pipes. Accordingly, the costs of installing this type of wiring will be quite low.
The peculiarity of this type of wiring is that it can only be used in those apartments where there is little plumbing installed. The problem is this: the longer the system becomes, the less pressure at the end. As a result, the plumbing equipment connected at the end of the system will not be able to function correctly due to low pressure.
Also, one of the disadvantages of a sequential system is that if a faucet or tank breaks down, the water supply will not work properly. To repair the plumbing, you will have to completely turn off the water in the entire apartment. You simply cannot disconnect one point from the water supply due to the serial connection.
Professionals highlight other disadvantages that you may encounter when servicing a tee system. Most often, the connection points are located under decorative trim, so getting to them will be problematic. If a leak occurs, you may not be able to immediately determine where the pipe has broken.
To repair the plumbing, you will need to gouge walls, remove false panels, etc. Having completed the pipe repair, you will be forced to re-decorate the room. Even taking into account all the above-mentioned disadvantages, tee water supply is the most common at present.
For small apartments, this water supply system is the best. After all, this is the most budget option. Since the length of the water supply system is short, the water pressure in the pipes remains satisfactory.
However, if you want to not only save on the installation of the pipeline, but also on its use, you will need to responsibly create a plan for laying out the water supply in the apartment, as well as ensure access to all tees. Under no circumstances should you purchase cheap, low-quality materials. Otherwise, this may lead to pipe breakdowns and leaks.
Piping of this type allows you to connect many points of consumption, which can be located far from the riser. The collector circuit means that the connection occurs in parallel: the tap, shower, toilet, bidet are connected to the collector using an individual outlet with a valve.
The main advantages of the collector circuit:
- the water pressure does not change, no matter how many plumbing fixtures are connected;
- It’s easy to find a breakdown on a separate line;
- the collector system for distributing water supply pipes in the apartment is reliable, since the number of connections in it is small;
- you can turn off the water on one line, while other lines can be used. So, while doing repair work in the shower, you can wash the dishes in the kitchen or use the sink.
- With a collector wiring system, the connection lines are hidden in boxes or niches. The interior of the room will not be damaged.
Despite the significant advantages, this wiring system has some disadvantages:
- to install it, you will have to purchase a large number of pipes;
- labor-intensive work to install parallel connections. Even if you invite professionals, this will significantly impact your budget.
Manifold diagram of water supply distribution in the apartment:
Thanks to the use of collector water supply in the apartment, you can increase the efficiency of the appliances. Install filters and pressure regulators on individual outlets that match the characteristics of the equipment used that consumes water, as well as the conditions for using this equipment.
Recommended articles on this topic:
- Arrangement of a small apartment
- Stages of renovation in an apartment
- Turnkey cosmetic repairs
Compared to a tee system, here you will need a much larger number of pipes. The collector system is difficult to implement, so a specialist with little experience may not even be able to design the circuit. Before you begin the collector connection, you need to select a place to install the collector from which water will be supplied.
You will also need this device if the hot water supply in the apartment is centralized. The hot water supply collector is installed separately. Then water pipes with a shut-off valve are installed between the collectors and the common riser. With its help, you can turn off hot or cold water in the apartment, if necessary.
Also on this section of the water supply you can install coarse filters, electric taps for emergency leakage protection systems and other devices. After the installation of the collectors is completed, you can begin to supply pipes for each plumbing fixture.
We supply cold water to the toilet cistern, as well as to the washing machine. Hot and cold water - to the sink, bathtub, shower. We connect the heated towel rail to the hot water supply manifold.
In addition to all of the above, the system may include filters, gearboxes and other devices. We install shut-off valves between the collector and the water consumer. With its help, you can shut off the water supply in a selected area if necessary.
If the size of your apartment is impressive, the best option would be to use a combined wiring diagram, when several consumers are connected to the collector branch, connecting them with pipes. As a result, this part of the water supply system will have the same disadvantages as the tee system.
This way, if a break occurs, you will be forced to turn off that part of the water supply. However, combining tee and manifold circuits helps reduce the cost of installing water pipes. This option is also ideal if your apartment has an individual layout.
Pipeline installation
So, now we're doing the plumbing. The assembly of pipes has already been described, but the installation of the entire system also has features of a non-construction nature, such as gating walls, installing channels in the screed. The latter should extend no further than 150 mm from the wall and no closer than 200 mm to the furniture. Plumbing fixtures, of course, are removed before pipe laying begins.
First of all, you need to install arcs - plastic strips with MPB angles under the mixers. They are attached to the main wall with self-tapping screws and dowels. When fastening, you need to take into account the thickness of the finish: plaster and tile or other decorative coating.
Without extensive construction experience, it is very difficult to achieve the location of the outlet pipes flush with the wall. It is better to make them in advance PROTECTING above the finished wall by half the width of the side of the decorative faucet caps: if the caps are non-adjustable, they can be easily adjusted using an emery wheel or manually on an emery block.
The next point is the assembly of pipeline sections. The most convenient way is to assemble them on a table and place them entirely in grooves. But then the question arises: how to install pipes through the walls? There are no problems with metal-plastic, it is all made of detachable fittings, and for soldered pipes two methods can be proposed:
- Using MRN/MRV adapters and metal-plastic inserts. In an apartment this is quite reliable, and in the corners above the grooves you can make removable hatches for inspection and repair of threaded connections.
- Install pipelines locally. For this you need a compact soldering iron. This one is more expensive, and you need to work with cotton gloves so as not to accidentally get burned.
Next, pipe cutting. You can’t saw, especially metal-plastic, you won’t get reliable connections. You need to cut it with a pipe cutter, and the pipe cutters for metal-plastic and just plastic are completely different.
The fourth point is soldering. One soldering requires 15 mm of pipe. That is, if there is exactly 1 m between two fittings, you need to cut 1030 mm; if 0.6 m - 630 mm, etc.
The fifth point is bending metal-plastic pipes. The minimum permissible bending radius is 5 outer diameters of the pipe. You can come across recommendations: they say, put a spring in there, fill it with sand, and you can bend it at an angle, and pull out the spring and pick out the sand with a wire hook. In no case: the coating of the pipe deteriorates, the residual stresses in it far exceed the permissible ones, and the metal-plastic pipe acquires the properties of a very poor, rusted steel pipe.
And finally, installing the boiler. This is a separate production cycle, and it is done after the water supply system is put into operation. The pipes for the boiler are made in advance, but the valves on them (they are definitely needed on both) are closed immediately after installing the pipes, and the pipes are additionally plugged.
Metal-plastic pipes
Laying pipes made of metal-plastic, as mentioned above, is the most suitable option for people who want to do all the work themselves. Metal-plastic parts consist of 3 layers: outer polymer, middle metal (usually an aluminum layer) and inner polymer.
Metal-plastic pipes, rolled into small coils, are very convenient for transportation and storage, which cannot be said about steel products
Metal-plastic communications are installed in two ways:
- Using threaded connectors that include sealing gaskets. The seal is necessary to achieve the required tightness in the system.
- Using compression fittings.
Helpful information! One of the main advantages of such pipes is the ability to bend them, which greatly facilitates the installation of water transport communications.
Products made of metal-plastic have resistance to the destructive effects of corrosion, and due to their smooth internal walls they are characterized by high throughput. And thanks to the smooth walls, such products do not accumulate salt deposits inside themselves, which can, over time, lead to a narrowing of the lumen of the pipe and its complete blockage.
How to lay out metal-plastic pipes with your own hands? To lay out metal-plastic pipes with your own hands, you need a pipe cutter, pressing pliers and reamers. It is strictly not recommended to carry out hidden wiring of metal-plastic water supply in the walls. This is due to the fact that sealing elements lose their useful properties over time and connecting units may leak, so it is necessary to provide quick access to the pipeline for repair work.
Which water pipes are better?
It is impossible to say unequivocally which pipes are best for wiring - there is no ideal material, there are more or less suitable ones for given conditions. Let's look at the most popular options, their advantages and disadvantages:
Polypropylene pipes
The option is good for everyone, except for the large thermal expansion - up to 5 cm per 1 meter, which is a lot. If the route is long, it is necessary to install a compensator or use reinforced pipes. Their thermal expansion is several times less, but their prices are higher. For hot water, you definitely need to use reinforced pipes, but whether you use fiberglass or foil is up to you. The routing of cold water pipes can be done with a regular PPR pipe for cold water - here thermal expansion is not so critical.
DIY plumbing in a private house
It's worth starting with the water supply,
since the availability of water is necessary already at the stage of construction of a private house. In this case, you need to think first of all about ensuring the supply of cold water. You can also install a heating boiler, the installation of which is a simple procedure.
To install the water supply system of a private home, you need plumbing fixtures, materials and tools:
- shut-off plumbing;
- PVC pipes;
- pump equipment;
- a set of keys;
- pliers;
- shovel;
- Bulgarian.
Before installing plumbing in a private home, you need to determine what types of plumbing equipment will be installed. Let's consider the general rules and installation sequence.
As mentioned above, at the initial stage a plan for the placement of plumbing and water supply elements should be developed. The diagram must include information about all the external and internal distribution points of the water supply system of a private house. Based on the parameters of the water supply, you need to select the optimal equipment for arranging a pumping station. Manufacturers of such equipment include an installation diagram indicating the main features of connecting to the water supply of a private house. The pumping unit must be placed in such a way as to minimize noise from its operation. To do this, select the most convenient place in the house (in the basement or basement). In the documentation for the pumping station you can find information about the noise level that is created during its operation.
Once the location of the pumping equipment has been chosen, you can begin to arrange trenches for laying external pipes through which water from the source will be supplied to the house. Their depth must exceed the freezing level of the soil. If it is not technically possible to lay a pipeline at such a distance, it is necessary to insulate the pipeline using special fiberglass materials.
After arranging the external part of the water supply system of a private house and installing pumping plumbing, the installation of internal pipes is carried out. This is a very important stage that must be carried out with strict adherence to the work technology. When the installation of water pipes is completed, specialists move on to installing plumbing and installing a sewer system.
Let's consider installing a sewer system for a private home.
Here, too, even before installation work is carried out, an engineering diagram of the system is drawn up, indicating the placement points of the plumbing fixtures. A professionally drawn up sewerage plan will eliminate installation difficulties and problems during operation.
The sewerage system of a private house includes external and internal systems. External installation elements include sewer pipes and cleaning systems. The internal part also consists of the pipeline and plumbing of a private house.
Rules for installing sewerage in a private house:
- when choosing the location of the cesspool, it is necessary to provide for the possibility of unhindered access to it by sewage transport;
- the lowest line of the cesspool is located one meter deeper than the soil freezing level. The sewage collector is installed on a slope and must have a depth of more than 70 cm.
In situations where it is not possible to lay sewer pipes below the freezing level, the collector is insulated.
Plastic pipes are currently used to install the sewer system of a private house. Unlike metal products, such a pipe will not experience problems with corrosion. Installation of these elements of a private house is carried out by inserting one pipe into another and then sealing the seams. Laying of sewer pipes is carried out in strict accordance with preliminary calculations of depth. This will allow the pipeline to be laid on undisturbed hard ground, which will prevent the elements from bending. Pipes for risers and collectors must be larger in diameter than sewer pipelines coming from the plumbing of a private house.
To carry out work on arranging sewerage systems in a private house, experienced and highly qualified specialists should be involved. The work itself on installing and connecting plumbing is carried out in strict accordance with the requirements of building regulations according to the drawn up diagram. Only experienced specialists who perform work under engineering supervision can satisfy such parameters.
Read material on the topic: How to choose components for pipes