Home / Welding technique
Back
Reading time: 2 min
0
1583
A large number of novice welders are surprised by the fact that rust appears on the surface of stainless steel. After all, it would seem impossible. The very name “stainless steel” says that stainless steel does not change its properties over time.
But the reason is not at all in the characteristics of the material, but in violations of processing rules - the lack of grinding in particular. Or no seam treatment at all after welding.
Small factories often hire inexperienced employees who do not know all the nuances of robots with different materials.
Skipping the preparatory or final stage of working with stainless steel, as a result we receive a low-quality product. In small enterprises, product quality is not properly controlled.
Then a product with untreated seams will end up on the market. This leads to subsequent corrosion of the material. Yes, these issues do not arise in large enterprises. But in a small workshop it occurs. Therefore, we will immediately clarify all the stages of grinding.
- Grinding
- Sanding Basics
- Stainless steel processing
- Let's sum it up
Stainless steel welding methods
When carrying out the process of welding stainless steel at home or in production, three techniques are usually used:
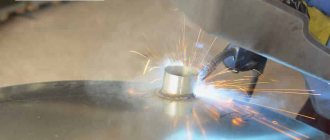
- Welding with conventional electrodes. In this case, the electrode, which melts during the work, is the main material for connecting parts and creating the seam itself. When carrying out the work, the welder uses an inverter-type welding machine.
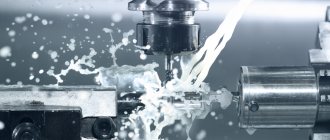
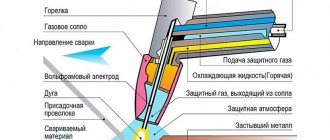
- Argon welding with tungsten electrodes. The essence of the process comes down to melting metal on a prepared metal part with a non-consumable electrode. In this case, the material used to create the seam is the metal itself. Argon in this case performs the protective function of the weld pool. Argon welding can also be performed using uncoated filler wire.
- Electric welding with a consumable electrode using a semi-automatic device. The process is carried out in a gas environment using argon with carbon dioxide or carbon dioxide alone.
Electrode selection criteria
To properly connect stainless steel workpieces, it is necessary to select suitable electrodes. They must be designed for the process with such material and selected taking into account its thickness. In order not to get confused in the wide range of products presented, you can resort to the experience of professional welders.
Many craftsmen use electrodes from the Swedish company ESAB brand OK 67.60 for the welding process with stainless steel. They are used for joining corrosion-resistant steels. The electrodes have a rutile-acid coating and provide easy re-ignition, hold the arc perfectly, which allows you to get a clean and even seam. The slag formed during the production process is easily separated from the metal.
To weld stainless steel, electrodes must meet the following requirements:
- Have low thermal expansion.
- Characterized by high elasticity.
- Have a high degree of wear resistance and thermal conductivity.
- Have great thermal creep resistance.
Electrodes with a base coating are produced by the domestic industry. They are not always suitable for a beginner, unlike the previous brand of electrodes, but they will cost less than imported ones, which explains their demand in production. To work with steel, OZL-8 and TsL-11 electrodes are most often used.
These materials are capable of providing the seam with good anti-corrosion properties, but are prone to frequent sticking and the creation of an unstable arc. To weld a large number of seams, it is recommended to purchase NZh-13 electrodes. They provide a reliable connection and form a thin layer of slag, which falls off on its own after cooling.
Welding with an inverter type machine
The field of study is very broad due to the mobility of the device. The inverter is not tied to one place, so you can work with it at home or in production. It is better to use manual arc welding for working with stainless steel:
- For creating short seams.
- For producing parts in small quantities.
- When installing metal structures. This method is not used when performing a large volume of work.
- To create tacks for basic welding work when installing structures.
- To eliminate welding defects after the process.
- For surfacing.
When using an inverter, you can connect small parts or pipes in this way, following the sequence of the process. Many beginners ask the question of how to weld stainless steel with an inverter at home, which is indeed not so easy to do without experience. You can purchase a small Resanta inverter for work. It is lightweight and has excellent technical characteristics. The variety of models will allow you to choose the appropriate device.
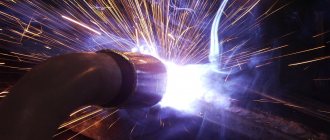
Welding stainless steel with argon
To carry out the process in an argon environment, tungsten electrodes are purchased. As a result of using this stainless steel welding technology, reliable and high-quality seams are obtained.
This method can be used when the customer needs to get a product with beautiful seams. The aesthetic side of creating a seam will be respected even when welding stainless steel with an electrode at home.
This method avoids the need to clean the seams from slag and sparks during the creation process. Welding in argon allows you to work with thin-walled metals. This method allows you to obtain the purest metal compounds. During operation, it is necessary to use direct or alternating current of straight polarity.
Read also: Choosing a circular saw for the home
A distinctive feature of this method is the non-contact method of igniting the arc. This is done to prevent tungsten from getting into the molten metal from the electrodes. During the work, it is necessary to exclude oscillatory movements of the rod in order to avoid oxidation of the seam.
Preparing for work at home
Before carrying out the welding process, it is recommended to carefully prepare the surfaces to be welded. Preparatory work is carried out in the following sequence:
- Remove all contaminants from the surface.
- Using a solvent, degrease the surface. This is done to ensure the stability of the arc and high-quality welding of the seam.
- A special agent is applied to prevent the adhesion of welding spatter.
During the welding process, it is necessary to monitor the temperature so that the metal does not overheat. It will promote burnout of alloying components.
Features of the DIY process
The process of welding with stainless steel at home should be carried out taking into account all the recommendations:
- During the connection process, reverse polarity current should be used. When carrying out the welding process, it is necessary to monitor the seam so that it does not melt. If there is a lack of experience, minimal penetration is acceptable.
- When creating an optimal environment for shrinkage, a small gap is left in the weld joint.
- When welding at home with a simple electrode, you need to select the right size according to the width of the metal. For thin metal, electrodes with a small diameter are chosen. Otherwise, the tightness of the seam will be compromised, which will lead to the appearance of microcracks and pores.
- The selection of the welding current value is carried out using special tables with normalization of values and taking into account the thickness of the metal.
- In order to preserve the anti-corrosion properties of the seam, it is cooled after completion of the work.
- Copper spacers can be used to cool the seam.
It is undesirable to carry out mechanical cleaning of the weld after the process has been completed. This will remove the top layer of material that provides corrosion protection. It will take about 6 hours to restore the oxidized layer. At this time, it is necessary to avoid contact with organic substances in the cleaning area. As an additional means, you can use a preservative made from passivating additives and synthetic oils.
Selecting Electrodes
If they have significant experience in the field of welding, specialists do not have a question about how to weld stainless steel with an electrode with ferrous metal. Sometimes there is a need to connect ferrous metal and stainless steel parts.
If you choose the right electrodes for these different materials, you can get a high-quality connection even at home. For work, you can use coated or tungsten electrodes. The most popular brands are consumables ANZHR-1 and ANZHR-2, TsT-28.
Tungsten electrodes are somewhat more expensive than conventional electrodes and require special equipment. In addition, to perform the process efficiently, it is necessary to ensure that the rod is perpendicular to the surface being welded.
Working with thin-walled stainless steel
Without minimal experience it is very difficult to work with such materials. In addition to the correct selection of electrodes, you should select the desired voltage. To work with three-millimeter metal, you should choose a consumable diameter of no more than 4 mm. The voltage on the device should not exceed 80 amperes. For work, it is preferable to choose electrodes of the TsL-11 or OK 63.20 brand.
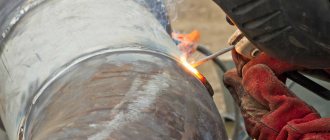
Welding steel pipes
To weld stainless steel pipes, you need to purchase electrodes with a basic or rutile coating. During the welding process, direct current of reverse polarity is used. DC welding can be used to join thin-walled pipes. This process provides minimal metal spatter and is easy for the welder.
Direct current of direct polarity is used when working with tungsten electrodes. This method allows you to protect pipes from oxidation, create arc stability during operation, and ensure high corrosion resistance of the seam.
The manufacturability of the process comes down to compliance with three main stages of work and allows you to connect pipes and cylindrical tanks. To make quality seams you must:
- Provide high-quality preparation of the welder and equipment for work. Remove all dirt from the working surface using sandpaper or a wire brush.
- Start the welding process by igniting the electrode or igniting the arc. After this, they proceed to the connection process, exercising control over the arc.
- Upon completion of the work, the slag is beaten off and the seam is checked for quality of welding.
When choosing OK 63.20 electrodes for working with stainless pipes, you should remember that the welding process takes place with a short-term ignition and extinguishing of the electric arc. In other words, welding is carried out by the spot method and allows you to work with thin metals.
Read also: Design of a lathe for turning wood
In modern conditions of development of the industrial complex, it is expected that stainless steel will be actively used to create pipelines and form containers for further interaction with aggressive liquids. In everyday life, products made from this metal are ubiquitous, namely all kinds of accessories in the form of household utensils and other household items.
A characteristic feature of stainless steel is its attractive mirror surface and long service life. However, it should be noted that to create such an effect, you must first properly treat the stainless steel seam after welding. Otherwise, there will be black and yellow spots on the weld area with subsequent potential rust.
In view of this feature, the question arises of how to clean stainless steel after welding and how to properly organize the processing of stainless steel after welding.
Stainless steel pickling procedure
The main way to clean the surface of stainless steel is etching (chemical and electrochemical). This method is used after heat treatment of the product, cold and hot plastic deformation, and also to remove weld marks. In addition to cleaning the surface, etching stainless steel restores the passive layer that protects the stainless alloy from the damaging effects of high temperatures.
Etching a stainless steel product using acid
The method is based on the chemical interaction of the metal surface with acids of varying degrees of concentration, mainly sulfuric or hydrochloric, and molten alkaline compounds. The use of acids involves a two-step process: first, treatment with a sulfuric acid solution, then placement in a nitric acid environment. When using the alkaline method, a caustic soda solution is used.
When processing stainless steel, careful control over compliance with technological conditions is necessary. The aggressive environment in which the metal is placed should only affect its surface, destroying defects without changing the structure of the object itself. To prevent overetching, special additives are used.
Reasons why processing is important
During the manufacture of numerous structures using stainless steel as the main material, welding methods are actively used due to the functioning of an electric arc in an inert gas environment.
Despite the formation of relatively smooth and strong seams, they are characterized by the presence of an unattractive appearance, resulting in the need to treat stainless steel welds. Thus, the place of the welded joint is characterized by the presence of a mirror color, while the area near the seam is yellow and its many shades.
In the case of the formation of a pattern in the form of scales, the presence of small black stripes is noted in the resulting grooves. After a certain period of time, there may be a risk of rust forming in these areas.
Phenomena of this nature are a consequence of exposure to excessively high temperature conditions, which results in overheating in the welding area. When high temperatures are present, alloying elements burn out with simultaneous depletion, which results in a change in color and an increase in the degree of vulnerability to external factors.
At the end of the process, a film is formed, which is characterized by a low level of resistance to aggressive environmental influences, which leads to the gradual development of corrosion at the treatment site.
Mechanical grinding
Stainless steel is characterized by the presence of a high level of corrosive properties, which determine its active use in environments where liquids are often used. Although products made from such material are in active contact with water and are subject to preliminary welding, their appearance does not change significantly over time. This feature can be traced as a result of the use of certain processing principles.
Among the main processing options, it is customary to highlight mechanical grinding of stainless steel after welding. During this process, the top layer of the oxide component that forms at the welding site and represents a weak point in the entire structure is eliminated. Distinct color transitions and existing irregularities in the weld joint are also eliminated.
This process is characterized by the following sequence:
- eliminating waves in the area of the metal seam by using a thick grinding wheel and grinder, as well as leveling out any bulges present;
- using petal circles for the functioning of the grinder; the main goal of such elements is more accurate work, along with longer process times and consumption of materials, which is especially important for large-scale work;
- the use of a specially designed equipment complex in the form of a grinding machine, the result of which is a one-color matte coating;
- mandatory use of a respirator to reduce the risk of abrasive dust and metal particles entering the respiratory tract that are in the air during work.
Electrochemical cleaning of the weld seam
The essence of the electrochemical method of steel processing
One of the types of processing of seams after welding on non-ferrous metals is the electrochemical method of etching and passivation. This procedure involves exposing the heat-affected zone to electric current and specially developed electrolytes for cleaning, etching, passivation and polishing. When removing tarnish from steel seams, we in no way spoil the surface of the metal itself, this means that if you use “mirror” (polished) steel, then after processing you will not see dull, dull spots in the heat-affected area that may remain when using nitrogen-containing etching pastes. Also, nothing happens to both matte and polished surfaces. Moreover, after processing steel using this technology, the alloying (passive) layer is completely restored, which during further operation protects the steel surface from corrosion.
Polishing stainless steel after welding
The next step in the complex of processing carried out in relation to the area of welding work is polishing the stainless steel after welding. It should be noted that not only individual areas of the product are subjected to such a process, but also the entire surface of the product as a whole, which guarantees a shiny final look.
Polishing provides an even greater level of cleaning of the surface being treated by obtaining a solid and smooth area, which subsequently results in the ability to withstand the external influence of aggressive liquids.
Initially, the area of the welds is exposed to a disk of vulcanite, the purpose of which is to give the weld the required shape and depth by forming the structure of the concave sample.
The next step is considered to be the application of a special paste intended for polishing. In most cases, GOI paste is used. The main objective of the polishing process is to achieve a mirror-like surface with the immediate absence of previously present matte spots.
Read also: Safety rules in the workshop
Grinding
Grinding, also known as polishing stainless steel after welding, is one of the main methods for processing a seam. In the picture below you can see the result before and after sanding. Agree, after grinding the metal began to look much more attractive. It has acquired a finished look, and its mirror shine seems to be something that goes without saying. In addition to its aesthetic qualities, polished stainless steel becomes stronger and more durable, and its service life increases.
There are many polishing methods: from classic to modern. Each has its own advantages and disadvantages. Some allow you to get better quality, while others speed up the process. In this article, we will not go into detail about each polishing method, since they are all applicable in different cases. Let's just tell you the basics.
Regardless of the method you use, polishing always involves using some kind of tool in conjunction with a grinding wheel, sandpaper, sanding disc or file. The tool can be a grinder or your own hands. It is more convenient and faster to work with a grinder, but for processing at home, you can simply pick up a sandpaper and polish the surface.
In any case, polishing is carried out in two passes. During the first pass, the so-called rough polishing is performed, when the surface of the seam needs to be made as uniform and even as possible. If you are using a sander, place a disc on it and thoroughly sand the surface. These are general recommendations; below we will look at the grinding process in more detail.
Grinding Features
Let's take a closer look at how seams are sanded, since this is a fairly broad topic and has its own nuances. First, don’t forget about safety precautions: wear protective clothing, goggles and a mask to prevent metal dust from getting into your eyes and respiratory tract.
Also keep in mind that sanding is not always necessary. If there are visible defects on the metal surface (for example, scratches) or the seam is not aesthetically pleasing enough, then you can grind it. And if everything looks good, then there is no need to waste time on additional polishing.
To remove deep scratches or any other similar defects, use sanding heads with abrasive belts. The width of the tape is selected based on the area of the metal that needs to be processed. The larger the part, the wider the tape.
As we said above, steel needs to be ground in several passes. Two passes is the minimum. Often, in large production with strict quality control, they grind in four or five passes. In any case, professional tools and skill will speed up your work.
Gels and acids for processing
In order to eliminate the presence of color transitions resulting from the welding process, as well as to neutralize the formation of an oxide layer that promotes the corrosion process, etching of stainless steel welds is widely used. This method falls into the category of acid exposure for the purpose of processing the material.
The best option is to use hydrochloric and sulfuric acid to treat stainless steel welds. If it is not possible to use the above compounds, nitric or hydrofluoric acid can be used. These substances are intended to be produced in the form of a gel and paste for etching welds on stainless steel.
It is also currently considered possible to purchase specially designed aerosols for such purposes.
Processing methods for stainless steel after welding
To do this, you will need a special protective suit and mask. As a rule, sulfuric, hydrochloric, hydrofluoric or nitric acids are used for etching in the form of gels, pastes, aerosols, and sprays. For etching seams, it is better to use pastes with a very thick consistency. The paste must be applied with a brush in a very even layer.
The first method is acid etching.
- Corrosion of scale using hydrochloric and sulfuric acid. Strict control of solution saturation and temperature must be observed.
- Washing with water.
- Immersion in a bath with a mixture of hydrofluoric and nitric acid.
- Thorough rinsing.
The process of etching stainless steel with acids.
Acid vapors form in the air; this requires a serious approach to protecting the skin and respiratory organs. This process has many different variations with the concentration of the composition, time and sequence of actions.
Electrolytic etching is one of the acid etching methods. An electric current, either direct or alternating, is passed into the bath; it produces a mechanical effect. The methods described above are very complex and require large financial investments.
The second method is etching with ready-made acid mixtures after welding.
- First, all traces of dirt, rust, and grease stains are removed. The composition is applied for half an hour.
- Final treatment with passivator.
This is an easily accessible cleaning method. As for precautions, the paste should not be heated or exposed to direct sunlight. The room must have good ventilation; these compounds have a pungent, unpleasant odor. If the paste gets on your skin, immediately wash the area with water.
Interesting video
Over several years of work, our specialists have accumulated extensive technical experience in processing stainless steel. Therefore, we are ready to present to your attention “Technology for polishing welds.”
Video instructions for polishing welds
1. To grind and polish welds, you need a powerful 125 mm angle grinder with electronic speed control. We always offer the ideal solution that covers all stainless steel processing tasks - the powerful, ultra-reliable FEIN WSG 15-70 Inox angle grinder. An angle grinder must have speed control.
2. Consider the workpiece on which the weld needs to be polished.
3. First you need to remove the weld, i.e. directly remove excess metal resulting from welding. The best solution for this task would be a petal circle made of ceramic material. He polishes stainless steel so quickly that it doesn’t even have time to get very hot. Today this is the best circle, and at the same time it is inexpensive.
IMPORTANT! Processing speed 8000-12000 rpm.
4. Remove the weld seam. Let's look at the result.
5. After removing the weld, we need to remove large marks after the grinding wheel and make a uniform matte surface. For this we need a finishing wheel 5A MED
IMPORTANT! Processing speed 3000-4000 rpm.
6. We fine-tune the surface and look at the result.
7. It can be seen that the surface in the area of the weld has become matte - and can already be polished to a mirror. And then you will polish the weld in 3 stages, but if you need to polish it to a perfect mirror, then we also go through the 2SF polishing wheel.
IMPORTANT! Processing speed 3000-4000 rpm.
It brings the roughness closer to the P600 value and eliminates all risks, making preparation for polishing ideal.
8. The surface is perfectly prepared and can now be polished. We do this with the cheapest and simplest means: a hard support plate, a felt disk with Velcro and pink paste.
IMPORTANT! Processing speed 2000-3000 rpm.
9. We polish and evaluate the result, as you can see, we have a mirror, many are satisfied with this result, both the phone and the operator’s hand are visible, but small stains remain and, if we need to do it perfectly, we can add another polishing stage.
IMPORTANT! Processing speed 2000-3000 rpm.
11. Polish and evaluate the result.
12. As you can see from the photo, our mirror is perfect; it simply doesn’t get any better. As a result: it turns out that technologies from 3 to 5 stages are used to polish stainless steel. If you are interested in these technologies, then for additional consultation or order, call the office or send a request by email
Ps for polishing fillet welds and hard-to-reach places, finishing end wheels dia. 150 mm, all circles are made of the same materials that are presented above, they just have a different shape. Their shape allows them to penetrate hard-to-reach places.
And lastly, if you just need to lighten the weld without removing the metal itself, then simply treat it with “Emulsion for removing tarnish marks”
© TechnoArmada, LLC INN 6168062463, 2012-2019 Prompt supply of machines, tools and abrasive materials throughout Russia. Consultations and selection of technologies in metal processing.
Prices on the website are not a public offer. Check the current price with the sales department.
Removing and polishing welds on stainless steel.
I decided to highlight my achievements in this topic, since at one time I did not find information even on the chip maker (perhaps I was looking poorly?). When communicating personally with specialists in stainless steel welding, everyone is silent like partisans, and the extraction technology is treasured like the secret of Stradivarius varnish :unknw:
And so, a short guide on how to remove and polish a TIG welded seam on stainless steel, without spending a lot of money (on equipment like Fein, 3M and other tsimes). You will still have to spend a little, as well as work. I don’t pretend to be the truth, what I have achieved is what I share. There are pros here from stainless steel and aluminum, as they say: “let more experienced comrades correct (and complement) me”!
It is highly advisable to make all parts from already polished material (sheet, pipe), and polish them as much as possible before welding.
The more accurately the seam is made, the easier it is to remove. I mean a smooth transition between parts (without traces of welding). Often, if the seam is neat, you can polish it over the top, leaving flakes. The basic rule: if you have already touched the seam with an abrasive, you need to remove it completely into a smooth transition.
To begin with, we clean it with a regular grinding wheel (I almost always use a small grinder, it’s convenient to work with one hand, I really need a speed controller). The goal is to remove metal deposits without particularly scratching the polish around the seam.
We put a petal circle on the grinder (grain 60-80). We remove the stripping marks and continue to smooth the surface. You can continue with petal 120-150, but not necessarily.
After this, we attach a plastic (rubber) disc with Velcro to the grinder, and work with sandpaper circles (for orbital sanders). It is advisable to grind the disc and chamfer it with coarse sandpaper on a block (directly on the grinder) so that its diameter is 8-12 mm smaller than the diameter of the sanding wheel - it is convenient to get into corners of 90 degrees or less.
I start with 180 grit. The task is the same - remove the grooves from the previous grain and smooth out the unevenness. Further grains are 240, 320, 400, 600.
After this, we attach a felt circle to the Velcro and polish it with paste. I use Polish pastes of different grain sizes. Like these https://marbad.pl/index.php?id=183&option=com_content&task=view
To begin with, I go through white (large), then you can do smaller ones - blue, green (like GOI).
The first polishing will almost always show scratch marks from previous steps.
We'll have to go back to sandpaper (no coarser than 400-600) and polish again. This is a philosophical activity, there is no rush :cray:
At the end, remove the remaining paste with a solvent and wipe with a clean, dry cloth. After polishing, try not to touch the product with your fingers (at least before handing it over to the customer  ).
).