How to find a suitable drawing?
The theme of the picture needs to be determined independently, as well as its specific version. The size of the image must correspond to the dimensions of the product, which must be taken into account when printing (if desired, you can reduce the copy of the image during printing or change it in a photo editor).
There are several important requirements for the finished picture - it must be:
- black and white;
- with clear edges;
- without influxes, gradual transitions;
- High Quality.
Pattern for etching on metal
The pattern is printed on special paper, which has a wax-like coating. If you cannot find a similar material, take any backing from the adhesive film, which is removed before gluing (it also has the necessary coating). As a last resort, use a cover from a glossy magazine.
Preparing the drawing
A piece corresponding to the A4 size or the one with which the printer works is cut out of the prepared sheet of paper.
Important! As for the printing device itself, only a laser unit with powder paint is suitable. Otherwise, the desired effect will not be obtained.
For printing, set the maximum clarity function without saving ink. Once printing is complete, the edges of the paper are trimmed, leaving only the image itself.
Drawing with a stencil
Elegant and cheerful design
Not everyone has artistic talents, but with the help of a stencil you can create bright and colorful compositions on fences from a variety of materials:
- Decorative concrete fences on the inside are not distinguished by a joyful palette of colors. Therefore, drawing a picture on the inside of such a fence will transform the yard at the dacha;
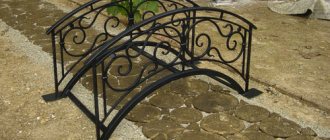
- Drawings of metal fences can also please the eye with bright and unusual decor;
- Painting a decorative wooden fence is not difficult even for an amateur.
Stenciling a pattern on a fence will be a fun activity not only for adults, but also for children. In addition, such painting develops fine motor skills, which is very important for children under twelve years of age.
Materials required for stenciling
This decor will delight you even on gloomy winter days.
In order to draw a picture with your own hands you will need the following materials:
- A stencil prepared independently or already prepared, purchased at a hardware store;
- Masking tape and tape;
- Level and plumb line for evenly attaching the stencil to the surface;
- Sandpaper or grinder for troweling surfaces;
- Solvent and drying oil. Necessary for removing paint residues, as well as for creating the effect of a “blurred” image;
- Paints.
Advice. The choice of paints depends on the material from which the fence is made. But without fail, the paint must have water-repellent and, preferably, antiseptic properties. Instructions for use of paint should contain information about the properties of a particular paint.
Sequence of work
Children will be happy with such a cute drawing
To ensure that the decor does not disappear after the first rain, you must follow the sequence of work:
- First you need to prepare the surface of the fence. Degrease and sand wooden surfaces for better paint adhesion to the surface.
Advice. If the drawing is made on concrete, then the surface is treated with a special deep penetration primer for painting. It is necessary to wait until the surface treated with primer is completely dry. This requires a minimum of twenty-four hours, as required by the instructions.
It is impossible to pass by such a fence without admiration.
- The stencil is attached level to the surface using masking tape or tape;
- The sequence of paint application is indicated in the specification for the finished stencil;
- After applying paint of one color, it is better to wait for it to dry completely and then paint with a different color;
- After applying all the colors, the stencil is removed and the design is outlined.
Important. After the painting has dried, it must be additionally coated with a protective layer of transparent varnish.
Transfer to metal
To transfer the image onto the product, you will need an iron, which is heated strictly to a temperature of +130...150 degrees, no more. While the iron is heating up, treat the surface of the metal item with any degreasing solution - alcohol, acetone, solvent.
Then do this:
- Place a knife or other object on the sole of the iron and let it warm up a little.
- Remove the product from the iron and immediately apply the design to the selected area, being careful so that it does not smear.
- Allow the ink to melt well and imprint on the metal.
- Iron the picture with a cotton pad or cloth, but without moving or pressing hard.
- Remove the item and allow it to cool, and turn off the iron.
- The paper is carefully detached and removed (if necessary, sprinkle it with a little water and only then tear it off).
- All sloppy lines, drips, and stains are wiped off with alcohol and acetone.
Transferring a drawing
The use of airbrushing in landscape design
Funny picture, you can't help but smile
Applying paint by spraying using a special device - an airbrush - is called aerography. Which literally means air brush. The device allows you to create a design on a fence made of any material, since the paint is sprayed with compressed air under pressure.
This method allows you to decorate materials that cannot be painted with a regular brush or roller.
Drawings made using the airbrush method are extremely realistic and impressive. The method allows you to perform the most subtle gradations of tone and retouching, which no other painting technique can achieve. .
Delicate palette of spring colors
Of course, the price for such fencing design is quite high. But this is justified by the exclusivity and beauty of the design. The technique is quite new and originates in youth street art - graffiti.
But thanks to the work of professional artists, simple drawings turn into surprisingly realistic and stylish paintings.
Advice. It is unlikely that it will be possible to reproduce such drawings as in the photo on your own. Therefore, it is better to turn to professionals.
But there are other, simpler techniques that allow you to make drawings on fences with your own hands.
Main stage
When the design has already been applied to the metal product, you can proceed directly to etching. To protect surrounding areas, a “barrier” is made of plasticine. They paste over the adjacent areas so that they do not come into contact with the liquid. The pickling solution should contain ½ teaspoon of salt for every 50 ml of water.
Prepare a power source with a voltage of 12 V or a battery. The positive wire is brought to a metal surface and glued with tape. Pour the solution on top and place the negative wire in it.
Important! The metal etching process takes about half a minute. If it lasts longer, it will have a bad effect on the appearance of the picture.
What is material rendering in 2D drawing and why is it needed?
The term “rendering” came into the field of digital drawing from 3D modeling. Literally translated, it means “visualization,” but essentially describes the final stage of creating an image using a computer program. At the rendering stage, objects acquire their final appearance - realistic or stylized. In 2D drawing, these words refer to the process of drawing details.
Why practice material rendering? To draw better! The ability to convey the texture and texture of different materials, correctly arrange highlights and shadows will help create a sense of reality of the object. It will be clear to the viewer that he is seeing metal, not plastic; glass, not haze. The surface of objects can also become a storytelling element and complement the story of a character or object. Clothes made from the same fabric will look different on a poor man or on a wealthy merchant. The first one's material is most likely worn out and dirty, while the second one's is clean and new, because he can afford to change his suit every day.
As a result of use, materials wear out, which affects their appearance. This applies not only to the skin, but to everything in general.
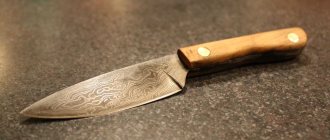
Final work
After the object is removed from the solution, its surface will become dark - which means the result is as intended. The plasticine is removed from the metal, and then the ink that still remains on the surface is wiped off with alcohol or acetone. As the metal is cleaned, it becomes clear that the design has turned into a beautiful engraving.
Even the smallest details are visible in the picture, so it looks natural and amazing. The quality of the product will be very high, it will immediately become exclusive, sharply different from mass-produced products.
LiveInternetLiveInternet
Sunday, May 29, 2021 2:17 pm + to quote book FROM the community
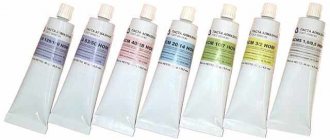
Products for creativity, painting and decoupage
[/td]
A metal surface is considered difficult to decorate, because... is non-absorbent. This means that for reliable adhesion of primer and paints to the surface of metal buckets, watering cans, pots, cans, jars, watering cans, etc. preliminary preparation is required. Before starting any decorative work, it is necessary to complete several mandatory steps that will make it easy to implement decorative ideas of any complexity and ensure the safety of the finished work. It is important to remember that before any manipulation you need to wait until the previous layer of varnish, primer or paint is completely dry. If you continue to work on a wet surface, an undesirable crackle effect (appearance of cracks) may appear. An undried layer will, as it were, explode the next one, even more moist and pliable. This will result in the work being ruined. That is why each layer must be well dried. Stages of preparing a metal surface: 1. Clean from dirt and degrease with an alcohol-containing solution. It is necessary to remove dirt and rust from old metal surfaces with a special product - a rust converter. Next, degrease. New metal products can simply be degreased. 2. Sanding (if necessary) The old paint coating must be removed and sanded for better adhesion of the primer to the surface. It is recommended to lightly sand new products before priming. 3. Varnish coating For decorative metal work, a base coating is a prerequisite. Before applying the primer, it is recommended to apply a clear varnish, because... Applying primer alone may result in peeling and unevenness, and the primer will scratch very easily. 4. Primer Primer is necessary to ensure adhesion of paint layers to the surface. This is a particularly valuable property when working with metal. The primer allows you to reduce the number of layers of paint. The primer slightly levels and whitens the surface, which is very important when working using the decoupage technique. When working with old products, you should first treat the surface with anti-corrosion primer, and then use acrylic primer. New products can be immediately coated with acrylic primer. A piece of sponge must be moistened with soil, the excess must be removed so that the sponge is semi-dry, and applied to the surface with light movements. Do not press hard, movements should be soft and fast; if bubbles form, walk over this area with a dry sponge. When the entire surface is primed, leave it to dry. Then, after completing the above preparation steps, you can begin the fun part - decorating the surface! #skillfully #decoupage #with your own hands #hobby #creativity
SOURCE
| Products for creativity, painting and decoupage |
Series of messages “Tips on Decoupage”:
Part 1 - Decoupage - mistakes that can be avoided. Or what distinguishes the work of a professional. Part 2 - Let's create our own structural pastes for volumetric decor. ... Part 22 - Transferring the image using acetone Part 23 - MK Homemade molds and base for decoupage Part 24 - How to prepare metal for painting and decoupage Part 25 - Master class on creating elegant lace
Tags:
tips on decoupage mk on decoupage
Cited 3 times Liked by: 3 users
Like share
0
Like
- 3
I liked the post - Quoted
- 0
Saved
- Add to quote book
- 0
Save to links
Liked3
0