Painting lining is not a difficult task. If you have complete information about all the details of choosing paint and its application, the process will be as simple as possible.
Painting the lining: photo
Painted lining
What you need to know about painting lining
When painting exterior wooden walls, you need to consider the type of finishing material. Lining, imitation timber, wooden siding are the same material. These finishing boards differ only in thickness and profile. The same paints are suitable for all these types of cladding, and any acceptable technique can be used when applying them.
Facade finishing with clapboard
Cladding the outside of the house with clapboard
If the wall is built from timber or rounded logs, a different approach to the choice of paint and the method of its application is required. You need to know about this before deciding how and with what to paint the walls of a wooden house.
You should not be afraid that in 2-3 years you will need to renew or repaint the facade. If you know all the rules and secrets of the painting process, the facing layer will not lose its properties even after 10 years. Many manufacturers of paints and varnishes provide a guarantee for a longer period.
Photo: painted imitation timber
Important points to know
Most homeowners who are not familiar with the nuances of choosing and applying paint complain that the very next year after painting, the facade loses its attractiveness. The finishing layer begins to peel and crack. All these troubles can be prevented.
But even among experts, few people know that to get an excellent result, you need to change the approach to painting wood. This job requires as much attention as painting a car. To obtain a durable cladding coating, you need to perform several steps:
- carefully prepare the tree;
- prime the surface;
- Apply as many coats of paint as recommended by the manufacturer.
Careful observance of all nuances has a positive effect on the result of painting the lining
Let us consider each of these processes in as much detail as possible.
Processing of lining
Lining is an environmentally friendly material with excellent sound and heat insulation qualities. It is precisely because of these properties that it has gained immense popularity both for cladding the facades of houses and for interior decoration.
Perhaps the only significant drawback of wood is its susceptibility to rot, which is easily solved by processing the lining. For this purpose, paints, oils and antiseptics are used. Before painting, the wood must be treated - cleaned of dirt and sanded. Any protective composition will fit perfectly onto a high-quality polished surface of the lining and will last for a long time.
Processing lining outside the house
To prevent rotting, hide traces of mechanical damage, and also to protect from environmental influences, clapboards decorating the exterior of buildings can be coated with:
- facade paint;
- varnishes and stains;
- wax and oils;
- matte and glazing antiseptics;
- various types of impregnations.
Processing of lining indoors
To treat the surface of the lining decorating the walls inside the house, it is necessary to choose the right coating, taking into account the features and purpose of the rooms.
How to properly prepare wood for staining
Drying the lining
Careful preparation of wood includes several stages. The first of them is high-quality drying of the finishing material. If the lining is damp, the paint will not last on it for more than 1-2 years. Already next season, its peeling and fading will become noticeable. The owner may decide that the quality of the paint or the inept hands of the workers are to blame for this, but in fact the reason is improper preparation of the wood or ignoring this important stage.
Chamber drying of lining
The board must be dry before painting. The permissible degree of humidity is 15-20%. But it is not always possible to achieve such indicators, especially for those facades that are already lined. Craftsmen recommend using this method: build a canopy over the walls to protect them from rain, and dismantle it after 3-4 weeks. During this time, the wood will lose a sufficient amount of moisture and it will be possible to begin finishing work.
There is an opinion that the process of drying wood speeds up the application of a high-quality deep-penetrating antiseptic to it. These include Neomid 46 Bio.
Neomid 46 Bio
Antiseptic for intermediate protection Neomid-46 BIO concentrate
Penetrating into the pores, the composition replaces moisture and the process of its evaporation accelerates. For these purposes, you can use any preservative that protects wood during the construction of a house. On average, these compounds act for 6-7 months, after which they spontaneously decompose into biologically safe substances.
How to check the moisture level of the lining
- Cut a piece of plastic film measuring 40/40 cm.
- Using tape, attach it to the lining so that there are no gaps.
- Leave for 24 hours.
- Assess the degree of moisture on the inside of the polyethylene film.
If the surface of the polyethylene is wet to the touch, it means the lining has not dried. Such wood cannot be painted.
Wood moisture meter
Processing of lining
An important point in preparing for painting is sanding the boards. All materials of medium quality (grade B and lower) require this procedure. Often on such wood you can notice “fleecy” areas, uneven profiles, and height differences in the area of knots. All of the above are problem areas, without eliminating which it is impossible to obtain a high-quality painted surface.
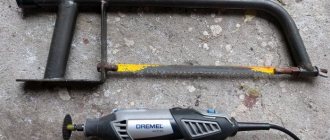
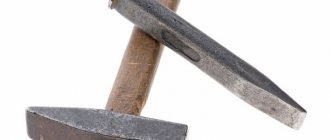
The easiest way is to process the facing material before it is laid on the walls. In this case, you can use various tools: a milling cutter with a cutter of the appropriate profile, an angle grinder with an abrasive disc, a thickness planer. However, the use of a mechanical processing method does not eliminate the need for manual labor. All recesses and protrusions of the profile will have to be sanded using sandpaper.
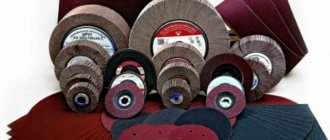
Tool for sanding lining
Sanding with sandpaper
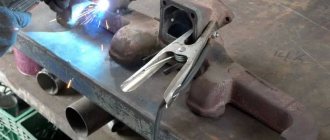
If the lining is already fixed to the facade, a nylon abrasive brush and a sander are used to process the wood. The grinding process is not fast, but it will allow you not to think about finishing the facade for 8-10 years.
Random orbital sander
Prices for popular models of sanders
Sander
Wood priming
After the lining has a flat and smooth surface, the wood must be primed. You should not postpone this process for long. Therefore, it is recommended to decide in advance on the type of primer and purchase the required quantity. There is an important point in this matter: it is not recommended to choose the most inexpensive composition. It will not be able to provide high-quality adhesion and will not adequately protect the wood from moisture.
High-quality primer often costs more than paint. This situation is observed in different product lines. A competent manufacturer knows that the most important part of the painting job is priming. It is its quality that determines the durability of the paintwork.
Tikkurila Valtti Akvabase
The following types of primers are suitable for external work:
- acrylic;
- based on acrylic and silicone;
- based on epoxy resins.
Regardless of the chemical composition of the primer, you need to choose those products whose containers indicate that they are intended for facade work. Another important property that you need to pay attention to is the degree of penetration of the solution deep into the wood. The primer should say so: “deep penetration”.
Valtti Pohjuste
It is not recommended to use alkyd compounds for facade work. They form a thin film on the surface of materials. It simultaneously protects the lining from pests and mold, and prevents moisture from escaping from the deep layers of wood. Therefore, the best choice is water-soluble primers, which include acrylic and (or) silicone.
You can often find acrylic penetrating primers with antiseptic additives on sale.
When priming and painting the facade, special attention is paid to the south side of the house. It is more exposed to the negative effects of ultraviolet radiation. Therefore, on the north side of the house, the paint fades less and cracks less often.
Prices for wood preservatives
Impregnation for wood
Indoor wall treatment
When cladding structural elements, not only the effectiveness of the material is taken into account, but also the composition. It is important that it does not contain ingredients that may adversely affect human health.
When choosing suitable materials, the purpose of the room as well as the desired decorative effect are taken into account. After sanding the lining, you can apply the following to the wooden surface:
- primer,
- bio oil,
- antiseptic,
- wax,
- varnish
This step is not advisable to carry out without preliminary surface preparation.
How to sand lining manually?
It is important to thoroughly clean the board from various contaminants, remove dust and smooth the surface as much as possible. Sanding the lining can be done either using power tools or manually. Regardless of the chosen method, you should move exclusively along the grain of the wood. If the technology is violated, unpleasant nicks and stripes will remain on the surface.
To process wood by hand, you will need sandpaper of various grits and a strong desire to carry out this processing. Just taking a blade and starting to sand the surface is not very convenient. The “skin” will constantly fly off, and the person doing the processing will have to interrupt the work and correct its position again. To avoid this, and also to protect your own hands, you should purchase a special pad. You can either make it yourself or buy it at your nearest hardware store. The latter has special grooves with which you can fix a piece of sandpaper of a suitable size. The block also has a special handle, which will greatly facilitate the work and protect the skin from damage.
An alternative to this method is to use a wooden beam. Attach sandpaper to its surface using small nails and you can begin sanding the lining.
Sanding lining using power tools
Technology will significantly speed up and facilitate the process. Experts recommend using the following types of grinding machines:
- vibrating,
- orbital,
- angular,
- tape
Each of them is designed for certain types of work. Thus, the vibrating machine is used more for finishing, when the lining has already undergone rough grinding. When operating the tool, it is based on reciprocating movements; in 60 minutes it performs them more than 2,000 times. Sandpaper is fixed on its sole. Experts recommend using material with a grain size above 120.
Then you need to secure the “skin” with rivets or Velcro. Only after this can the lining be polished.
Before painting the paneling, you can use an orbital machine. In it, the sandpaper is attached only with Velcro at the bottom. The equipment starts to move after rotating the working part in orbit and around its axis; it is also used for finishing polishing of the lining.
For rough processing, you can use a grinder or an angle machine. They allow you to effectively clean not only wooden, but also stone and metal surfaces. The machine is equipped with a special abrasive wheel on which sandpaper of different grain sizes is fixed. This tool will allow you to easily carry out not only initial rough grinding.
The draw frame is more versatile. It will allow for rough and finishing processing. The tape is equipped with sandpaper, with the help of which sanding is carried out before painting; it begins to move along with the rollers.
Which method of sanding lining is preferable?
Of course, the use of power tools significantly speeds up and facilitates the process. Even with a modern grinding machine, it can be difficult to do without manual labor. It is inconvenient to work with a tool near the window sill, in corners, near the ceiling and in other hard-to-reach places, so it is better to clean small fragments by hand.
However, if you give preference to any of these methods, you will have to sacrifice your time and put in a lot of effort. In addition, purchasing a grinding machine may result in unexpected expenses. And how rational such an investment is is up to you to decide.
The optimal way out may be already sanded lining. Its processing is carried out on professional machines, due to which you will receive a perfectly flat surface without any defects. It is more profitable to purchase materials in the autumn-winter period, when the “season” of finishing work comes to an end. You can realize many of your creative ideas and begin installing the lining immediately after receiving it.
Choosing paint for a wooden facade
One mistake many homeowners make is not reading carefully, or not reading at all, what is written on the paint can. This information contains instructions and recommendations from the manufacturer, following which you can achieve the desired result. But before it comes to them, you need to decide on the type of paint. After this, you can begin to familiarize yourself with the nuances of its application.
It has been noticed that oil paints lose their color saturation the fastest. They become covered with cracks faster than others. The reason is the composition of these coatings and their viscosity. The latter property provides high covering ability, but does not guarantee the quality of the coating. Therefore, oil compositions are not often used for finishing facades.
Oil paint MA-15 “Economy”
The best choice for exterior work is quick-drying water-soluble acrylate paints. You can pay attention to the products. This manufacturer has a wide range of paints and varnishes for facade work. Excellent reviews of Ultra and Pika Techo paints.
"Pica-Techo" acrylate paint
Paint for wooden facades Tikkurila Pika-Techo
For regions with unstable climatic conditions, characterized by temperature changes and cold winters, silicone-based façade paints are suitable. These compositions successfully withstand low and high temperatures, have a high degree of moisture resistance, and at the same time remain vapor permeable. Silicone facade paint combines the best properties of acrylate and silicate compounds and forms a durable, uniform coating.
Facade silicone paint
Prices for different types of construction paints
Construction paint
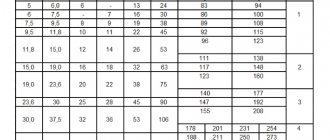
Characteristics of facade coatings
| Type of paintwork | Working temperature | Drying time | Consumption |
| Acrylic | +5°С – +20°С | 12-24 hours | 115-120 g/m2 |
| Oily | +5°С – +20°С | At least 72 hours | 110-130 g/m2 |
| Alkyd | +5°С – +20°С | 24 hours | 140-150 g/m2 |
| Silicone | +5°С – +20°С | 24-48 hours | 150-180 g/m2 |
The lining can be painted with stains, tinting impregnations and oils. Wax or varnish is used as a finishing coat.
Samples of shades of applied stains
Wood stain, shades
Methods for painting lining
Before choosing a painting method, you need to learn about the rules for performing work, without which it will not be possible to achieve high quality surface finishing. The main point is the timing of the work. The lining is painted no earlier than 3 days after the last rain. During this time, the wood will be able to dry completely.
The air temperature must be positive. The limits recommended by paint manufacturers are +5°С – +20°С. It is also important to consider the time of day. It is best to start coloring at 10-11 am. By this time, the lining will be completely dry from the morning dew.
Lining painting techniques
The easiest way is to paint the lining before installing it on the facade. In this case, you can get a uniform layer without smudges. The paint is applied with a brush, roller or spray gun. Since the boards are quite long, the work is carried out in a spacious room or outdoors. In any case, you will need to do a little preparation.
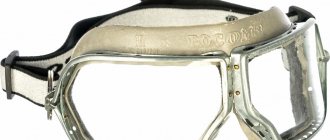
If you decide to work indoors, you need to provide the possibility of high-quality ventilation. The floor, furniture and household items are covered with plastic film. This is especially important if you plan to use a spray gun. Don't forget about your protection. First of all, you will need cotton gloves. If the paint will be applied by spraying, wear safety glasses.
Painting lining with a paint brush
The process of applying paint is easiest if you use a quality paint brush. The best choice is semi-hard bristles, with a fairly soft and even edge. The choice of tool also depends on the amount of work. Synthetic bristle brushes are more wear-resistant.
Paint brush
The coloring technique consists of several simple steps.
Step 1. Open the container with paint and thoroughly mix the composition using any convenient device. You can use a wooden strip of sufficient length.
Step 2. Dip the brush into the paint to 1/3 of the length of the bristles.
Step 4. Lightly press the bristles onto the edge of the jar.
Step 5. Apply paint to the wood using light strokes.
Painting lining with a brush
Step 6. Repeat the process until all the boards are painted.
Do not put a lot of paint on the brush, otherwise there will be streaks
Painting the lining with your own hands
Processing lining with paint
Painting lining with a roller
Choose a narrow roller equipped with a fur coat with medium-length pile. You will need a paint tray, which is otherwise called a “paint bath” or “construction ditch.”
Paint tray, roller
Step 1 . Open the container and mix the paint.
Step 2. Pour paint into a special tray.
Step 3. Immerse the roller in the paint to ½ the height of the roller.
Step 4. Roll the roller along the corrugated beveled part of the cuvette. Thus, the paint is evenly distributed over the coat and the excess is squeezed out. One set of paint should be enough to paint 1-1.5 m2 of lining.
Putting paint on a roller
step 5. Apply paint by pressing the roller against the wood with even force.
Painting lining with a roller
Step 6. Distribute the paint so that the surface is well painted and there are no smudges on it.
Step 7: Repeat the process.
Applying paint with a roller
The lining has a rather complex profile, so the edges of the boards will have to be painted with a brush.
Gray painted paneling
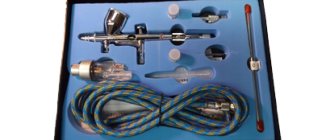
Painting lining with a spray gun
An airless sprayer can be used to apply paint. This is the most successful way to carry out finishing work with an already installed facade. The spraying method allows you to paint all hard-to-reach places. But areas near window and door openings need to be refined using a paint brush.
To apply paint, you can also use devices such as low-pressure paint sprayers. When working with these tools, you need to take into account that some of the drops will settle on objects located close to the workplace. This happens because the paint exits the device’s nozzle in a fan-shaped manner. Therefore, not all particles reach the surface of the facade.
Spray painting
Working with a spray gun is more convenient than using a brush and roller. In addition, the dyeing process will be much faster.
Prices for paint sprayers
Spray gun
Manufacturing stages
At first glance, it seems that making a wooden canvas with your own hands is quite difficult, but this is not true. You will need to go through a number of simple steps:
- choice of wood type. At this stage, it is necessary to choose the right canvas, because each type of lining has its own nuances, for example, appearance, presence of resin, etc.;
- direct production. You will need to cut the canvas into boards of the length you need. Or you can stick to standard sizes. Wooden panels with a length of 1.5 m., 3 m. are presented in the customization markets. and 6m. However, at this stage it is important not to forget to sand the construction canvas with sandpaper size 120-150. Next, you need to clean off all the chips with a vacuum cleaner; it is best to use powerful professional models, not household ones;
- drying. If the canvas is not dried beforehand, installation time may be delayed. For drying, special equipment with a 12% humidity level is used;
- grinding. At this stage it is recommended to use a grinder, since manually this process can take a long time. Final sanding must be carried out after installation and coating with a special construction varnish and antiseptic. Once you've coated the blade, you can confidently grab the 320-grit sandpaper or sander and do the final sanding. Before buying a wooden panel, you need to ask the seller which antiseptic varnish is best to apply to the paneling, otherwise you may get into trouble.
If you want to change the natural color of the wood, you will need to purchase a stain, with which you can manually give the canvas the color that will highlight your interior, as shown in the video.
Let's sum it up
Lining is a universal material that is widely used for interior and exterior finishing work. At the same time, the cost of the canvas is affordable for everyone.