Most people involved in building their own home believe that it is enough to purchase a high-quality roofing coating and this will be enough to achieve an excellent result. In this case, the quality of accompanying roofing elements, such as self-tapping screws, is not taken into account. The quality of the roofing work depends on the quality of the screws used to attach the metal tiles.
Self-tapping screws are an integral part of a durable, well-laid, durable roof. It is this element that bears almost the entire dynamic load both during laying of the coating and during its operation. Therefore, it is necessary to take the choice of fastening elements seriously and responsibly.
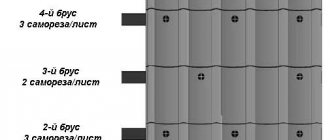
Scheme for fastening sheets of metal tiles with self-tapping screws
Metal tiles are roofing materials made of metal with a sheet profile shape that imitates classic clay tiles. It is attached to a wooden frame. For this, special self-tapping screws are used. Installation is carried out taking into account the distinctive characteristics of the material.
Design and types of lathing for metal tiles
Use a dry edged board that has been treated with an antiseptic and has no traces of mold, rot, or fungal infections on the surface. It is mounted horizontally to the rafters and vertical slats. Dimensions of elements: width - 100, thickness - 25-30 mm. The last dimension must be the same for all parts, the maximum deviation is no more than 3 mm. The bottommost board is made 15 mm thicker than the others. To fasten the ridge along the upper ridge section of the roof, a special strip is installed.
Three types of lathing are used:
1. Sparse (step) the most common type, suitable for roofs with a slope of 20°. The optimal pitch between the boards is equal to the wavelength of the roofing covering. The exception is the distance between the slats of the first and second row. It should be less by the amount of overhang of the sheet - about 5 cm. With this arrangement of the boards, it is easy to fasten the metal tiles, since the places for the screws are immediately visible. The permissible distance from one frame element to another is 30-70 cm. The greater the slope of the roof, the less snow accumulates on it, the more steps can be taken between the boards.
2. Solid. Suitable for flat roofs with a slope of 14 to 20°. The step between the boards is 2-3 cm.
3. Combined. With this option, step lathing is made on the main part of the roof, and continuous sheathing is made in the area of the ridge connection, chimney, valley, roof window, hatch, and snow retainers.
Installing metal tiles around pipes or other obstacles
The scheme for fastening metal tiles is quite simple, but there are moments that are worth talking about separately. All protruding roof elements must be lined around the perimeter with an additional row of sheathing, spaced 20 cm away from them. This is necessary to install a corner covering the joint.
Depending on the location of a particular element, it may be necessary to produce a specially cut sheet corresponding to the size of the remaining space or reaching the next sheet, located in a regular manner. For example, this option can be used to form a drain for a roof window.
Correct pipe bypass with metal tiles
Manufacturers produce parts that correspond to all elements of the roof - internal and external corners, ridges, valleys, gutters, etc. Almost all of them have a single installation requirement - the presence of an additional strip in the sheathing, to which they will actually be attached.
CAREFULLY!
You should remember the need to pre-waterproof all joints from external leaks; such places are most susceptible to this danger. The roof ridge is attached on top of the sheets; its fastening also requires the installation of an additional board along the upper ridge of the roof.
The location of the screws is determined by the size of the element, or according to the rule - at least 3 pieces per linear meter. The requirements for screwing force are the same as for sheets - control and inadmissibility of pushing.
What do you need to know about self-tapping screws?
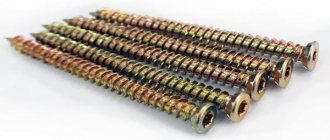
For metal tiles, special roofing self-tapping screws with sharp tips are used. When screwed in, they cut through the covering sheet and secure it tightly.
- They are made from high-carbon galvanized steel. They do not rust for a long time from frequent contact with rainwater and snow. High-quality roofing screws are marked on the head.
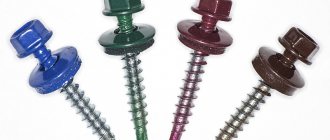
- Self-tapping screws are available in different colors. This allows you to match them to the shade of the roof; they do not stand out against the background of the coating. For copper tiles, special products made from the same metal are chosen.
- The set of roofing fasteners includes rubber or latex caps and press washers. When screwed in, they are flattened, which creates an effective waterproofing in the holes. The penetration of water inside is significantly reduced. Poor quality gaskets (press washers) deteriorate over time and moisture begins to enter the holes.
- The length is at least 2.8 cm and must be 2 cm more than the total thickness of the roofing covering and the layer of waterproofing material.
Scheme and methods of fastening
Self-tapping screws are installed in the hardest place of the wave - the bottom, almost at the base of the next one. If the frame is mounted correctly, then the fasteners fall on the cross boards. You cannot place it in the upper part of the wave - in this case, the metal tiles bend.
Before starting installation, it is recommended to draw a drawing of the sheathing and roof with the screw locations marked. Too much screw consumption requires the same number of holes. This leads to more moisture getting under the roof during rain, which means the material will deteriorate faster. If you rarely install them, the tiles will vibrate from the wind, create noise and will soon become unusable.
- The outermost sheets (ends and overhang) are fixed on each wave. The same consumption is planned in the area of the ridge, valley, and valleys.
- The main part is attached through one wave.
- The metal tiles are connected to each other along the frame in increments of 1 m.
- On additional elements - 3-5 pieces per linear. m.
- The self-tapping screw should be in the center of the sheathing board or no closer than 1-1.2 cm from its edge.
To draw up a drawing and calculate the required quantity, find out how many screws are needed per square meter. Usually this is at least 8-12 screws. For a roof of complex geometric shape, the quantity is increased.
The nuances of installing metal tiles
The tiles are made from the following materials:
- cold-rolled galvanized steel sheets;
- aluminum;
- copper.
The first two have a special protective polymer coating on the surface on one or both sides that prevents exposure to ultraviolet radiation and precipitation.
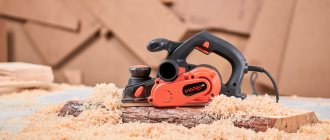
According to the instructions, devices and devices that cause heating should not be used for cutting and fastening metal tiles. This is associated with the risk of damage to the protective polymer coating. It is correct to turn on the drill and screwdriver at low speeds. When screwing, it is necessary to control the pressure force; it should be moderate. Bending and too much pressure also lead to the destruction of the protective polymer layer and deformation of the material. Insufficient pressure will not fix the product securely.
Installation tools
To properly fasten metal tiles with self-tapping screws, you will need the following tools:
- roulette;
- marker;
- hammer;
- a screwdriver or drill with a low-speed function, it is acceptable to use a screwdriver; power tools are more convenient when powered by a battery rather than mains power;
- tools for cutting metal - jigsaw, metal saw, carbide circular saw.
Place tools in a convenient place to prevent them from falling from the roof.
Fastening roofing screws
When installing metal tiles, follow the following rules:
1. Start from the lower right or left corner, and if the roof is hipped, then exactly from the center to create symmetry, finishing the work at the ridge.
2. The overhang above the eaves line is at least 5 cm. It is needed so that rain and melt water flows directly into the drain. In special cases, under difficult conditions, it is permissible to install the first sheet above the eaves board, but it is advisable to avoid this.
3. Screws are screwed in from bottom to top strictly at right angles to the roof surface. Otherwise, the press washer will not close the hole and water will get into it.
4. The self-tapping screw is placed at a distance of 10-15 mm from the stamping line between the crests of the waves.
5. The gap between the screw head and the tile should be at least 0.5-1 mm. When screwed in, the cap is slightly deformed, the rubber gasket is pressed tightly against the surface of the coating. It is impossible to screw the products all the way, otherwise there is a high risk of deformation.
6. The sheets are mounted overlapping the width of one wave. At the joints, self-tapping screws are installed in the rise of the wave, through both layers of material. This is necessary so that there is no gap and water does not penetrate. For this purpose, special short screws are used.
7. The ridge is placed on top of the fixed metal tile, fixed to the board at the top of the sheathing.
If the roof slope is small, then the joints and junctions of the tiles with vertical surfaces and elements during installation are additionally treated with silicone sealant to create a barrier to moisture penetration. If the polymer protective coating was damaged during the process, then this place is painted over with anti-corrosion paint for metal.
How many self-tapping screws are required for 1 m2 of metal tiles?
When erecting a roof, not only the order of laying the roof is taken into account, but also how many self-tapping screws per 1 m2 of metal tiles are required, at what points to screw them in, to what depth and many other points.
Due to its strength and ease of installation, metal tiles are a very popular material for roofing.
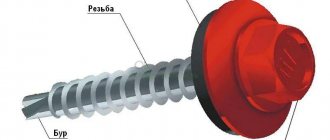
Metal tiles are one of the most popular roofing materials, along with slate and soft bitumen coating. Its fastening to the sheathing is carried out using special fasteners - self-tapping screws. Self-tapping screws for metal tiles differ from all other types of hardware in their special structure - their end is made in the form of a drill that easily pierces a sheet of metal, and there is a special washer around the head that facilitates complete adherence to the roof surface.
Knowing the procedure for installing self-tapping screws is important not only to avoid wasting fasteners, but also to avoid making unnecessary holes in the roofing material. Next, we will consider the layout of the roofing material and its fastening, the types of screws and the calculation of their consumption.
Attaching the roof
The metal tile is fixed to the sheathing in the lower third of the sheet, that is, at the points of the tightest fit of the sheet to the supporting element.
To do this, it is recommended to use metal roofing fasteners. It is recommended to fasten it a couple of centimeters below the step taken as a guide. The space between the roofing material and the cap of the fastening material must be completely filled with a gasket that deforms when screwed in and completely covers the free areas, thereby preventing moisture from entering. Thus, due to the vulcanizing properties of the rubber, a reliable connection is obtained and completely sealed. Fasteners whose length does not exceed 28 mm are best suited for this work.
To make work easier, it is best to use a screwdriver.
How to choose quality self-tapping screws?
Structure of a metal tile sheet.
Self-tapping screws for metal tiles are designed so that they not only easily pierce thin but durable roofing metal, but also hold securely in the wooden sheathing.
To prevent corrosion processes, a protective coating must be applied to the fasteners. In most cases, zinc is used for the top layer of the self-tapping screw, which is applied using the galvanic method, which ensures maximum adhesion of the materials. You should not be afraid that the screws will visually stand out against the background of colored metal tiles - today they produce fasteners in a huge range of colors that will suit any roof. Some manufacturers of metal tiles supply their products with a set of hardware of the appropriate color and high quality, and even refuse a warranty if third-party fasteners were used in the work.
The tight fit of the screw head to the roof surface is carried out using a small but very important element - a rubber or polymer gasket, which is located directly under the head. The durability of the roof structure depends on it. Low-quality gaskets are gradually destroyed by the sun, water and frost, moisture gets into the resulting gap, after which the corrosion process starts.
When choosing self-tapping screws in a hardware store or at the market, be sure to pay attention to the presence of markings on the head. Its absence indicates that the manufacturer was trying to save on production and the fasteners may be made of low quality metal.
The self-tapping screw head is tightly sealed to the roof using a special gasket.
Fastenings for metal tiles are made from high carbon steel and are thoroughly tested before going on sale. Manufacturers guarantee a service life of self-tapping screws of about 50 years, while the fasteners can withstand quite severe deformations:
- about 20 thousand times bends by 5°;
- 2 thousand bends at 10°;
- 100 bends at 15°.
There is a simple way to check the quality of the protective coating on a self-tapping screw - to do this, you need to squeeze the head of the fastener with pliers, deforming it. If the galvanized layer does not peel off, then the self-tapping screw can be considered high-quality.
The sizes of screws can be different, their choice depends on the purpose of the hardware:
- when installing tile sheets to a wooden base, use hardware 4.8x35 mm or 4.8x20 mm, depending on the parameters of the sheathing;
- Fastening the sheets to each other, in places with a complex geometric shape, is carried out with short-length self-tapping screws - 4.8x20 mm;
- in places where particularly reliable contact of the roofing material is required, elongated self-tapping screws are used - 4.8x50 or 4.8x70 mm.
Calculation of screw consumption per 1 m2
When designing the roof of your house, you should take into account even such little things as the consumption of self-tapping screws and their relative position. The disadvantage of too many fasteners is that moisture will penetrate through the holes, even if the screws are installed correctly. The more holes there are, the more water, melted snow and ice will get into the under-roof space, thereby reducing the service life of the structures. If the fixing elements are sparsely arranged, the sheets of metal tiles will vibrate from the wind, creating noise and collapsing.
Places for fixing metal tiles.
In order to calculate the number of screws required for roof installation, you need to know only two parameters:
- roof area;
- density of fasteners per 1m2.
Sheets of metal tiles are attached to the wooden sheathing, with screws passing through the place where the lower part of the wave of roofing material rests on the wood. Under no circumstances should fasteners be passed through the top of the wave - with this installation method, the tiles will bend under the force applied by the screw to its surface.
Metal tiles are laid according to the following scheme: a sheet of metal tiles is attached to the outer parts of the roof and to the ridge with self-tapping screws in each wave, and at intermediate stages - through one wave. The sheets are connected to each other with fasteners at intervals of 1 meter along the direction of the sheathing. If we take into account that the average pitch of the lathing is 30-50 cm, then we find that the consumption of self-tapping screws will be from 6-7 to 10 pieces per 1 m2.
It should be borne in mind that the calculation described above is approximate and is not suitable for sheets of complex geometric shapes, since they are secured with a large number of screws.
Material consumption
Experts recommend buying a complete set of self-tapping screws, rather than buying different versions of them separately. In this case, it is worth calculating the consumption of roofing fasteners in advance in full accordance with the roof design.
Fasteners should be purchased at an average rate of 8-10 pieces per 1 m2 of roof area. It should be understood that the number of screws per square can be increased if the roof has a non-standard geometric shape or some additional elements.
In the lower part, it is recommended to place fasteners through one wave in each of the sheets of metal tiles, while the self-tapping screw is screwed in in places where the cavity of the wave abuts the profile. It is considered a gross mistake to fasten through the crest of a wave - this can deform the metal tile. Then the screws are screwed through the wave, keeping the rows in a checkerboard pattern.
Sheets of metal tiles are laid overlapped on the sides ; these seams should be secured along the crest of each wave. The end strip is fixed, observing the screw pitch of 500-600 mm. The ridge strips are fixed with special ridge screws; they are also screwed into the roofing through one wave.
Tools and materials for installation
When carrying out roofing work, it should be taken into account that they will be carried out at a fairly significant height and what seemed like a simple technological action on the ground will be very difficult to perform at a level of 5-10 meters.
Tools for installing metal tiles.
All tools used must be kept in a place where they will not fall and used only when necessary. If a hammer or screwdriver falls to the ground, you will have to go down to get it, wasting valuable time.
To work you will need a standard set of tools:
- tape measure for measuring the distance between screws;
- marker;
- hammer;
- electric screwdriver or drill with slow speed function;
- a tool for cutting metal sheets - a metal saw, an electric jigsaw or a carbide circular saw.
Sequence of fastening metal tiles
Metal tiles are a very popular roofing material, the main differences of which are their light weight and variety of colors, shapes and sizes. It consists of a fairly thin sheet of metal coated with a protective polymer layer. The material is given rigidity due to the presence of shaped elements - they prevent the roof from bending under the influence of natural factors.
Before starting installation work, care should be taken to prepare the base - the sheathing. It is made from wooden planks, and the construction of the sheathing can be quite light, because the weight of the roof will be small. The pitch between the horizontal strips should be chosen so that it is a multiple of the size of the metal tile sheets. For example, with a roofing material width of 1000 mm, the sheathing pitch will be equal to 500 mm - this ensures that one sheet is simultaneously attached to three planks.
To screw in self-tapping screws, you can also use a regular screwdriver, but if there is a large amount of work, it is better to get an electric screwdriver. The screw is pressed against the bottom of the wave of the metal sheet and screwed into the material until the thin metal head begins to deform slightly. This serves as a sign that the fastener is installed correctly, and the rubber gasket is pressed tightly against the surface, ensuring a complete seal.
Self-tapping screws for metal tiles: consumption and fastening technology
When building a house yourself, you need to understand that there are no trifles in this matter. Even such a seemingly insignificant detail as self-tapping screws for metal tiles can have an impact on the overall service life of the coating. Therefore, the choice of hardware for the roof must be approached carefully. You need to choose roofing screws in such a way that these parts will last no less than the metal roofing itself. Saving on small things can lead to big expenses in the future.
When planning to begin independent construction, you should carefully consider the choice of building materials, even small ones such as self-tapping screws, which will be used to fasten sheets of metal tiles. When installing the roof, you need to remember that the entire coating will last as long as the shortest-lived material used for its installation can last.
If you do not want to change the roofing in a couple of years due to poor-quality screws, you should pay close attention to the choice of hardware. Let's consider how to choose fasteners and how to properly fasten metal tiles with self-tapping screws.
What is a roofing screw?
Fasteners for roofing are made from stainless alloy steel. The screw caps are coated with anti-corrosion powder paint.
Advice! Manufacturers paint the screw caps in various colors that match the shades of the polymer coating of the metal tiles. This allows you to match the screws to the color of the roof and then the fasteners will be practically invisible.
Roofing fasteners are made with a self-tapping tip. The quality of sharpening of the hardware tip will determine how much damage will be caused to the protective coating of the metal tile at the fastening site. The main difference between roofing fasteners and conventional self-tapping screws is that each self-tapping screw is equipped with an elastic washer that seals the fastening site.
What screws are needed for metal tiles
It may seem that any type of self-tapping screws is suitable for laying and fastening profiled steel sheets. The fastener is screwed into the cavity of the profile wave with a recess into the wooden sheathing board, so the length of the self-tapping screw for metal tiles can be 25-35 mm. Formally, the metal sheet on the frame can be secured with any screw or self-tapping screw. You can even try using black carpentry or plumbing fasteners, which often happens when laying roofing on the roof of a summer house or shed.
In fact, the requirements for roofing screws for metal tiles are quite serious:
- The fastener must be equipped with a metal washer and a rubber gasket;
- At the working end of the self-tapping screw, a four-bladed drill is used to pierce the sheet and protective coating of the metal tile;
- The drill and threaded part are necessarily subjected to heat treatment, the tip is hardened;
- The surface of the screws is covered with zinc protection, and the head and upper part of the washer and rubber bands are painted in the color of the metal tile.
Important! Many experts pay attention to the quality of the carving. The top of the threaded profile must be sharp, then when screwing in the fastener, a counter groove is cut into the hole and into the thickness of the wood, firmly holding the rod inside the sheathing.
The quality of fasteners can be determined visually with a certain degree of accuracy. If you take a dozen randomly selected branded screws, inspect and compare, you will immediately notice the identical size of all elements. In addition, the color of the paint and the sheen of the zinc coating should not differ.
Choosing a quality material is just the beginning of the process; self-tapping screws of several sizes are used for installation, so you will need to calculate the screws for metal tiles by the number of pieces for each size group.
How to choose high-quality roofing hardware?
There is a fairly large assortment of hardware on the market, so how can you choose the most suitable ones? First, you need to make sure that the head of the screw has the appropriate marking in the form of a brand. Secondly, it is worth checking the quality of the sealing washer.
To do this, you need to squeeze it with pliers. A low-quality washer will immediately become covered with cracks. In addition, you need to check that the washer fits tightly to the head of the screw; it is better not to buy hardware whose washers do not hold tightly.
What size screws will be needed?
To construct the roof, you will need the following types of self-tapping screws:
- To fasten sheets of metal tiles together, screws measuring 4.8 by 20 mm are required.
- In order to attach the metal covering to the sheathing, you need self-tapping screws of the same diameter and length of 28 and 35 mm.
- To fasten additional roofing elements, longer screws with a length of 50 and 70 mm will be required.
How many screws will be needed?
It is important to secure the covering to the roof well, so you need to find out in advance how many screws per sheet of metal tile will be required. According to the standards, 8-10 screws should be used per square meter of coating. This is the norm for laying sheets on slopes. On roofs with complex geometry, the number of screws should be increased.
When installing the roof, the metal tiles are fastened with self-tapping screws - the arrangement of sheets of material and screws is determined by the design of the roof and its area. Let's consider a specific example of calculating the number of screws:
- The dimensions of the roof are the width of the slope is 10 meters, the height is 7.75 meters, the total area is 150 square meters.
- To cover the roof you will need 40 sheets of metal tiles.
To perform installation you will need:
- Self-tapping screws for fastening metal sheets together (4.8 by 20 mm) For each of the side joints of the sheets, 21 self-tapping screws of the specified length are required. Since there will be 18 sheet joints on the roof, a total of 378 self-tapping screws of this type will be required.
- Self-tapping screws for attaching the covering to the sheathing measuring 4.8 by 35 mm. 568 pieces of these parts will be required. The calculation is as follows: for each of the 20 inter-row joints, 6 screws are required, a total of 120 pieces. To secure it along the ridge and cornice, you need to use 3 self-tapping screws per 40 sheets, that is, another 120 pieces. To fasten 4 sheets along the end lines of the slope, you will need 88 self-tapping screws, 33 pieces each. To fasten a sheet over an area, 6 self-tapping screws are needed, for 40 sheets - 240 pieces. In total there will be 568 screws.
- Approximately 360 long self-tapping screws for fastening wind and cornice strips and ridge elements will be required.
Advice! The above is a theoretical calculation of the number of screws; in practice, it may turn out to be slightly larger. Therefore, self-tapping screws should always be purchased with some reserve.
Dimensions of self-tapping screws for metal tiles
Installation of metal tile roofing is not limited to just fixing the sheet on the roof sheathing. In addition to the main part of the work, there are two more important stages, such as sewing sheets of metal tiles together and installing additional parts - cornice and ridge strips, wind and gable corners, chimney pipes and valley assembly.
Therefore, the length of self-tapping screws for fastening metal tiles is also required for different purposes. At a minimum, three size categories are used:
- Self-tapping screws 28 mm, diameter 4.8 mm. This group can be used to fasten the thinnest and flattest types of metal tiles, but more often they are used for stitching sheets along the overlap line;
- Fasteners with a rod length of 35 mm. The most common version of the self-tapping screw is used for ordinary fixation of the sheet to the roof sheathing;
- Fastening material with a working part length of 50 mm. In certain types of roofing, additional elements require longer options with a rod of 70 mm.
Sometimes the question arises: why use fasteners with a length of 28 mm in order to connect two sheets, the thickness of which, taking into account the polymer coating, barely reaches 1 mm. The problem is in the design of the self-tapping screw and the installation technology.
Important! When laying metal tiles, the overlapped edges should not fit tightly to each other, so there is always a small compensation gap of a few millimeters between them.
When the rod is screwed in, the sharp edges cut thread grooves in the top and bottom sheets. It turns out something similar to two nuts screwed onto one bolt. It is in this position that a strong and at the same time flexible connection of the two sheets is ensured. The parts of the extensions are connected in a similar way. Naturally, correct and reliable fixation can only be achieved with high-quality fastening material.
How to attach metal tiles?
Let's consider the question of how to fasten metal tiles with self-tapping screws.
Advice! To tighten screws, it is convenient to use a screwdriver with a special attachment for an octagonal head. To perform roofing work, it is more convenient to use a power tool with a battery, so that you do not have to stretch electrical wires to the roof.
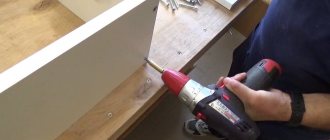
- The bottom edge of each sheet is secured with self-tapping screws, screwing them through the wave. When fastening metal tiles, you need to tighten the screw into the lower part of the profile, that is, where the metal fits closely to the flooring.
- For the remaining area of the sheet, it is necessary to screw in self-tapping screws through one wave, arranging the screws in a checkerboard pattern.
- When fastening two sheets to form a side overlap, screws are screwed into the crest of the wave. Screws need to be screwed into each wave.
- When installing cornice and end strips, screws are tightened in increments of 50 cm. It is recommended to place the screws along a zigzag line.
- To attach the ridge strip you will need special ridge screws; they are screwed into every second rise of the profile.
So, self-tapping screws for metal tiles are, although small, but quite an important element of the roof. The choice of fasteners should be approached as carefully as the choice of all other materials for roof installation.
Two ways to join sheets
Fastening metal tiles with self-tapping screws begins with preparing the roofing sheets. Sheets of metal tiles are overlapped to the width of one wave . This can be done in two ways: from left to right and vice versa.
The difference is that in the first case, each subsequent sheet is slipped onto the previous one, and in the second, it is placed on top of it. The choice of one method or another is dictated by ease of use, type of roof or other considerations and has no effect on the result.
Most often, both methods are used when working, whichever is more convenient.
When joining sheets between rows, they cannot be placed in a checkerboard pattern ; each sheet must be positioned strictly above the bottom one. An exception may be the single inclusion of a fragment of a sheet when filling, for example, the slope of a hip roof or similar areas.
how to fasten metal tiles on the roof with self-tapping screws: photo
All sheets, in addition to being attached to the sheathing, must be fastened together with short self-tapping screws along the joint line to ensure a tight connection and prevent wind from penetrating under the sheet, which can cause it to be torn off.