From the editor:
The article was inspired by a short comment by comrade sergey_esp. We have studied the topic, tested it practically, expanded it, deepened it, added all the explanatory photos and even the recipe itself. In total, the article was brought to the Datagorian canons.
It is difficult to remove ferric chloride from a sink or a kitchen towel. It's hard to explain the acid hole in my pants to my wife. I recently switched to the cheapest and cleanest method of etching printed circuit boards. Thanks to the unknown chemist who first described this method on the Internet. Unfortunately, I don’t remember where or who he is.
Later, I saw similar recipes many times on different sites on the Internet, and decided to add this cheat sheet to Datagor, so that it is always at hand and in the appropriate section. This method of etching boards is great for both beginning radio amateurs and elders.
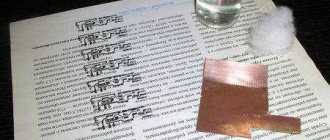
To chemicalize the etching solution we need safe and affordable potions
| Ingredient | Quantity | Note |
| 1. Citric acid | 30-50 g. | powder in a bag from a grocery store |
| 2. Hydrogen peroxide 3% | 100 ml | solution in a bottle from a pharmacy without a prescription |
| 3. Table salt | 5-7 g. | 1 teaspoon, non-iodized |
☂️ Please note that there is no water in the recipe! ⚖️ This amount of solution is enough to etch ≈100 cm² of copper foil with a standard thickness of 35 microns.
A SIMPLE AND CHEAP METHOD FOR ETCHING PRINTED BOARDS
Hi all! In this article I will talk about the simplest and cheapest way to etch boards at home using this technology. For this we need:
- Hydrogen peroxide 100 ml 3%
- Citric acid 30 g
- Salt 3 g
As you can see, all components are available to everyone. We buy hydrogen peroxide at the pharmacy, citric acid and salt at the grocery store. Everything will be quite cheap - no more than 100 rubles.
Citric acid and hydrogen peroxide
Now let's start preparing the solution. To do this, you need to find some kind of plastic container that fits the size of the board. I used a regular plastic tray.
Plastic trays
Pour hydrogen peroxide into the tray, then pour in citric acid and salt. Mix everything. We can assume that the solution is ready. Before lowering the board into the solution, you need to check if everything is fine with it. Namely, how the tracks are laid. To do this, we take the template that was applied to the board and the board itself and compare the drawing. If there are places where the paths break off, you need to take a marker or varnish and finish drawing them. The main thing is that the marker is indelible. This can be checked this way: it should have the inscription: permanent marker. I advise you to pay special attention to this, because if it is an ordinary marker, nothing will work.
Marker for drawing paths
Board drawn with marker
After inspecting the board, we lower it into the liquid. Nothing will happen right away; in order for the board to etch quickly, you need to heat the solution. To do this, take a pan of water and carefully lower the tray into it so that no water gets into it. And we put it all on the stove to heat. When the solution heats up (50 degrees), the reaction begins, this can be seen by the release of bubbles.
PCB etching
The etching process itself takes about 15-20 minutes, and if not heated, it can take more than an hour. When you see that all the tracks have been etched, carefully remove the board and wash it under the tap. We pour out the solution, as it will no longer work.
Tinning and drilling of boards
As a result, we get a pretty good printed circuit board; in the photo, the board didn’t quite work out due to the fact that the template was poorly applied. If you do it right, you will do better.
Assembling parts onto a board
Finished device with this board (guess what it is)
As you can see, this is the cheapest and most accessible method of etching boards. The only drawback is that the solution is disposable, that is, you need to make a new solution each time. Good luck to all. Kirill .
PCB Forum
↑ How to use the recipe?
All this must be mixed before use in glass or plastic containers. The amount of ingredients can be changed proportionally, and more citric acid can be used
.
Etching time about 20 minutes
at room temperature, depends on the area of the board. Increasing the temperature does not lead to a significant increase in activity, so I believe that heating is not necessary. It is important to stir the etching solution to access fresh solution and wash away reaction products.
The solution according to this recipe does not corrode hands and clothes
and does not stain the sink. Initially, the solution is transparent, but as it is used, it acquires a “sea wave”, greenish-bluish color.
Photo in progress, sent to Datagor Beso
(Minsk): “Indeed, it poisons quickly, poisons cleanly, and, most importantly, poisons cheaper than with ferric chloride.”
To correct LUT imperfections, a permanent marker, paint marker or nail polish is suitable.
The solution is not stored; it is always better to etch in a freshly prepared mixture
.
My version of pickling in a bucket of some kind of food. The solution is used very economically.
They also offer an option on the Internet that involves replacing citric acid with 70% acetic acid. I believe that this can only be done as a last resort, because we end up with a stink and working in a more dangerous environment.
How to etch boards in hydrogen peroxide and citric acid
Although I have always been an adherent of the conservative path, despite all the advantages of the FeCl3 solution, its disadvantages are gradually pushing me to search for alternative etching mixtures. And so I decided to test the method of etching boards in hydrogen peroxide and citric acid.
On the way home, I went to the grocery store and, in addition to the ingredients for a delicious dinner, grabbed 4 10g packets of citric acid. every. Each bag cost me less than 6 rubles.
I went to the pharmacy and bought a bottle of hydrogen peroxide, it cost me 10 rubles.
I don’t have any project at the moment, so I decided to purely test the method, to understand what the big deal is. I found a scrap of foil PCB in my stash and made a few strokes with a permanent marker. This is a kind of imitation of tracks and copper polygons; it will work quite well for experimental work.
The solution is not difficult to prepare, but it is important to maintain the proportions. Therefore, pour 100 ml of peroxide into a plastic tray and pour out 30 g of citric acid. Since I had 10 g bags, I poured out 3 bags. All that remains is to salt the whole thing, add 5 g of table salt, this is about 1 teaspoon without a slide.
I noticed that you can add even more salt than required, this speeds up the process. Mix thoroughly. It is very important that you do not need to add water to the solution, so for preparation we select a container so that the solution covers the board, or we increase the amount of solution, observing the proportions.
We put our “printed circuit board” into the resulting solution and observe the process. I would like to note that the solution turned out to be completely transparent.
During the etching process, bubbles begin to appear and the temperature of the solution increases slightly. Gradually, the solution begins to turn greenish - a sure sign that etching is in full swing. In general, the entire etching process took me less than 15 minutes, which made me very happy.
But when I decided to etch another board in the same solution, a little larger in size than this one, everything turned out to be not so positive. The board was etched exactly halfway and the process slowed down very much, slowed down so much that we had to complete the process in ferric chloride.
Apparently the power of the solution is enough for the duration of the chemical reaction between hydrogen peroxide and citric acid. The process can be extended by adding and adding the required components.
Cleaning Copper Coins and Antiques: Tips
Such items have a high value, so they should not be damaged under any circumstances. Therefore, the cleaning agent must be selected carefully and tested on a small area of the product. Below are the most interesting and effective methods.
Methods for cleaning copper coins:
- If there is a greenish coating on the products or coins, you need to prepare a 10% citric acid solution. Immerse the products in the solution and watch what happens. If you see that the plaque is dissolving, you need to remove the product from the solution and rinse in cold water. Don't forget to polish.
- If a reddish coating appears on the products, it is necessary to prepare a 5% ammonia solution or ammonium carbonate. Remember, you can buy 3 and 10% ammonia solutions at the pharmacy. Use it to clean copper coins or antiques. Soak the products for a few minutes in the solution. After this, wipe with the hard side of the sponge and rinse in cold water.
- A yellow coating indicates that there was contact with lead. This kind of darkening can be removed using a vinegar solution. Regular table vinegar with a concentration of 5% is suitable. Soak the items in vinegar for a few minutes, rinse with cold water, and wipe with a soft cloth.
- If the product has become very dark and no longer shines, you can use shine restoration. To do this, you need to dissolve 50 g of copper sulfate in a liter of distilled water, and then add 5 g of potassium permanganate to the solution. Next, the resulting solution must be heated almost to a boil, but bubbles should not be allowed to appear. The temperature should be at 90 degrees. Place antiques and copper coins into the solution and leave for 30 minutes. Turn the products over from time to time. Once you achieve the desired result, dry the product.
- After this, you can treat them with a mixture of alcohol and benzene. To do this, the components are mixed in equal proportions. Such a solution will allow the formation of a protective film on the surface of copper products, which will further prevent the copper from darkening.
Copper cleaning
Is lemon juice good for cleaning coins?
The simplest and most gentle cleaning method today is considered to be using soap. But, I think many will notice that it does not always give the desired result, and sometimes none at all. What to do in this case? It is expensive to give it to professionals for mechanical cleaning, and the use of radical substances is fraught with complete loss of the coin. There is a way out, for this there are a lot of different options, if you look a little, you can probably choose the right one from them.
In previous articles, the following methods were discussed in detail: soaking in olive oil and kefir; their results can be found by clicking on the corresponding link.
Now it's the turn of chemicals. The most in demand at present are lemongrass, ammonia and Trilon B.
A little bit from chemistry lessons
Let's start with the first substance. Many claim the amazing results of the action of citric acid on the oxides of coins, while others say the opposite - it is an acid in Africa, but it will only kill the find. Let's try to figure out what is true and what is not.
Citric acid belongs to the group of organic acids; it is a solid substance in the form of large transparent crystals, soluble in water and ethyl alcohol. It is classified as a weak acid; it interacts very poorly with most metals, but with their oxides it does very well. This is the basis for cleaning copper and silver coins. Having destroyed the foci of corrosion, when it reaches pure metal, it practically stops working. Those. You don’t have to worry about the relief of the coin, but the patina will fade away if you don’t constantly monitor the process.
Cleaning Copper Coins
Let's look at the example of 2 kopecks of Paul I how a lemon cleans copper. She underwent preliminary cleaning in soap for two weeks. At the end of the process, it became obvious that further exposure to soap is fraught with the loss of part of the original patina in those places where the field of the coin has been cleared of green oxides.
It was decided to stop soaking and remove the remaining greenery in a more radical way. The choice fell on citric acid. Let me note that this should only be done (cleaned) with low-value coins. There will be experience, then please, but now if you please, learn a little from poop.
Experimental specimen.
1
2
First, prepare a solution of the required concentration: water + 35-50 g C - 100 ml, citric acid 1/3 tsp. The ratio is given approximately, over time you will determine the desired proportion yourself.
Then we pour the solution into a suitable container, put a coin in it and begin to remove the green oxides using toothpicks and cotton swabs. Using chopsticks, we remove the easily coming off greenery, and clean out the hard growths and small details of the relief with sharp toothpicks.
3
The process of interaction between acid and oxides, even in such a small concentration, is quite intense, so we do everything quickly. In just a few seconds the greenery will begin to peel off; difficult areas will take a little longer to work on.
As soon as the field of the coin becomes clean on both sides, immediately remove it and rinse it under running warm water.
4
If in any place the growth is difficult to give in, you should not keep the coin in the solution, because it will damage the original patina - the copper will be covered with pink spots. Therefore, we take it out, wash it and deal with this area separately, for example, by applying cotton swabs moistened with lemon to it.
If this does not help, then only mechanical clearing with a scraper.
The result of treating a copper coin with citric acid.
5
6
Overall, I think the two-room apartment was cleaned well. The only drawback is the lightening of the patina on the reverse of the coin, in the area of the letter O, in the word kopek. The reason is that it had to be taken out a little earlier; such a delay was associated with the removal of a difficult-to-grow growth in the lower right curl of the monogram.
Next, you can leave everything as is or work a little more - go over it with a soft nylon brush and rub in a little olive oil, again if the specimen is not expensive.
Some facts from respected experts:
- Use acid to clean low-value copper coins, or in exceptional cases.
- Citric acid best purifies copper carbonate - light (dark) green oxides.
- During the cleaning process, it is better to replace the solution with a new one, then there is less chance of the formation of reduced copper on the surface of the coin in the form of pink spots.
- It is better not to touch a find with deep or even through corrosion.
Silver cleaning
Citric acid is considered one of the most, if not the best, way to clean silver coins. It is excellent for both pure metal and low-grade metal (bilons).
There can be three options for its use:
1) Soaking in solution. 2) Local cleaning. 3) Boiling.
The first method is carried out in exactly the same way as in the case of copper: the coin is filled with an acid solution and then cleaned of dirt deposits and oxides with dental chopsticks.
The second method is gentle and is used to remove small contaminants. Its essence is as follows: only a small area of the coin’s field is subjected to treatment, periodically adding drops of the solution and using three sticks until the stain completely disappears.
7
The third method is the most radical, but at the same time the most effective (in advanced cases).
Cleaning is carried out by boiling the coin in a solution of citric acid. This removes strong or very stubborn stains. This has to be done especially often with low-grade silver - small change money, starting from the end of the 19th century. and until the 2000s of the last century.
8
9
For cleaning, take a suitable enameled iron vessel, in this case a mug. Pour water and add lemon at the rate indicated for copper.
10
We put the coin(s) there, put it all on the fire and boil. The process requires your continuous presence. As the temperature rises, it will be noticeable how the reaction of the acid with metal oxides proceeds. From time to time we take out the coins with a wooden spatula or special tweezers and try to clean them with cotton swabs and toothpicks; if the result is not impressive, we throw them back. And so on until the silver becomes pure.
You shouldn’t pore over the mug too much, the coin won’t dissolve, but you shouldn’t let everything take its course; overexposure can threaten to damage the relief.
At the end of the process, be sure to wash each one under running water.
11
12
Most often, citric acid copes with its task, only in rare cases it turns out to be powerless. But you shouldn’t get carried away with it if gentle, albeit longer, methods are possible.
The original photos are “slightly” blurry, so I’m posting the results of another cleaning.
13
14
Etching circuit boards with hydrogen peroxide
I want to share with you a method for etching printed circuit boards using hydrogen peroxide and citric acid. This method is not new, but many have not even heard of it. Below I will etch the boards with peroxide and lemon juice, and for example, also with ferric chloride.
To prepare the solution, you need to take 100 ml of peroxide, 50 grams of citric acid and one teaspoon of salt. Pour the peroxide into a plastic container, add salt and lemon juice, then stir everything until completely dissolved. There should not be any water in the solution!
[ads1]
For a clear example of the effectiveness of this etching method, I will etch two identical pieces of textolite, one in a solution of ferric chloride, and the other in a solution of hydrogen peroxide and citric acid. So, I prepared the solutions, placed pieces of foil PCB there and timed them.
After just 30 seconds, the solution with peroxide and lemon began to actively release bubbles. This indicates that the reaction is going well. In the ferric chloride solution, there is still silence.
After some 50 minutes, the board made from a solution of peroxide and lemon juice was completely etched, the liquid acquired a dark turquoise color. The board that was in the liquid solution was etched only after 2 hours!
From all of the above, I will draw some conclusions and talk about the pros and cons.
Peroxide and lemon.
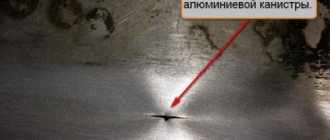
The board etching time ranges from 50 to 100 minutes, depending on the area, this is a plus. You can reuse the solution, but no more than 2-3 times. The ingredients are accessible and not expensive; 50 g of lemon and 100 ml of peroxide cost me 32 rubles. The solution leaves holes on clothes and fabric items, this is a huge disadvantage, so be careful, wear gloves and do not touch the clothes. Here's what happened to my rag the next day:
Ferric chloride.
This ingredient costs from 50 rubles per 100 gram jar. You can only get it in cities where there are radio stores and chemical stores. The board etching time ranges from 2 hours or more, depending on the area. But there is a big plus, with a ferric chloride solution, you can etch many more boards, for example, after each etching, I pour the ferric chloride solution into a bottle and use it again, for about a year now and every month, I collect 2-4 circuits and a solution still alive, significant savings!
It’s not difficult for me to say who won, peroxide and lemon are considered a disposable solution, but they poison the boards quickly. Ferric chloride is not available to everyone; the etching time is two hours, but the solution lasts a long time. I'll finish here, don't forget to write comments!
How to clean copper: methods
Over time, copper becomes covered with a dark coating; it can be brown, brown or even black. The fact is that copper reacts with oxygen, and copper oxide is formed on its surface, which is what has a dark tint. In order to return products to their original shine and color, there are several interesting and unusual ways.
Copper cleaners:
- Vinegar
- Lemon acid
- Salt with flour
- Ketchup
- AMWAY HOME™ LOC™ metal cleaner
Copper cleaning
- The easiest option is to wash the products in soapy water . It is necessary to soak the copper dishes in a container of soapy water for several minutes, then rub with the hard side of the sponge, rinse with clean water and wipe dry. This option may not work in all cases, especially if the products have a dark, old coating. In such cases, we recommend using more aggressive techniques.
- You can remove plaque using ketchup . The fact is that this product contains a weak acid, which is absolutely natural and harmless. Apply a little ketchup to the product and leave for 30 minutes. Next, wipe with a brush, and then rinse off any remaining tomato product with warm water.
- Another unusual and interesting option for adding shine to copper products is using newspaper . You need to crumple up the newspaper and scrub the dishes with force.
Copper cleaning
Effective etching of copper peroxide citric acid
Copper etching citric acid peroxide - with the help of such simple and readily available natural products as hydrogen peroxide, citric acid and table salt, you can very effectively chemically etch copper foil on a printed circuit board.
In amateur radio practice, when making printed circuit boards for electronic devices at home, I would call this etching method the most preferable. Moreover, the chemical reaction occurs much faster than with traditional reagents usually used in such cases, for example: ferric chloride.
Of course, you can experiment and instead of citric acid, take, for example, acetic acid, or another that does not oxidize when combined with hydrogen peroxide. It is also possible that the chemical process will differ little from that described above. But it’s somehow not comfortable to work indoors with chemicals that have a pungent odor. Therefore, it is still better to use citric acid; moreover, it is not difficult to purchase it; it is available in any grocery store and, when diluted, is practically odorless and harmless. It is worth noting that etching copper with citric acid peroxide has another positive aspect - “Limonka” creates a very strong complex with copper foil, which means that any impact of reaction elements on the speed is completely eliminated!! If there is a need to increase the etching speed, you can add a sodium chloride solution; in everyday life this is ordinary table salt.
Distinctive advantages of the solution
- Extremely fast etching
- Does not form dirty stains after etching
- The chemical process occurs at average room temperature
- All reagents are available for free sale: hydrogen peroxide is always available in the pharmacy, citric acid in any grocery store, and every housewife has salt.
- The prepared solution from the components of peroxide and citric acid is absolutely harmless to human skin and clothing.
- It is quite obvious that this method of etching printed circuit boards is the least expensive!
There are also some disadvantages, as you know, nothing happens without them.
Copper citrate is practically insoluble and can form as a precipitate, which is not desirable on the surface of the board. To avoid such moments, you should not skimp on citric acid.
Read also: How to avoid burning metal when welding
The optimal recipe for preparing an etching solution:
Take 100 ml of hydrogen peroxide and add 30 g of citric acid and 5-6 grams of regular salt to it, then mix everything thoroughly. This amount of solution is quite sufficient for etching printed circuit boards with an area of 100 cm2.
By the way, you don’t need to skimp on salt during the process of making the solution. As they say, “you can’t spoil porridge with oil,” since it acts as a catalyst, it practically does not decrease during the entire pickling period. Hydrogen peroxide should remain as is, that is, without additional dilution to avoid a decrease in concentration.
If the percentage of hydrogen peroxide in the solution turns out to be too high, then the etching will go faster, but add it without fanaticism, since you will not leave this solution in reserve - it cannot be stored and is not suitable for reuse. It is very easy to determine if the percentage of peroxide in a solution is too high - intense bubbles will begin to form during etching. Nevertheless, adding citric acid and hydrogen peroxide to an already prepared solution is possible, but it is still recommended to make a new solution.
You can try replacing citric acid with acetic acid, but I think you won’t like working with it too much, due to the pungent odor and slow etching.
A small reminder for those trying it for the first time:
— to make a solution for etching, you must have a plastic or glass container.
— the solution should only be heated in hot water, but not over an open fire.
— the solutions used are poisonous due to the high concentration of copper.
— the etched printed circuit board must be treated with six percent vinegar and rinsed in running water.
A week ago the thought came to me that copper sulfate was helping me out once again. In fact, for the last three months, I have been etching boards exclusively with a solution of copper sulfate and table salt and am not upset by the result. Or there is simply no choice, I live 40 km from the city of Kerch and I simply have neither the desire nor the time to go for ferric chloride, but copper sulfate and salt are always available.
My family grows fruit trees and treats the bark with a solution of lime and copper sulfate against various beetles, that is, access to copper sulfate is free, and table salt is in every kitchen
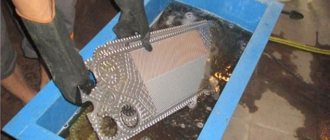
So, the last time I etched a board measuring 105mm*143mm for 2 hours. Printed circuit board made of double-sided Soviet PCB. This PCB is not a modern PCB; it has such a layer of copper deposited on it that it needs to be cleaned with emery rather than sandpaper. I would like to briefly tell you about my recipe for etching with a solution of copper sulfate
To make the solution you need 500g of boiling water, 3 heaped tablespoons of copper sulfate and 6 heaped tablespoons of table salt. Stir the ingredients in the jar until they are completely dissolved and pour the contents of the jar into the pickling bath. I have this regular “dosherak” plate, it’s perfect for my boards.
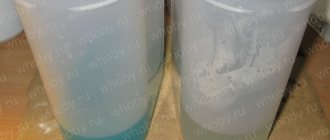
Copper sulfate with salt before mixing
Ready solution with copper sulfate
Next, I lower the prepared signet into the solution so that the etched layer of copper is located in the thickness of the solution with paths down. I take the bath out into the sun and place it on a sheet of iron, it seems to me that the sun is hot right now and the sheet perfectly warms the solution, which contributes to the rapid etching of the board. By the way, an article on how to make a board
I'll post a few photos taken during the process.
My “soup kit” for etching boards. Bath, remaining solution and toothbrush to speed up the etching process
This photo shows how clearly the board fits into the bath; in this position, etching goes faster
Well, the result of a 2-hour wait
So after two hours the board was ready for drilling. When there is no ferric chloride, copper sulfate is a great help. That's all for now.