Kitchen utensils made of metal can serve a housewife for many years. In order to maintain the appearance and integrity of the device, you need to take care of it. However, during cooking, an accident may occur, resulting in a hole appearing in the pan. Of course, you can throw away the pan and buy a new one, but it is much cheaper to try to revive it. How to repair an enamel pan on your own? We invite you to find out with us.
Advantages and disadvantages of metal utensils
At the moment, the selection of dishes on store shelves is surprising, both in color and shape, and in the materials used for production. Of course, many people prefer dishes made of ceramics or glass, but metal is a classic option that is invariably in demand. There is a justification for this, because this material has a number of advantages, namely:
- Easy to care for.
- Low cost.
- Resistant to high temperatures and temperature changes.
- Heats up and cools down quickly.
However, metal, like any material, has disadvantages, for example, not in all cases the dishes can be repaired. The following types of metal are used to produce kitchen utensils:
- Aluminum.
- Stainless steel.
- Enameled steel.
Important! Cast iron cookware is also in demand, as it has a number of advantages, however, there is no point in talking about it, since cast iron cookware cannot be repaired.
Design stage
After all work has been completed, you can begin registration. To do this, my mother took out enamel that matched the color and was approved for use on dishes. Using a thin brush, I covered the areas treated with resin and left to dry.
The star of the series “Sultan of My Heart” spoke about the choice of his future wife
Only on a soft spot: Russian Domostroy forbade punishing children in any other way
When toothpaste is harmful to children: permissible age doses
After this, my mother thoroughly washed the saucepans with warm water and regular soap. This is necessary in order to remove all traces of repairs. That's all the magic. Now the dishes can be used for their intended purpose again.
Enamel restoration
If there is no hole, but just chipped enamel, then it can be restored. To do this you need putty, which you can make yourself. Required ingredients:
- Accurate gram scales.
- Mortar and pestle.
- Mixing container.
- Kaolin – 225 grams.
- Trepan – 60 g.
- Calcined borax – 40 g.
- Sodium silicate – 30 g.
- Slaked lime – 20 g.
- Powdered glass – 20 g.
- Water – 2 teaspoons.
You can buy all this in a special store or online. The ingredients themselves must be thoroughly crushed and mixed, after which the procedure is as follows:
- Clean and dry the surface.
- Degrease the problem area.
- Apply the mixture you made.
- Wait 2 days.
You can also make homemade enamel from quartz sand, for which you will need:
- Quartz flour (14 parts).
- Borax (10).
- Casein (12 parts).
- Crushed glass (5).
- Sodium liquid glass (6).
Stages of work:
- Mix the ingredients.
- Add water and make a homogeneous mixture.
- Clean the pan down to metal, degrease and dry.
- Apply the enamel to the dishes, rub and let dry.
- Sand the surface.
Is it possible to use cookware with damaged enamel?
Most often, areas with worn enamel are found on pots by housewives who wash dishes with abrasives or hard metal sponges. Also, a piece of enamel can break off if the product is hit or dropped. In this case, the coating will continue to crumble, causing the damaged area to grow in size.
If the problem is on the outside of the pan, you can continue cooking in it without hesitation. But the presence of internal defects will be fraught with a number of troubles:
If the pan was initially of poor quality, its base may well contain heavy metals and other harmful impurities.
Enamel reliably protects food from penetration, but its absence even in a small area can lead to serious consequences. Damaged pots can only be used for washing vegetables and fruits, but you cannot cook in them!
Brazing Solder
If a hole appears on a pan with a crooked surface, you cannot close it with a bolt and you need to use hard solder. To do this you need to prepare:
- Soldering iron.
- File.
- Sandpaper.
- Flux.
- Tin solder.
- Tin plate.
Tinned sheet metal is used to produce the body of a AA battery. Repairing a pan using hard solder looks like this:
- Clean the area around the hole by removing the enamel layer.
- Apply flux.
- Tin with a soldering iron using hard solder.
- Cut out the patch.
- Tin the patch and cover the hole with it.
- Heat it with a soldering iron and let the solder melt.
- Press the patch.
- Remove remaining solder with a file.
Important! Only pure tin can be used as solder, since lead is toxic. Solder thickness is at least 5 millimeters.
Preparing the surface of the pan
The surface must be degreased. This procedure is performed using acetone. Gasoline will also work. After this, the oxide layer is removed from the place where soldering will be performed. This must be done with sandpaper, a wheel or a brush with metal teeth.
Please note that it will not be possible to completely remove the film. The problem is that a new coating appears in place of the removed one. For this reason, stripping is carried out not to completely remove it, but to reduce its thickness. This operation simplifies the task of flux.
Big hole
In case of severe damage, the repair procedure is as follows:
- Wash the pan.
- Remove plaque and rust from the damaged area.
- Clean the plate until shiny.
- Treat surfaces with gasoline or acetone.
- Apply flux and treat the surface with soldering fluid.
- Heat up the soldering iron and place the tip in the rosin.
- Start repairs as soon as a little smoke appears.
- Take some solder and apply it to the hole.
- Flatten the solder.
- Repeat the procedure until the hole disappears completely.
If you have no experience working with a soldering iron, then you need to know that it needs to be tinned first:
- Clean the sting.
- Heat up the device.
- Rub the sting over the rosin.
- Take some solder.
- Using a circular motion, distribute the tin over the heat.
- Repeat until you have an even layer.
Step-by-step repair instructions
Damaged metal utensils are repaired as follows:
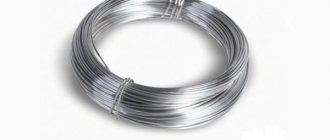
- Prepare a small piece of aluminum wire or special solder. If the hole is large, use a copper patch. It should completely cover the hole.
- Before soldering, the damaged area of the pan is cleaned of enamel with abrasive paper or a file. Stripping is carried out until metal appears. There should be no soot, greasy film or deposits on the surfaces. The copper strip is cleaned to a shine.
- The surface of the dishes is degreased with acetone. After this, the pan is treated with flux using a brush. Soldering acid is used to remove residual grease and oxide deposits from metal.
- Heat the soldering iron, immerse its tip in ammonia or rosin. This helps remove oxides from the surface of the nozzle. After smoke appears, you can begin to tin the pan. The tool touches the solder, on which a shiny film should appear. The molten tin is transferred to the desired area. Solder is applied to the entire damaged part of the pan.
- If it is not possible to seal the hole with tin, use a plate. The areas adjacent to the hole are coated with solder. After leveling the layer, apply a patch. Its surface is heated so that the plate sits firmly in place.
- When the tin has cooled, wipe the surface with a dry cloth. After this, the repaired area is cleaned with sandpaper.
Repairing an aluminum bucket is easy. After cleaning and degreasing, the surface is quickly coated with rosin, which prevents the appearance of an oxide film. You need to solder with a tool with a power of at least 100 W.
The solder must contain at least 80% tin, 5% bismuth. Paraffin or stearic flux is suitable for pre-treatment.
Aluminum pan repair
Soldering aluminum cookware is extremely difficult, the exception would be if the household has argon welding. There is no point in buying it for repair, since it is very expensive and it is easier to buy a new pan. So what to do with an aluminum pan and can it be repaired? For repair you will need:
- Drill.
- Bolt with nut.
- A piece of aluminum.
- Hacksaw for metal.
The repair process includes the following steps:
- Surface preparation.
- Prepare two patches that are larger than the hole.
- Apply patches to both sides of the hole.
- Secure them with a bolt and nut.
The most expensive, powerful, nimble and fast cars
–Categories
- Auto-moto (31)
- Jokes, jokes, humor (126)
- Army, weapons (91)
- Aphorisms, quotes, phrases (49)
- Relationships (15)
- Video, cinema (68)
- Questions and answers (15)
- Cities and countries (50)
- Demotivators (24)
- Children (6)
- For parents (22)
- For your girlfriend (20)
- House of Soviets (28)
- Wife (25)
- Female look (12)
- Laws and rules of life (52)
- Stars, celebrities (46)
- Health, well-being (22)
- Do you know? (64)
- Dating, dating (16)
- Ideas, thoughts, maxims (35)
- History, retro (183)
- War (46)
- USSR (74)
- Computer, Internet (57)
- Short stories (77)
- Babes (50)
- Creative (40)
- Love (13)
- Masters of Arts (46)
- Sculptors (1)
- Photographers (24)
- Artists (20)
- Dreams, desires, fantasies (32)
- Myths and misconceptions (60)
- My hobbies (25)
- Male mistakes (27)
- Men's wardrobe (28)
- Man and woman (48)
- Music (42)
- We and foreigners (65)
- Real men (85)
- Mood, emotions (3)
- Our home (78)
- Cottage, vegetable garden (18)
- We do it ourselves (25)
- Interior, design (29)
- Our life (26)
- Nifigasse! (53)
- New fairy tales (21)
- About business (73)
- About food and drinks (50)
- About women (77)
- About a friend and lover (19)
- Society, politics (58)
- Vacations, travel (38)
- Congratulations, wishes (18)
- Useful tips for playboys (48)
- Holidays (28)
- Psychology (37)
- Friday! (47)
- Stories, parables (38)
- Russia and Russians (101)
- The very best (96)
- Wedding, marriage (9)
- Sex as it is (86)
- Sex stories (58)
- Family (12)
- Modern girl (39)
- Sports, physical training (54)
- Poems (38)
- Superpeople and superthings (19)
- Creativity of our readers (8)
- Life Lessons (42)
- Success, victory (39)
- Courtship, compliments, gifts (17)
- Self care (6)
- Flash drives, videos, clips (23)
- Flora and fauna (12)
- Photo galleries (51)
- Photo sessions (30)
- Economics, finance (19)
- Erotica (80)
- This is interesting (64)
- This is a must see! (60)
-Always at hand
Banners of men's and women's clubs. Copy the code to your blog!
–Photo album
–Search by diary
–Subscription by e-mail
–Interests
-Friends
– Regular readers
-Statistics
Monday, August 27, 2021 11:53 + to quote book
This is the easiest way to solder aluminum that you can imagine. With its help, anyone, at home or in the garage, can easily repair and restore any aluminum products, without any argon welding. You can easily make various structures from aluminum profiles and much more.
Now, in order to solder a radiator or an aluminum bicycle frame, you don’t have to go to a workshop and spend a lot of money, everything can be soldered at home. With the right approach, soldering turns out to be no worse than a welded joint, but certainly more reliable than any cold welding, which is usually used as an alternative.
Read also: Three-phase panel connection diagram
You will need: ● Cored wire for soldering aluminum. ● Gas burner.
A gas burner does not have to be professional. A regular burner attachment for a gas cylinder is sufficient, or any other will do.
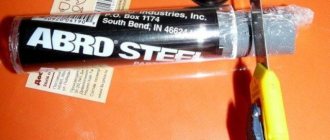
But you need to buy tubular powder solder
, specially designed for soldering aluminum (why powder? - powder inside the tube). It consists of two components: a shell and a powder base inside. We won’t go into details about the chemical composition, there’s no need for that.
It can be purchased in specialized stores and is used in car repair shops. The most accessible way for everyone is to buy it on Ali Express - link to solder. It’s inexpensive, I advise you to buy the package right away – it will definitely come in handy in life.
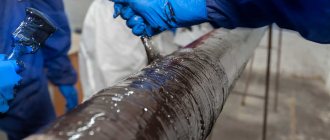
Soldering aluminum with a gas torch
We take the profile or parts that need to be welded.
Clean the surface with a metal brush. Alternatively, you can use coarse-grain sandpaper. The higher the roughness of the soldering surface, the better the bond with the solder.
We fix the connection with a clamp or other device. Turn on the gas burner and heat the joint.
We bring tubular solder. It melts and spreads along the seam.
The entire process occurs at approximately 450 degrees Celsius. Solder has incredible fluidity and flows into any, even the smallest, cracks in the metal.
After distributing the solder, we warm up the connection a little more so that it is distributed and spreads out at the joints of the assembly as much as possible.
Let's sum it up
Personally, when I learned about such a simple and accessible soldering method, I was incredibly surprised. I think I managed to surprise you too, if of course you didn’t know about it before.
A few words about reliability. Of course, welding wins, since the structures are combined and mixed, but this method is not much inferior. If the connection bends, the part itself bends. The solder connection is extremely reliable and is quite capable of withstanding almost any load, as if the connection was cast.
The only thing is that if the soldering is not of very high quality, it is most likely insufficient heating with the torch. In other cases, everything holds tight.
Now soldering a hole in an aluminum pan, making a tank from sheet metal or a rack from a profile will not be difficult for you. Take this method and use it, friends!
| Categories: | Our home/We do it ourselves |
Tags:
soldering aluminum how to solder an aluminum frame
Cited 2 times Liked by: 21 users
How to solder an aluminum pan?
In order to solder aluminum you need to have certain skills, as well as a soldering iron with a power above 100 W. Also, bismuth should be added to the tin solder in a ratio of 4:1. In addition, although the method will give the desired result, the use of utensils for cooking is excluded, since bismuth is very toxic. Stearin or paraffin is used as a flux.
You can prevent the formation of an oxide film in this way:
- Clean the damaged surface.
- Melt the rosin.
- Fill the hole.
- Apply flux.
- Apply solder to the tip and seal the hole.
Important! In order to restore an attractive appearance to an aluminum pan, simply clean it using baking soda.
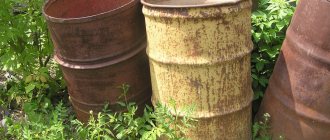
Welding an aluminum flask
Aluminum and aluminum alloys are widely used in the manufacture of various types of products, in this case, soldiers’ or officers’ flasks and others for milk, for example. Flasks were popular during World War II among soldiers of the Soviet army and the Wehrmacht.
The main advantages of using aluminum is that it is resistant to corrosion, which makes it possible to use it to create durable and high-quality soldier canteens.
often see various food utensils made from aluminum because they have a long service life. In terms of the ratio of strength and fluidity to density, aluminum is significantly superior to cast iron, low-alloy and low-carbon steels. To some extent, their properties are inferior to high-alloy steels of increased strength, as well as titanium alloys, which have greater strength than steel products.
To weld soldiers' and officers' flasks, welding in an inert argon gas environment is used. The work is carried out using a non-consumable electrode, mainly tungsten. During long-term operation, oxide build-ups accumulate on the working surface of the tungsten electrode, which significantly reduce the properties of the electrode and affect the quality of welding.
In order to remove these “crowns”, the electrodes are sharpened on a hard, fine-grained disk. This tool allows you to protect the working surface of the electrodes from the formation of burrs and grooves on it. Under no circumstances should the electrode sharpening disc be used for working with other materials. You can reduce the likelihood of build-up formation by intensively cooling the welding electrode, providing it with reliable gas protection.
The flasks are made of thin aluminum , therefore, it is necessary to use thin aluminum welding methods, thanks to which it is possible to work on thin metal without compromising the quality of the seam and the physical and chemical properties of the metal.
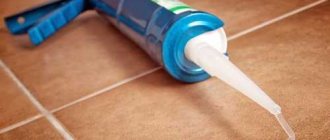
How to glue dishes?
If you can’t solder a metal surface, you can glue it together; however, the pan cannot be used for cooking. The following adhesives are used for this:
- BF-2.
- BF-4.
- Epoxy.
In the first two cases, you need to take glue, which is produced on the basis of phenol-formaldehyde resin. You need to use it as follows:
- Degrease the surface.
- Treat the problem area with gasoline or acetone.
- Apply glue with a brush and spread in a thin, even layer.
- Wait an hour.
- Reapply glue.
- Wait 1-2 hours.
- Press the metal plate onto the pan.
- Place the pan in the oven and bake for 1 hour.
As for epoxy glue, it contains:
- Epoxy resin.
- Hardener.
- Quartz flour or aluminum oxide.
- Dibutyl phthalate.
Important! The gluing process when using epoxy glue is similar to the previous methods, but calcination should last for 1 and 3-4 hours.
Brief instructions on how to solder a pan at home
The action algorithm will be as follows:
- degrease and clean the soldering area (this was mentioned above);
- fix the solder;
- heat;
- Place a solder rod with flux where you want to solder.
The product is ready and can be used.
Preparing for work
Determination of product alloy
It is necessary to determine the alloy of the parts being soldered, as far as possible, whether it is aluminum at all or not. Many aluminum items and parts in the household are aluminum alloys. Many alloys can be successfully soldered at home using a home vice and a soldering iron. But some alloys can only be welded on an industrial welding machine. The composition of an aluminum part can be guessed based on the hardness of the material. The softer the material appears when processed, the greater the amount of pure aluminum it contains. This is a condition for successful and high-quality rations.
Solder selection
- If you are soldering aluminum with other metals, for example, aluminum and copper wires, then this soldering requires a special approach. Often in such cases, the aluminum wire itself, a small section of it, is covered with a layer of copper. Then they tin with regular solder and solder the wires.
- Low temperature solder is required for soldering. Since the melting point of aluminum is 660 ºC, and it has good thermal conductivity, a necessary condition for successful soldering with a soldering iron is the need for a sufficiently low-melting solder containing tin, which means fast melting of the solder. In many cases, POS-50 solder is quite suitable. It is also possible to use POS-61 solder.
- You can purchase special solders for soldering aluminum. These are alloys of aluminum with silicon and zinc. They are different, depending on what you will be joining - aluminum to aluminum or aluminum to copper and other materials. You must carefully read the label on the package.
Flux selection
It is necessary to select a suitable flux for soldering aluminum. Aluminum can be soldered in different ways. Due to the fact that the main problem when soldering and welding aluminum is the removal of the oxide film from the surfaces of the parts being joined, different fluxes are used for different soldering methods. At home, use regular rosin or alkaline oil. A saturated solution of copper sulfate is also used. In addition, regular sewing machine mineral oil, which can be purchased at a hardware store, is often used. It is applied directly to the aluminum.
Tool selection
- You need to choose the right heat source. For small parts, a soldering iron with a working power of up to 150 watts is quite suitable, but for massive parts, for example, a car radiator, a low-temperature gas burner is required. Its operating temperature is 315–425°C. It can provide good heating of the soldering areas of the product and rapid melting of the solder.
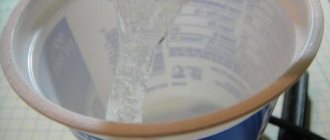
- Buy or collect additional equipment. When you join aluminum, you will need some kind of clamp or vise. In addition, after completing soldering, it is necessary to rinse the soldered surfaces in water or detergent to remove any remaining acid or oil fluxes. If a resin-based flux was used, then you need to wash the aluminum with acetone. Accordingly, this requires some kind of container or bath.
- Take care of your safety. Create a comfortable work area. Be sure to purchase a respirator mask to protect against toxic fumes. Work only in a well-ventilated area. When using liquid, and especially acidic fluxes, use a mask or safety glasses. When using a gas torch, aluminum can melt, so when working you need to use cotton overalls and boots.
Aluminum soldering process
Product preparation
- Before joining pieces of aluminum, it is possible to pre-tin the pieces. This is useful when soldering complex structures. In this case, it is very easy to tighten the aluminum in a clamp and then solder it with a soldering iron or gas torch. Accordingly, this does not need to be done if you are sealing cracks or holes in one product.
- Next, you need to clean the aluminum and its surface to be treated using a stainless steel brush. When exposed to air, aluminum quickly becomes coated with a layer of aluminum oxide, which cannot be tinned or soldered. Another condition for high-quality soldering is that you need to be prepared for quick cleaning, fluxing and soldering so that the aluminum does not have time to become covered with a new layer of oxide. A product that is heavily soiled or oxidized needs to be sanded and wiped with isopropyl alcohol or acetone.
- Clamp the metal parts to be soldered together. You need them to touch in the place where you want to solder them. For solder you need to leave a small gap, less than 1 mm. If the metal parts do not touch smoothly, then you need to make the ground areas smooth. There is another way to work. Since when working with aluminum you need to work quite quickly, you can lightly clamp the aluminum pieces together in a vice, clean them there, and then tighten the vice clamp firmly.
- Next, quickly , before a new layer of aluminum oxide forms, apply flux along the soldering area. To do this, you can use a wooden stick or a solder rod. This will ensure that the solder is drawn out over the entire joint area and a strong solder seam is achieved.
Read also: Knots for tying fishing nets
Soldering the product
Now you can heat the parts to be soldered. To do this, you can use a soldering iron with a power of up to 150 watts or a gas torch, depending on the mass of the product being soldered.
- Heat should be near the joint. You need to start heating from the lower end of the product. The direct flame of the torch can overheat the connection, and then all the work will go down the drain. Therefore, the torch tip must be kept at a distance of 10 - 15 mm from the metal surface. In order to evenly heat the seam being soldered, it is necessary to smoothly move the heat source in small circles across the soldered area. Please note that when using a soldering iron, it may take 10 minutes for it to reach the desired operating temperature. If, when heating the joint being soldered, the flux used turns black, this means that the heating temperature of the joint was too high. The flux must be removed and, after cooling, a new one must be added and work continued.
- After warming up the work area to the desired temperature, you need to apply solder. The heating temperature is determined by the color of the flux. In general, fluxes that are used for soldering aluminum become light brown in color and begin to bubble when they reach operating temperature. Bring the solder to the soldering area while continuing to heat the area indirectly from the opposite side of the part or a nearby surface. Continuing to move the soldering iron or torch along the soldered seam, it is necessary to achieve uniform spreading of the molten solder over the entire area of the soldering area and the formation of a shiny, mirror-like surface.
- If a new layer of aluminum oxide has time to form on the surfaces to be soldered before applying the flux, the solder will not bond to the aluminum. Then the surfaces of the parts need to be cleaned again, flux added and soldered again. This situation may arise if the type of solder and flux are not suitable for working with aluminum and its alloys. Or the aluminum alloy of your product is really poorly soldered.
- After cooling the part to be soldered, it must be cleaned of any remaining flux and oxides formed at high soldering temperatures. If the flux used was water-based, it can be washed off with water or a neutral detergent. If the flux was made based on resin, then acetone can be used for cleaning. Sometimes an acid etching solution is used to remove oxides.
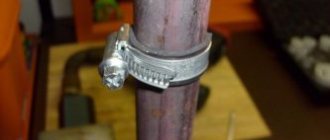
Install the bolt
This method has a significant drawback - the enamel cannot be restored in this way. Just the opposite - it will gradually peel off. So this option can be regarded as temporary. If you urgently need to repair a small hole in the bottom and absolutely don’t care what happens to the pan later, you can’t think of a better way. The enamel can then be restored.
How to repair an enamel pan? Very simple. You need:
- bolt of suitable size;
- drill;
- metal drill.
The hole is rarely exactly the right shape. Therefore, first of all, it needs to be brought into relative order:
- Take a 3 mm drill (if you have a 2 mm bolt, then you need the same drill).
- Drill the hole, giving it the most correct shape possible.
- Insert the bolt.
- Tighten the nut firmly from the inside.
Important! It’s hardly worth cooking in such a pan, but you can boil the water for a long time - as well as use it for other purposes (for example, if it is steel or enameled, you can paint things in it, boil laundry, etc.).